

कोड टूल्स
ElevenLabs के इंफ्रास्ट्रक्चर पर सीधे कस्टम JavaScript लॉजिक चलाएं।
कोड टूल्स आपके एजेंट को sandboxed server-side environment में कस्टम JavaScript चलाने देते हैं, ताकि आपको अपना webhook endpoint सेट अप और होस्ट न करना पड़े। बिल्ट-इन कोड एडिटर में लॉजिक एक बार लिखें, और जब भी एजेंट टूल को कॉल करेगा, ElevenLabs उसे चलाएगा।
ओवरव्यू
कोड टूल एक JavaScript फ़ंक्शन है जो एजेंट के कॉल करने पर चलता है। आप पूरा फ़ंक्शन बॉडी लिखते हैं, इसलिए टूल टास्क के अनुसार कम या ज़्यादा काम कर सकता है:
- कस्टम कैलकुलेशन: सिर्फ़ टूल-कॉल पैरामीटर्स का इस्तेमाल करके pricing rules, unit conversions, scoring logic या date math लागू करें। नेटवर्क एक्सेस की ज़रूरत नहीं है।
- बाहरी APIs को कॉल करना: allowlisted domains से
fetchकरें और workspace secrets व auth connections को फ़ंक्शन के context में inject करें। - कई स्रोतों को मिलाना: दो या तीन APIs को कॉल करें और एक जवाब देने से पहले उनके नतीजों को merge, compare या reconcile करें।
- कंडीशनल ब्रांचिंग: टूल-कॉल पैरामीटर्स के आधार पर अलग-अलग लॉजिक चलाएं, बिना हर branch के लिए अलग टूल बनाए।
- डेटा को नया रूप देना: raw upstream response के बजाय ठीक वही structure लौटाएं जो आप एजेंट को दिखाना चाहते हैं।
बिना कस्टम लॉजिक के किसी एक बाहरी API कॉल के लिए, webhook tools को सेट अप करना आमतौर पर आसान होता है। किसी यूज़र के browser या app में actions trigger करने के लिए, इसके बजाय client tools इस्तेमाल करें।
यह कैसे काम करता है
आपका कोड एक JavaScript module है जो एक single default async function export करता है। फ़ंक्शन को ctx object मिलता है और वह टूल का result लौटाता है:
आप जो value लौटाते हैं, वही टूल का result बनती है। इसे एजेंट को वापस भेजा जाता है, conversation transcript में दिखाया जाता है और dynamic variable assignment के लिए इस्तेमाल किया जा सकता है।
ctx object
ctx वह entry point है जिससे टूल कॉल के समय उपलब्ध हर चीज़ को access कर सकता है। एजेंट जो parameters देता है, वे हमेशा ctx.args में आते हैं; secrets, config values और auth connections वैकल्पिक हैं और सिर्फ़ तब दिखते हैं जब आप उन्हें टूल के Context object section में map करते हैं।
एजेंट के टूल कॉल करने पर सिर्फ़ ctx.args उसे दिखता है। Secrets, config values और auth
connections एजेंट को कभी नहीं बताए जाते।
पैरामीटर्स कॉन्फ़िगर करना
पैरामीटर्स वे values हैं जो एजेंट टूल कॉल करते समय देता है और वे ctx.args में आते हैं। इन्हें टूल configuration form के Parameters section में या code editor में Params tab के Define Params sub-tab में define करें। हर parameter के लिए एक data type, एक identifier और description होता है, जिसका इस्तेमाल एजेंट conversation से सही value तय करने के लिए करता है। आपका कोड identifier के तहत वह value पढ़ता है, जैसे नीचे ctx.args.appointment_datetime।
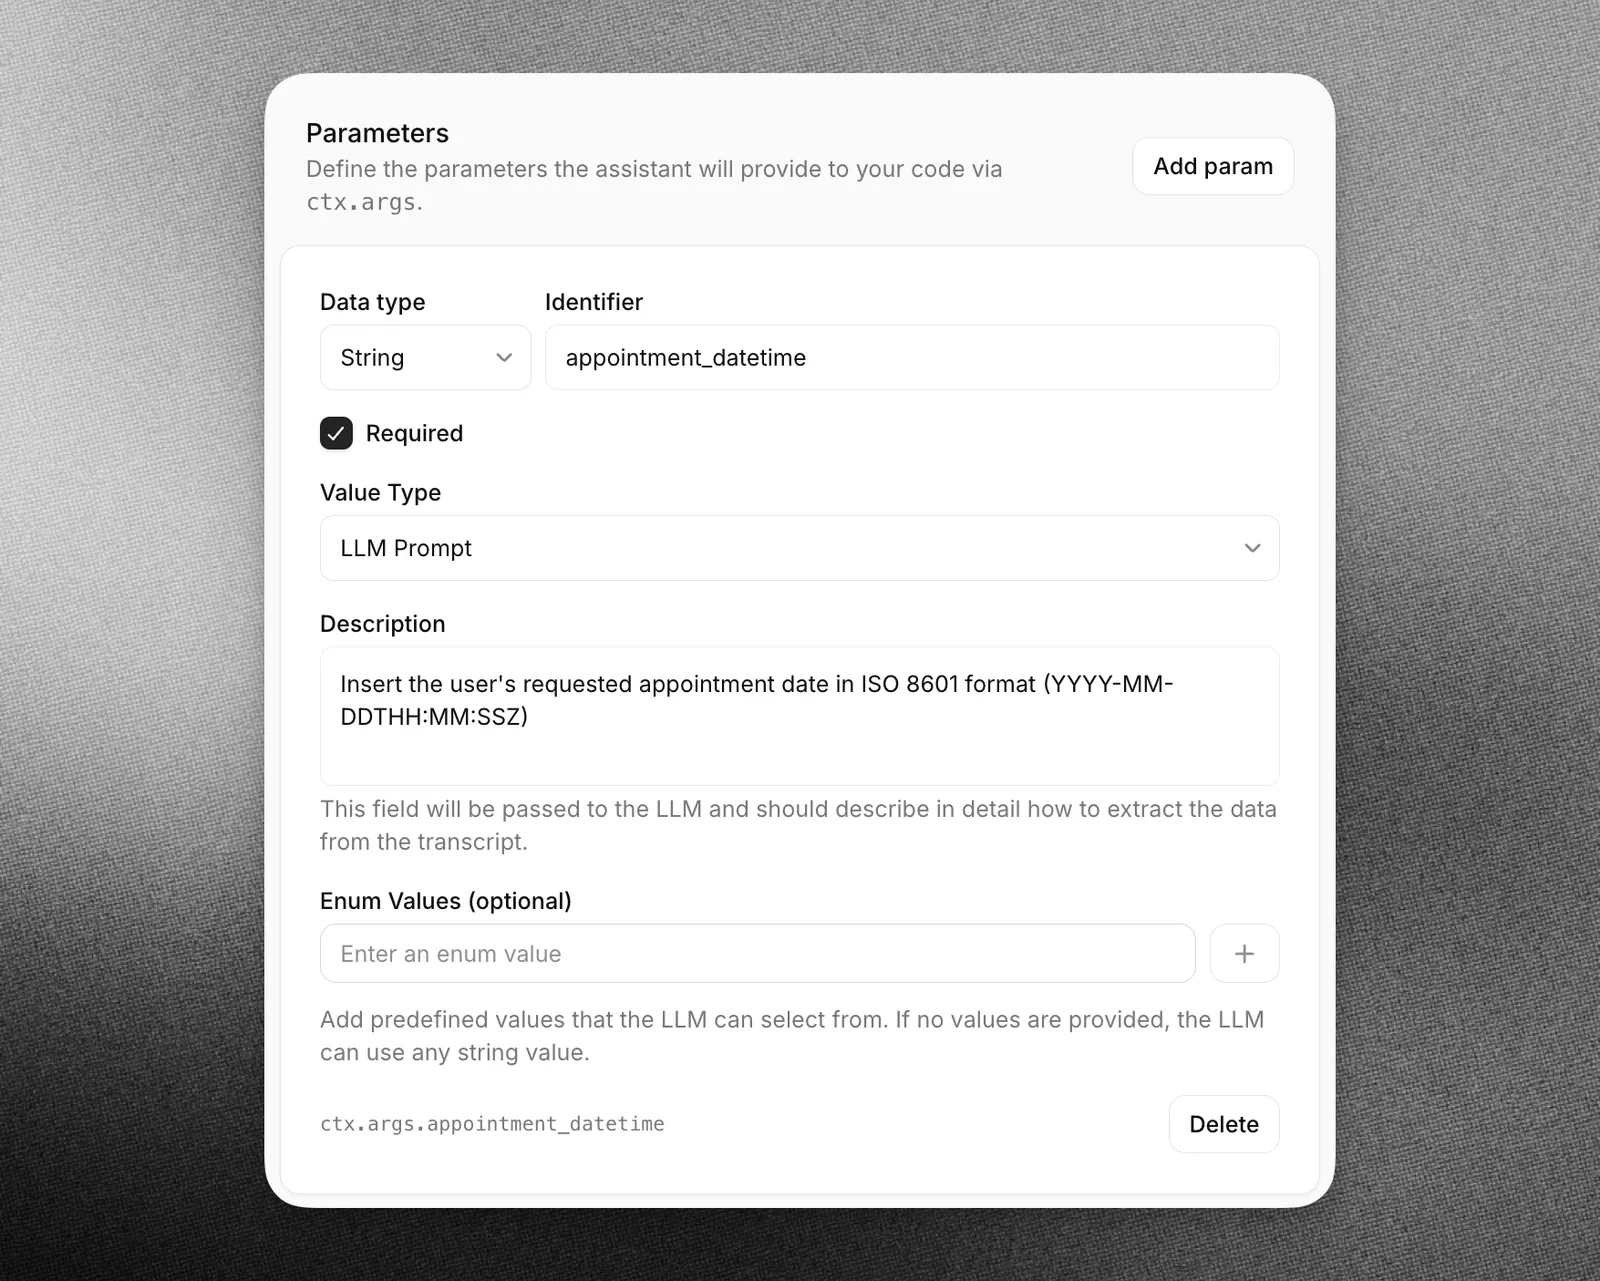
context object कॉन्फ़िगर करना
टूल के Context object section में secrets, config values और auth connections जोड़ें। हर entry के लिए एक type और एक name होता है। पैनल हर entry का सटीक accessor दिखाता है, जैसे नीचे ctx.secrets.DEMO_KEY।
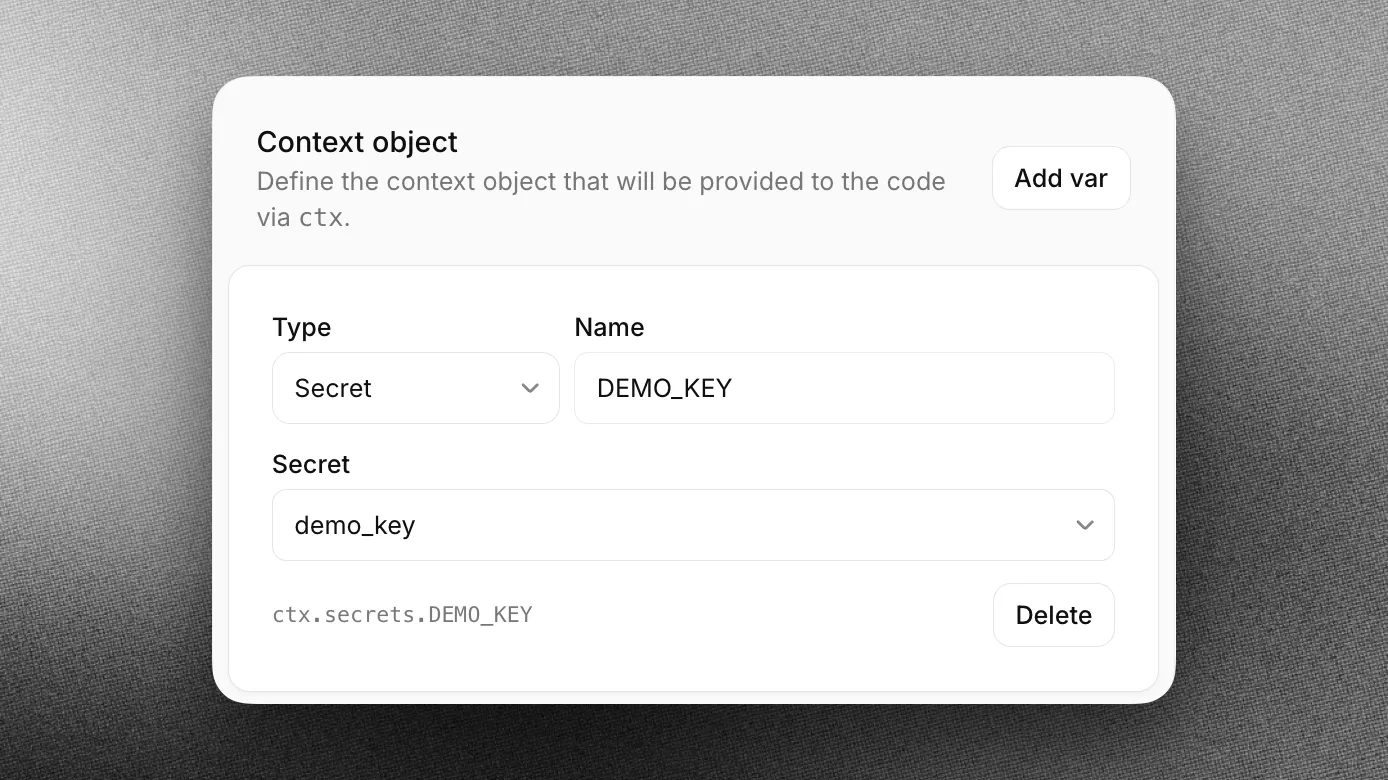
नेटवर्क एक्सेस
sandbox में चल रहा कोड सिर्फ़ उन domains तक पहुंच सकता है जिन्हें आपके workspace ने साफ़ तौर पर allow किया है। जिन domains को आपके कोड को कॉल करना है, उन्हें ElevenAgents Settings में Code Tool Network Access के तहत जोड़ें। किसी और domain को request करने पर वह fail हो जाएगी।
Code Tool Network Access को edit करने के लिए Workspace admin permissions चाहिए।
execution limits
- Timeout: हर run को टूल के configured response timeout के भीतर पूरा होना चाहिए, जो 1 से 30 seconds तक हो सकता है।
- कोई external packages नहीं: कोड टूल्स फ़िलहाल npm dependencies के बिना चलते हैं।
अपने कोड की टेस्टिंग
save करने से पहले, sample parameter values के साथ अपना कोड चलाने के लिए code editor में Run इस्तेमाल करें:
- Params — आपके टूल द्वारा define किए गए हर parameter के लिए test values सेट करें।
- Output — returned result देखें या execution fail होने पर error देखें।
- Logs —
console.log,console.warnयाconsole.errorसे लिखी गई हर चीज़, साथ ही build और execution timing देखें।
गाइड
इस गाइड में, हम एक कोड टूल बनाएंगे जो temperature convert करके एक आसान, formatted string लौटाता है:
नया कोड टूल बनाएं
अपने एजेंट settings page के Agent section में Add Tool चुनें। Tool Type के रूप में Code चुनें, फिर name और description सेट करें:
कोड लिखें
code editor खोलें और default source को इससे बदलें:
save करने से पहले output confirm करने के लिए कुछ sample values (जैसे value: 100, from_unit: "C") के साथ Run इस्तेमाल करें।
authentication के उदाहरण
secret के साथ API कॉल करना
टूल के Context object section में EXAMPLE_API_KEY को workspace secret से map करें, फिर api.example.com को Code Tool Network Access में जोड़ें, ताकि request को egress की अनुमति मिल सके। जिस value को आप reference करते हैं, वह placeholder है: असली secret egress पर header में substitute किया जाता है और आपके कोड को कभी नहीं दिखता।
OAuth auth connection के साथ API कॉल करना
टूल के Context object section में EXAMPLE_CRM को configured auth connection से map करें। जिस value को आप reference करते हैं, वह placeholder है: असली credential egress पर header में substitute किया जाता है और आपके कोड को कभी नहीं दिखता।
सर्वोत्तम तरीके
टूल्स के नाम सहज रखें और विस्तृत descriptions दें
अगर आपको लगता है कि assistant सही टूल्स को कॉल नहीं कर रहा है, तो आपको टूल के names और descriptions अपडेट करने पड़ सकते हैं, ताकि assistant को बेहतर तरीके से समझ आए कि हर टूल कब चुनना है। टूल और argument names को छोटा करने के लिए abbreviations या acronyms इस्तेमाल न करें।
आप यह भी बता सकते हैं कि किसी टूल को कब कॉल करना चाहिए। Complex tools के लिए, हर argument का description शामिल करें, ताकि assistant को पता हो कि उस argument को पाने के लिए यूज़र से क्या पूछना है।
टूल parameters के नाम सहज रखें और विस्तृत descriptions दें
टूल parameters के लिए स्पष्ट और descriptive names इस्तेमाल करें। अगर लागू हो, तो description में parameter का expected format बताएं (जैसे किसी date के लिए YYYY-mm-dd या dd/mm/yy)।
अपने assistant के system prompt में टूल्स को कैसे और कब कॉल करना है, इसकी अतिरिक्त जानकारी देने पर विचार करें
अपने system prompt में स्पष्ट निर्देश देने से assistant की टूल-कॉलिंग accuracy काफ़ी बेहतर हो सकती है। उदाहरण के लिए, assistant को इस तरह के निर्देश दें:
Complex scenarios के लिए context दें। उदाहरण के लिए:
LLM चयन
टूल्स इस्तेमाल करते समय, हम GPT 6 या Claude Sonnet 5.5 जैसे high intelligence models चुनने की सलाह देते हैं।
यह ध्यान रखना ज़रूरी है कि function calls की सफलता में LLM का चयन अहम होता है। कुछ LLMs को conversation से relevant parameters निकालने में मुश्किल हो सकती है।