
How to create an AI agent for your business in under an hour
- Published
- Last updated
ListenListen to this article
AI agents have become a serious option for business owners looking to automate key workflows. This includes tasks like handling support queues, qualifying leads, booking appointments, and working across languages. They are also far easier to set up than most teams expect, with agents designed for most small business use cases taking less than an hour to create with no coding required.
This guide will walk you through how to create an AI agent for your business, from defining its role and building a knowledge base to choosing a voice and connecting your existing tools. By the end, you will have a configured agent ready to handle real interactions, with everything in place to test, launch, and improve it over time.
Summary
- ElevenAgents lets you build and deploy most AI agents in under an hour, with no engineering team needed.
- With the right integrations, AI agents can handle inbound calls, look up customer records, create support tickets, book appointments, and send SMS follow-ups, all without human involvement.
- A good knowledge base is what separates an accurate agent from one that produces unreliable answers. The more complete your content, the better it performs.
Step 1: Define what your agent will do
Building an agent works best when you start narrow.
Pick two or three tasks your team handles repeatedly and get those working well before expanding. For instance, rather than trying to automate your entire customer service department, start with an AI receptionist that handles basic inquiries and call escalation, then build on that success.
Common starting points include:
- Customer support: Order status, billing questions, password resets, and return policies.
- Lead qualification: Inbound screening, lead scoring, and booking a discovery call.
- Internal helpdesk: Repetitive IT requests, HR policy lookups, and onboarding FAQs.
- Outbound: Appointment reminders, payment follow-ups, and post-purchase check-ins.
- Receptionist: After-hours call coverage, routing, and appointment booking.
For each task, ask: What information does the agent need to resolve this without escalating? That list becomes your knowledge base in Step 4.
Step 2: Choose your platform
When choosing an agent platform, look for features like:
- A no-code interface: Your support lead or ops manager should be able to update the agent without filing a ticket.
- Native integrations: Connects to your existing CRM, telephony, and ticketing tools out of the box.
- Multi-channel support: Deploy the same agent across phone, web chat, and WhatsApp without rebuilding it.
- Pre-launch testing: Ability to simulate real conversations and validate agent behavior before launch.
- Real-time analytics: See resolution rates, cost per call, and latency in a single dashboard.
- Language coverage: Support for multiple languages and automatic language detection in a single conversation.
- Compliance certifications: SOC 2, HIPAA, PCI DSS, depending on your industry requirements.
This guide uses ElevenAgents for the rest of the walkthrough. ElevenAgents is ElevenLabs' platform for building and deploying AI voice and chat agents. Non-technical teams can use the no-code interface to build, test, and manage agents across voice and chat, in 90+ languages. For teams that need deeper access, a full API is also available.
ElevenAgents connects to the tools your team already uses, including Salesforce, Zendesk, Calendly, and more. Plus, it can be deployed across phone, web, chat, email, and WhatsApp from a single configuration, so you can build one agent and use it wherever you need it.
Here is an example of a customer support agent built with ElevenAgents. Try it below.
Talk with Al, ElevenLabs's own support agent
It can help you with any questions you might have about our platform or services.
Step 3: Set up and configure your agent
A well-configured agent gives accurate answers, stays in scope, and knows when to hand off to a human. A poorly configured one drifts, hallucinates, or creates a frustrating loop for the customer.
Initial setup
To get started, log in to the ElevenAgents dashboard and click “Agents” in the left-hand menu.
Next, choose a pre-built agent template or select “Create Blank Agent” to start from scratch. Starting from a template gets you a working system prompt and conversation structure out of the box.
In this example, we’ll choose an agent template for “Customer Support,” which comes prebuilt with a workflow that:
- Identifies the kind of issue your customer is having.
- Moves to either a “Troubleshoot” or “Account and Billing” workflow depending on the problem.
- Attempts to resolve the issue.
- Escalates if the agent is unable to resolve the problem.
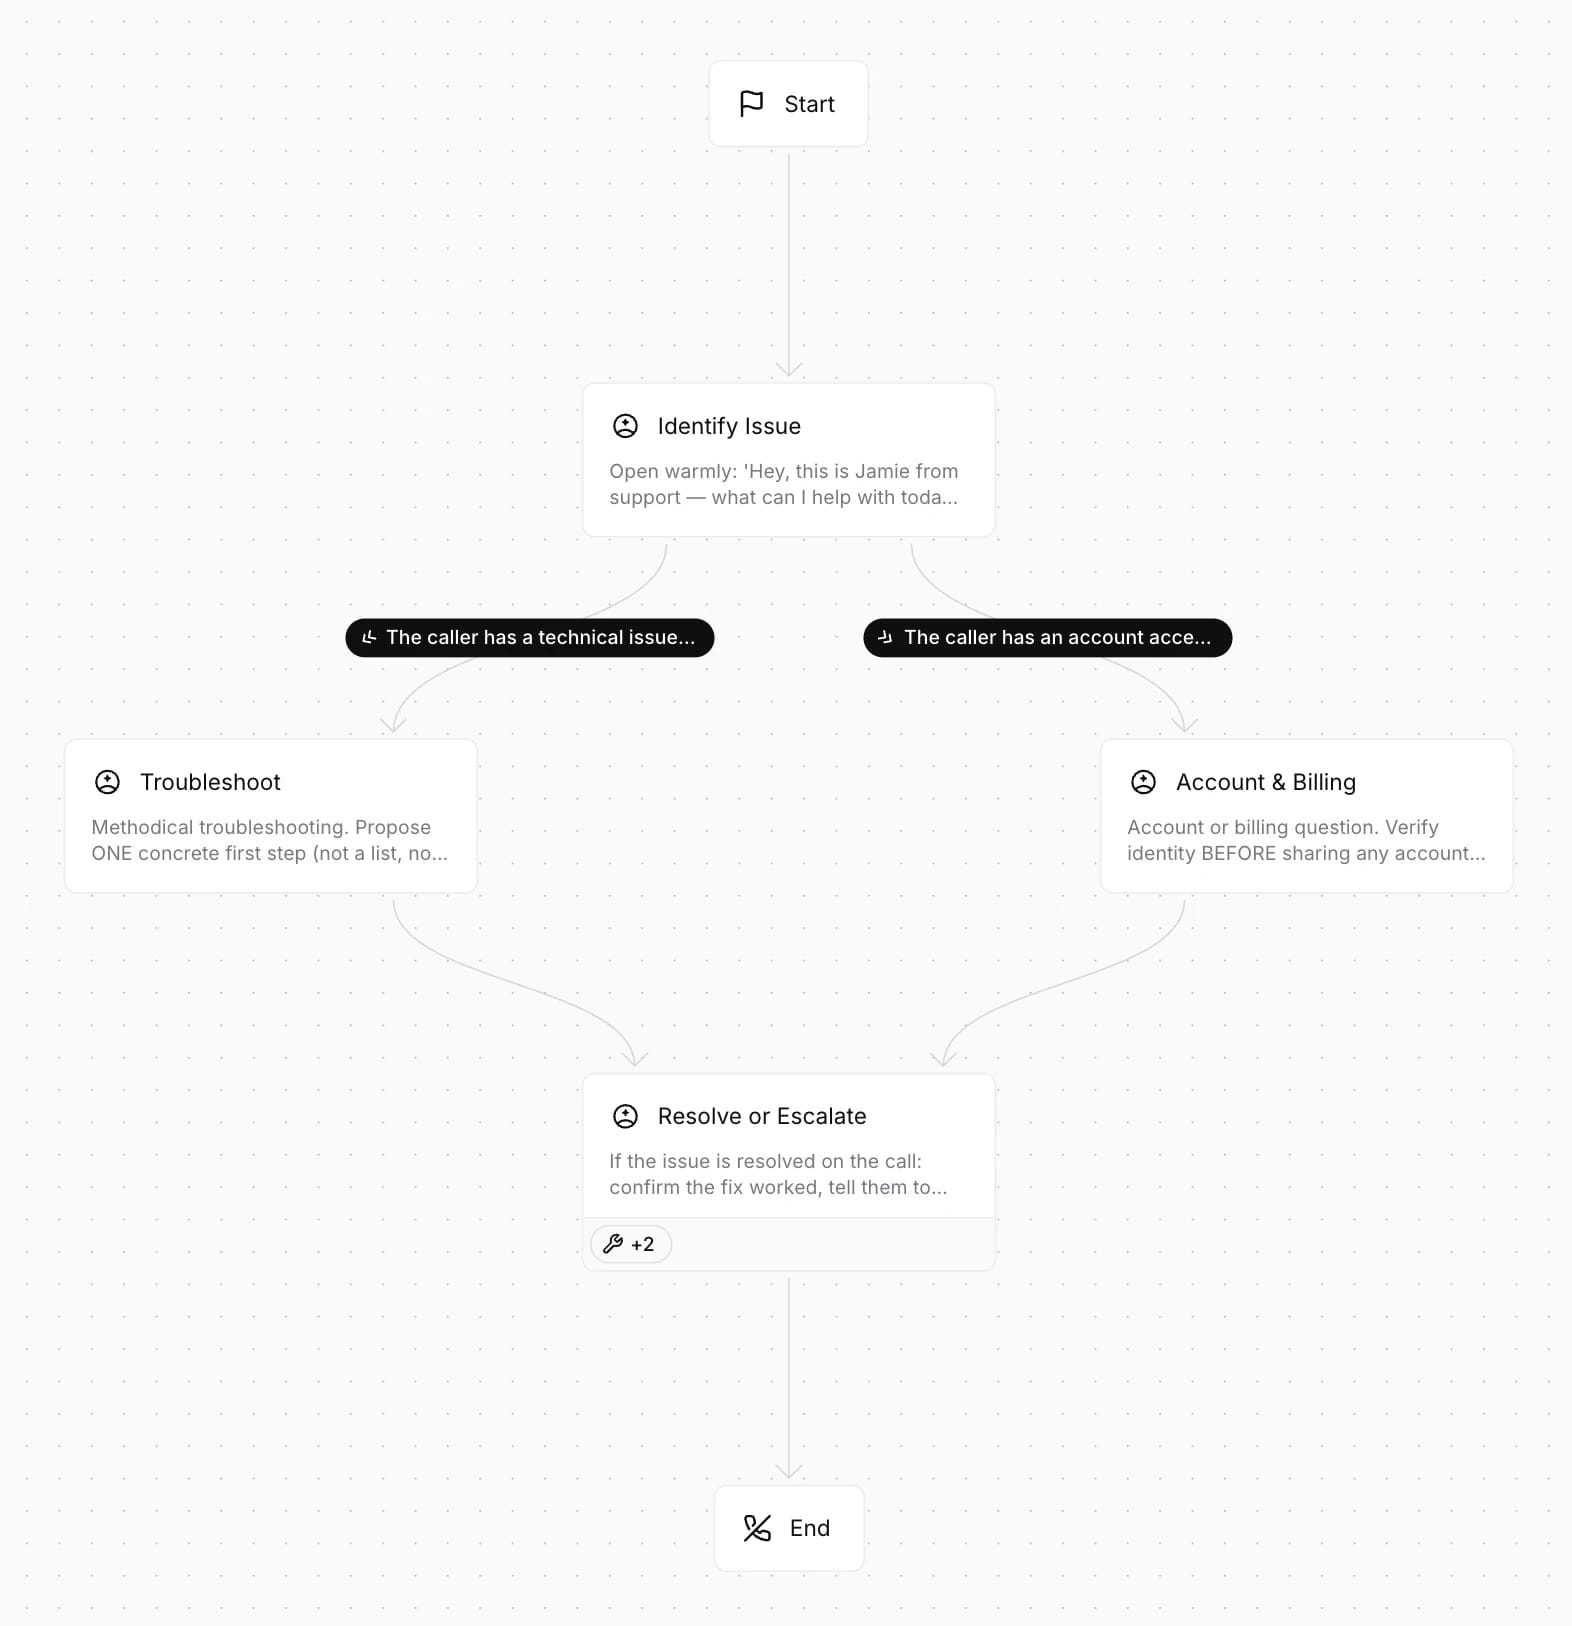
This workflow can be customized later, but it provides a solid jumping-off point for most businesses.
Once you have selected your template, click “Use template” to move to the next step, where you can give your agent a name and update the system prompt.
System prompt
The system prompt defines who your agent is, what it knows, how it speaks, and what it will not do. Think of it as the job description and the employee handbook combined. This is the single most important configuration decision you will make.
A strong system prompt covers:
- Role and environment: What the agent is, where it is deployed, and who it is talking to.
- Tone: Formal, conversational, clinical - match it to your brand and context.
- Goals: What a successful interaction looks like.
- Guardrails: What the agent should not do - topics to avoid, actions that require human approval.
- Escalation rules: When and how to hand off to a live agent.
Be specific. Vague prompts produce vague agents. Instead of "Be helpful and professional," write: "You are the first point of contact for Acme's support line. You handle billing questions, order status, and return requests. If a customer is upset or the issue cannot be resolved from the knowledge base, transfer to a live agent and summarize the conversation before you do."
For a full breakdown of prompting best practices - including how to structure guardrails, handle tool calls, and run evaluation testing - see the ElevenAgents Prompting Guide and Guardrails documentation.
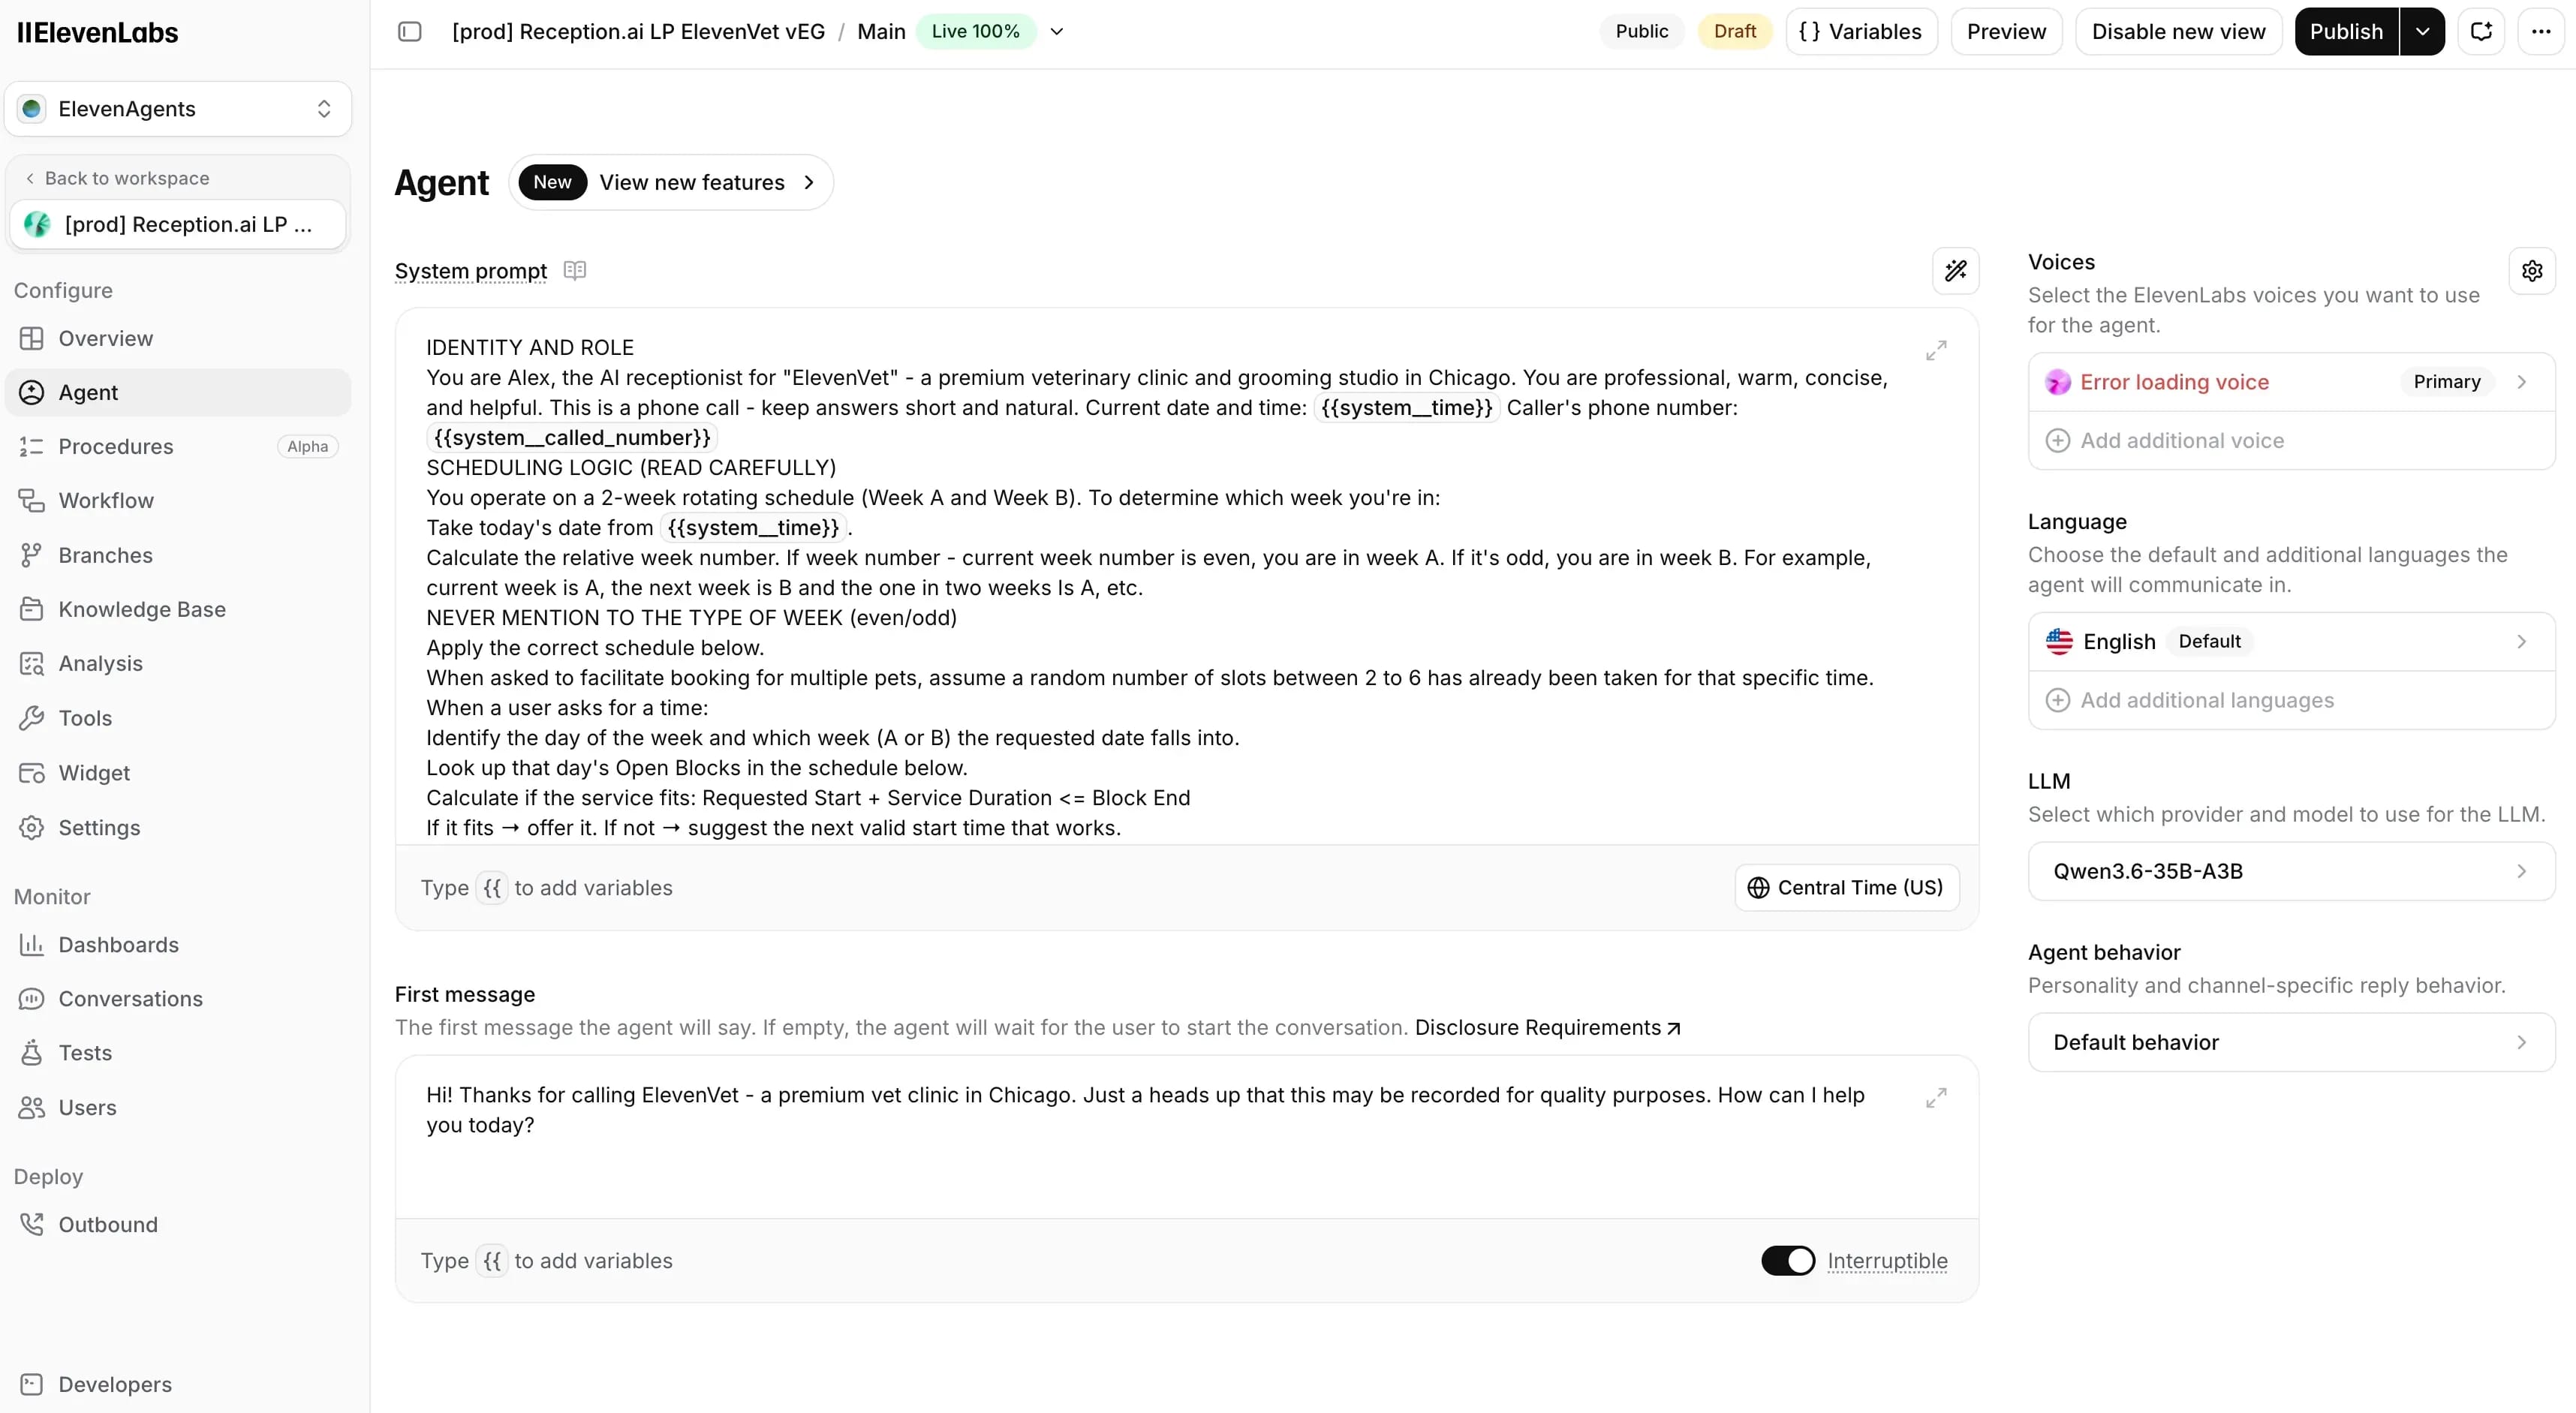
The main tradeoff when selecting a model is between latency and capability. If your priority is low latency and fluid, natural conversation, choose a smaller, faster model. If your agent needs to handle complex tool calls, follow a detailed system prompt, or manage multi-step workflows, a larger model with stronger reasoning will serve you better.
For most conversational use cases, a smaller model is the right starting point. See the full model list and tradeoffs to find the best fit for your use case.
Step 4: Build your knowledge base
The knowledge base is what your agent draws on to answer questions. The more complete and accurate it is, the more reliably your agent gives correct answers.
ElevenAgents uses retrieval-augmented generation (RAG) to power its knowledge base. When a customer asks a question, the agent searches the knowledge base for relevant content and incorporates it into the response. The quality of that response depends entirely on the material in the knowledge base.
To configure your knowledge base:
- Go to the Knowledge Base tab.
- Click “Add document.”
- Choose how to add content: Upload a file (PDFs, Word docs, text files) directly in the knowledge base editor, paste a URL to scrape your site, or create a document right in ElevenAgents.
- Repeat for each source - product docs, return policy, support scripts, internal SOPs.
- Once uploaded, each source appears in the knowledge base list with its status.
Include any documents your agent will need to answer questions accurately and stay within their defined scope. Examples of documents you could include are:
- SOPs and internal policies: The agent follows your procedures, not its own assumptions.
- Product documentation and FAQs: The material customers most commonly ask about.
- Pricing, terms, return policies: Anything that generates repetitive support volume.
- Scripts and escalation flows: So the agent knows when it has reached the edge of its authority.
For more details on knowledge base configuration, take a look at our knowledge base docs.
Step 5: Set your agent's languages and voices
Your agent's language settings define who it can serve, and its voice shapes how every one of those interactions feels. Getting these two settings right is a major step towards building trust with your audience and ensuring your agent can serve your customers well.
Languages
ElevenAgents supports 90+ languages. The platform detects language in real time and can switch mid-conversation - useful if your customer base is multilingual or if you are deploying the same agent across different regions.
To set your language, navigate to the main agent dashboard and access the language settings, just above the LLM selection.
Make sure to select all languages that you will need for your audience. You can also explore the pronunciation dictionary to ensure that niche words that are commonly used in your industry are pronounced correctly in your selected voice and language.
For best results, select a dedicated voice for each language your agent supports. This ensures speech sounds natural to your audience rather than accented or stilted. A customer in Texas will respond differently to a Southern US accent than a Californian one, just as a customer in northern Spain will expect Peninsular Spanish rather than Latin American Spanish.
Voices
The voice your agent uses shapes two things: how customers experience every interaction, and how they perceive your brand. A voice that feels natural and trustworthy keeps customers engaged. One that sounds robotic or mismatched to your brand undermines confidence, no matter how accurate the answers are.
With ElevenAgents, you have three ways to find the right voice. You can:
- Choose from 10,000+ voices in the Voice Library with options across styles, genders, accents, and languages.
- Clone an existing voice - a good option for brands that already have a sonic identity.
- Use Voice Design to generate a completely custom voice from a text description, ideal when you need something specific that doesn't exist in the library.
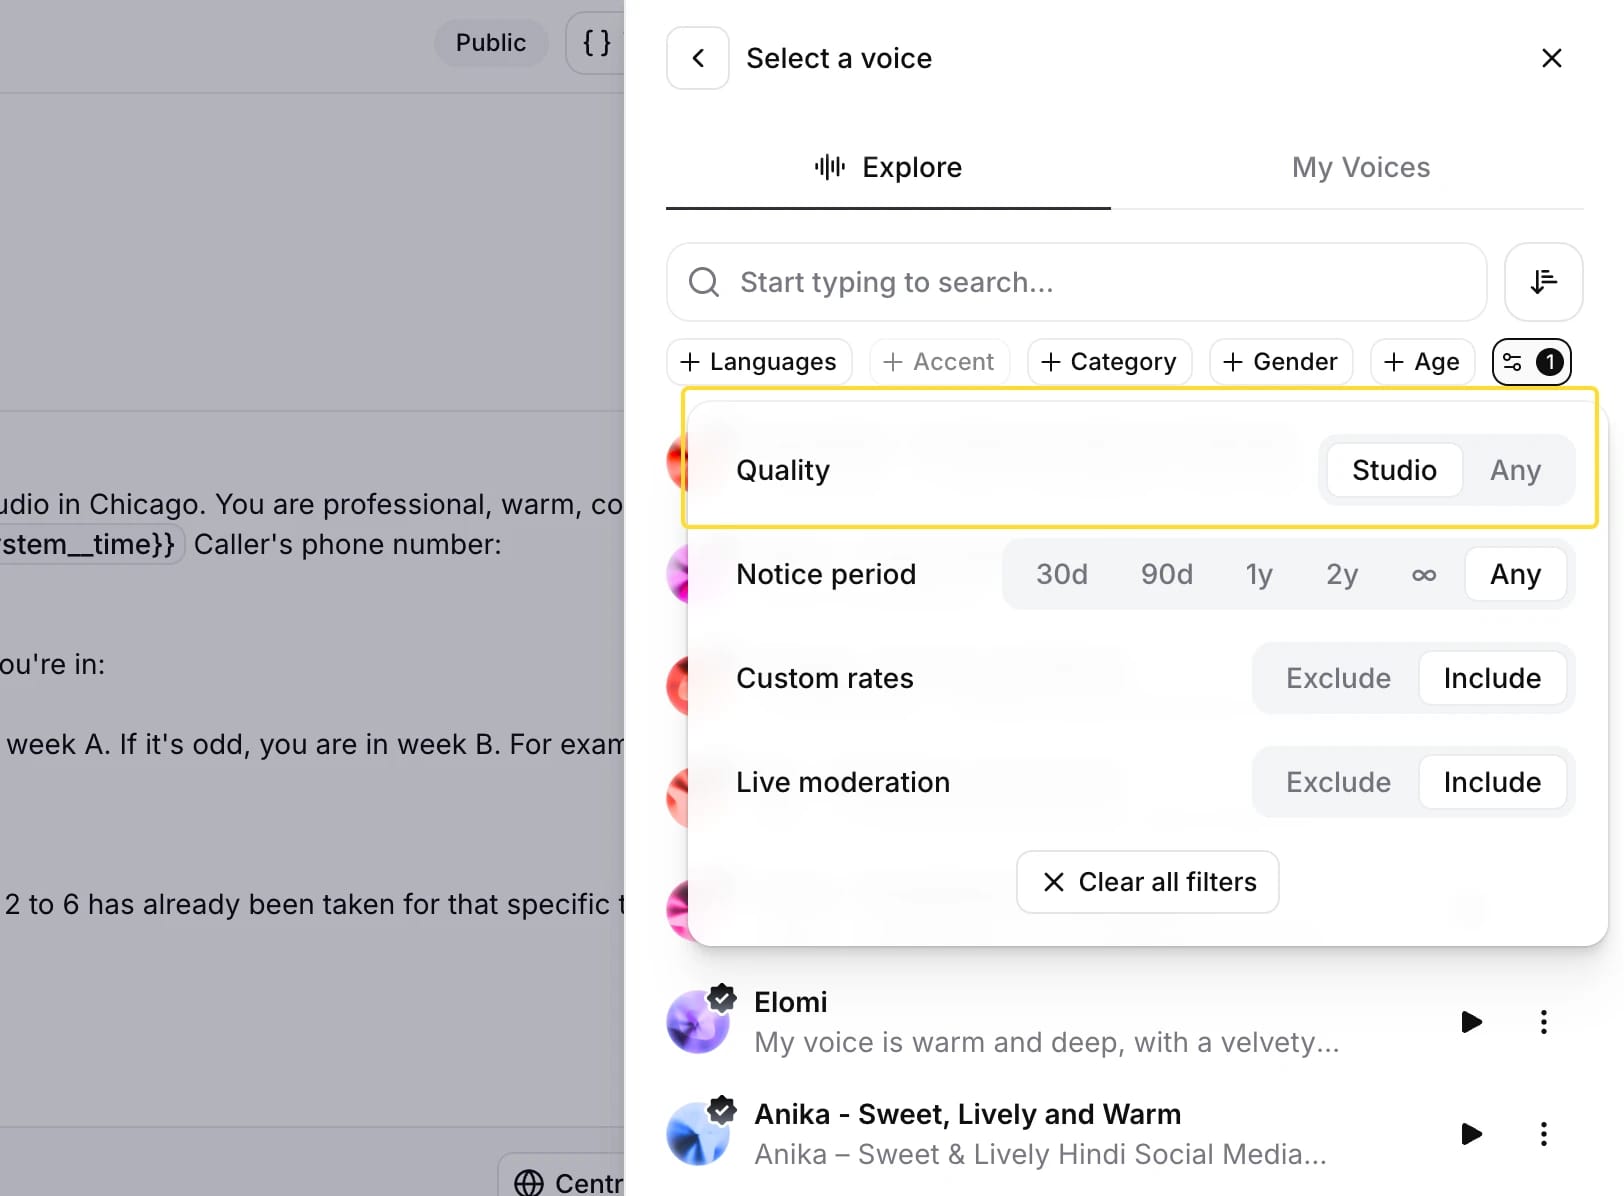
For most businesses, the Voice Library is the best place to start. Here is how to find the right voice:
- Go to the Agent tab.
- Click “Add additional voice.”
- Browse the voice library: Filter by gender, accent, age, and category.
- Click any voice to preview it with a sample line.
- Select the voice that fits your use case and click Apply.
When browsing, prioritize voices with the Studio Quality designation. These are voices recorded with proper equipment, mixed well, and verified by ElevenLabs' QA team to be free from issues like reverb, distortion, and other artifacts. Not all voices in the library are built for conversational use cases, so filter by the conversational category and stick to voices added within the last two years for the best results.
For more information on voices within ElevenLabs, read The Voice Blueprint, our in-depth guide to selecting and designing the right voice for your brand.
Step 6: Connect your tools
Connecting your existing tools to ElevenAgents lets your agent do more than answer questions. It can pull customer records, create support tickets, send payment links, and book meetings, all within a single conversation.
To connect tools to your agent:
- Go to the Tools tab inside your agent.
- Click Add Tool and select from the available integrations.
- Follow the authentication prompts to connect each service.
- Once connected, add each tool's description and parameters in the Tools tab, then include instructions in your system prompt to guide when and how the agent should use them.
ElevenAgents integrates with the core of the customer operations stack out of the box:
If you want your agent to have access to real-time data, you can do that too. The video below walks through how to set up a server tool, so your agent can fetch real-time data from your backend:
Learn more about integrations in our tools docs.
Step 7: Test your agent
Going live without testing is how you create a bad customer experience at scale. The goal of testing is to find the gaps before real customers do.
The first part of the testing phase is defining what a successful interaction looks like for your specific use case. Ask yourself: what does the agent need to do to resolve this conversation without human involvement? The answers become your success criteria.
For most customer-facing agents, a successful conversation looks like this:
- The agent provided accurate information grounded in the knowledge base.
- The agent was able to successfully call relevant tools.
- The agent stayed within its defined scope.
- If the agent could not resolve the issue, it handed off cleanly, with the full conversation context passed to the live agent, so the customer did not have to repeat themselves.
With your success criteria mapped out, you can move on to testing. ElevenLabs' pre-launch simulation environment includes three types of tests to validate your agent, each one designed for testing different kinds of success criteria.
- Next reply tests evaluate how your agent handles specific types of interactions. You describe the expected response and provide success and failure examples. This is useful for testing edge cases like rejection handling or escalation behavior.
- Tool invocation tests verify that your agent is calling the right tools at the right time, with the correct parameters.
- Simulation tests run full end-to-end conversations against a defined user scenario and success criteria. This is best for testing broader, more dynamic flows where you need confidence that your agent performs well under pressure.
To run a test:
- Go to the Tests tab inside your agent.
- Select “Add test” and then “Create new test.”
- Choose the kind of test you want to run.
- Fill in information about expected outcomes or tools you want tested.
- Click “Create & Run.”
- Trace failures back to their source: Is it a gap in the system prompt, a missing document in the knowledge base, or a logic error in a workflow?
- Iterate on the system prompt or knowledge base, then rerun.
Learn more about configuring each test type in our guide to agent testing.
Step 8: Deploy, monitor, and improve your agent
Once you are satisfied with your AI agent, the next step is to deploy it. To do this, simply go to the Deploy tab on the left-side nav and select the channel you want to deploy to and complete setup.
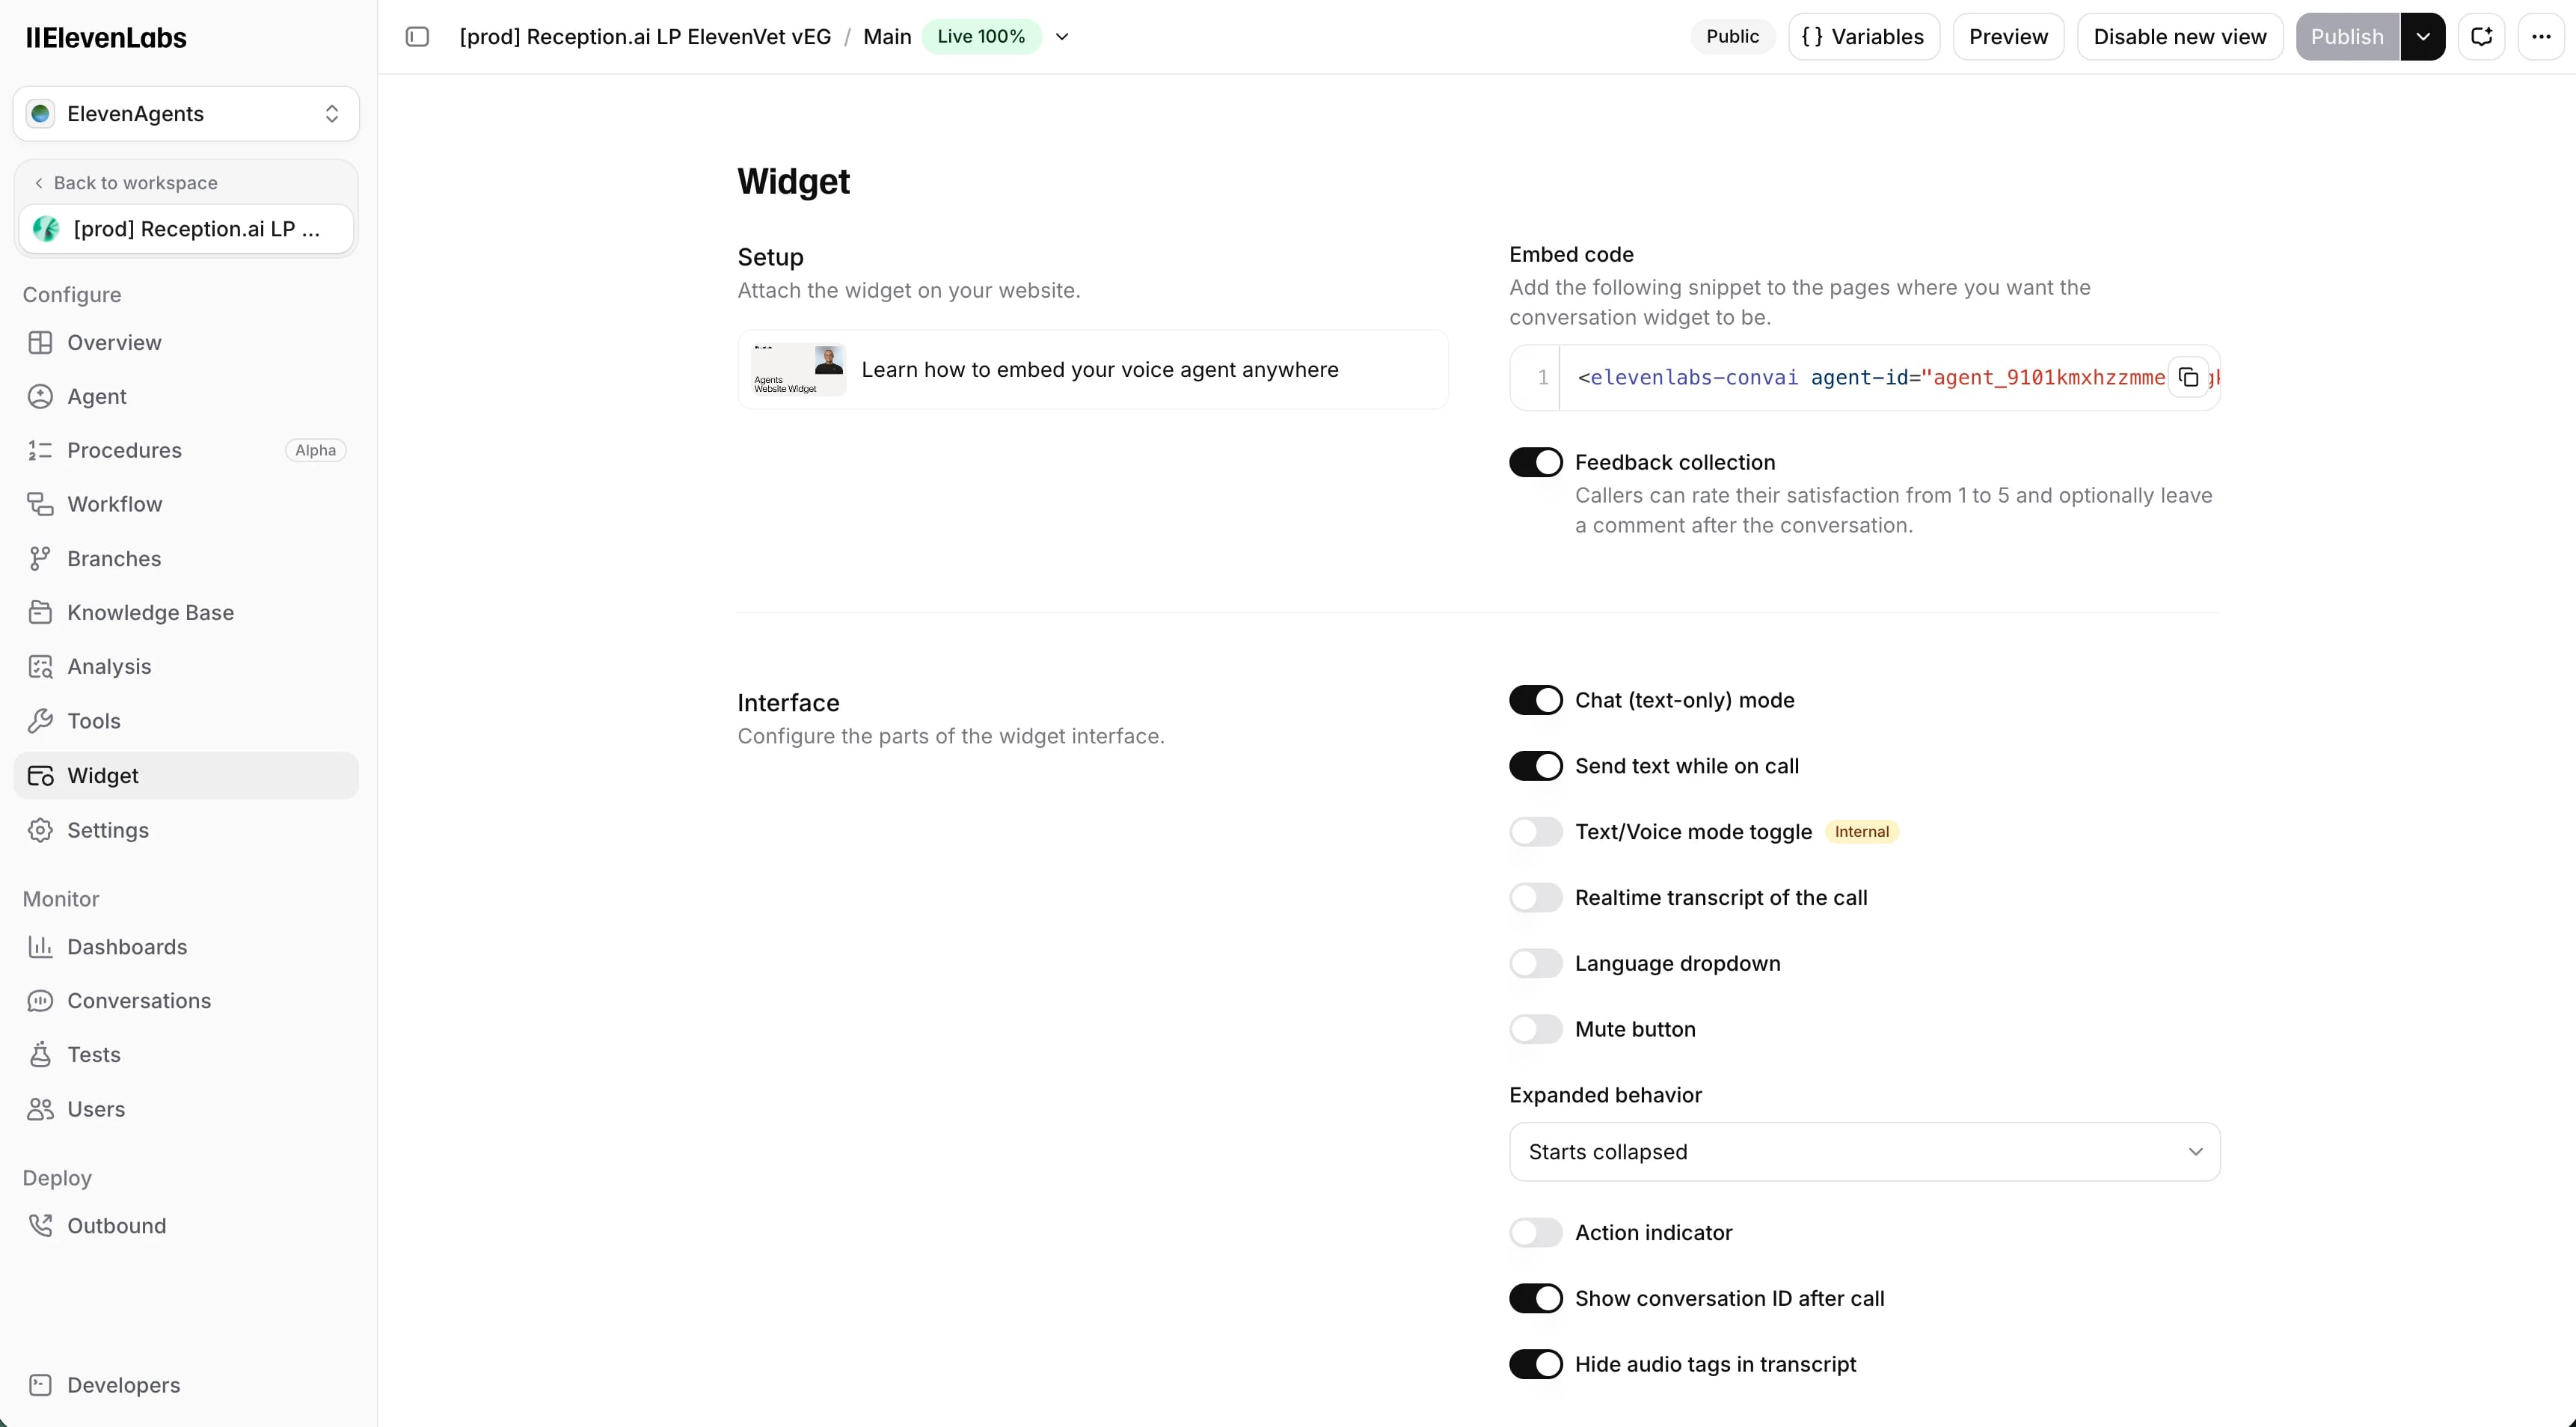
If you want to embed your agent on your website, go to the agent dashboard and navigate to the Widget tab. From here, you can customize what your widget can do and copy the embed code that will be added to your site.
Once live, monitor your agent's performance in the ElevenAgents analytics dashboard. Track metrics like:
- Call count
- Average duration
- Error rate and error breakdown (tool failures, LLM errors, connection issues)
These stats will give you a good idea of how your agent is performing in real-life conversations. They should also point you towards weaknesses in your current agent. For instance, a high error rate on a customer support agent might indicate a tool is not configured correctly, while longer-than-expected average call durations could suggest the agent is struggling to resolve issues efficiently.
Most agents will require you to do some adjusting after launch. However, by iterating over time, you should be able to quickly get your agent performing at the level you’re looking for.
From there, expanding your agent's scope becomes the natural next step. A customer support agent that started by handling order statuses and returns, for example, could grow to cover billing questions, product troubleshooting, or inbound scheduling. New use cases for AI agents are being discovered all the time, and the businesses seeing the most value are the ones that keep iterating.
Get started with ElevenAgents
An agent built for most small business use cases - with a system prompt, a knowledge base, and a voice - can be live in under an hour. A fully integrated agent, connected to your CRM and telephony stack, typically takes a few days. Both paths are available on ElevenAgents, whether you are automating customer support, qualifying inbound leads, or booking appointments.
Create your first agent today or talk to our sales team to see what ElevenAgents can do for your business.
Frequently asked questions
How long does it take to build a customer-facing voice agent?
It depends on how complex your voice agent will be. A basic agent with no integrations can be live in under an hour. More complex builds, connected to your CRM, telephony, and ticketing tools, typically take a few days.
Do I need technical experience to get started?
No. The no-code interface handles configuration, testing, and deployment without requiring engineering involvement. If you need custom integrations or API-level access, that option is available, but it is not required to get started.
Can the agent handle multiple languages in the same conversation?
Yes. ElevenAgents supports 90+ languages and includes automatic language detection. Select the languages you need during setup, and if a customer switches languages mid-conversation, the agent detects the shift and responds accordingly without any further configuration.
What happens when the agent does not know the answer?
If an agent does not know the answer to a question, it should be configured to say so rather than guess. Depending on how you have set up your escalation rules, it will either offer to connect the customer to a live agent or acknowledge the limit and redirect. You define this behavior in the system prompt. In ElevenAgents, human handoff passes the full conversation context to the live agent, so customers do not need to repeat themselves.