How to clone your voice with ElevenLabs: A deep dive
- Written by
- Jack Limebear
- Published
- Last updated
ListenListen to this article
No two voices are the same. Your voice is shaped by your biology and environment, refined over years of expression. It’s personal.
Until recently, that kind of individuality couldn’t be replicated. But advances in AI have made it possible to clone voices with striking precision. With just a few minutes of audio, AI systems can generate speech that sounds remarkably close to the original.
In this guide, we’ll show you exactly how to clone your voice with ElevenLabs. We’ll touch on what to record, how to choose between Instant and Professional Voice Cloning, and how to put your clone to work once it’s ready. For both pathways, we’ve included a step-by-step deep dive you can follow along to.
Summary
- ElevenLabs offers Instant Voice Cloning and Professional Voice Cloning services.
- Instant Voice Cloning requires a few minutes of clean, consistent audio.
- Professional Voice Cloning requires up to 3 hours of voice data.
- After launching your clone, you can connect it to other products under the ElevenLabs umbrella.
- You must have explicit consent to clone a voice. ElevenLabs requires consent confirmation before being able to use these services.
Instant Cloning vs. Professional Voice Cloning: Which do you need?
ElevenLabs offers two distinct voice cloning methods to choose from.
Instant cloning provides a usable voice in just a few minutes, letting you get started with practical uses of your voice clone quickly. Professional Voice Cloning takes more time but also produces an extremely high-fidelity model.
Here’s a quick-reference guide so you can choose the best option for you:
Understanding how these approaches differ will save you time upfront and let you get started quickly.
What you need before cloning your voice with ElevenLabs
Whether you opt for professional or instant ElevenLabs Voice Cloning, there are a few fundamentals that are useful to have. While not mandatory, especially for instant pathways, they can make a significant difference to clone quality.
Here are a couple considerations to make before you hit record:
- Audio quality requirements: A professional recording microphone will make a big difference. That said, the minimum requirements here are that you can record WAV files at 44.1kHz or 48kHz with a bitrate of at least 24 bits. Try to record in a quiet place into a Digital Audio Workstation (DAW) that supports WAV files. Audacity is a good free one you can use.
- Minimum sample length: Make sure to read how much audio data you should supply. What matters here is the total combined runtime, not the number of files. For Professional Voice Cloning, upload a file as close to 3 hours as possible.
- What to say: ElevenCreative’s voice clone aims to replicate the voice you provide. If you read in a slow, monotone voice, your recording will reflect those qualities. Speak naturally with varied emotion and pacing. ElevenLabs offers built-in scripts for Professional Voice Cloning.
Taking the extra few minutes to make sure these aspects are prepared ahead of time will lead to a higher quality final voice clone.
How to create an instant voice clone with ElevenLabs
If you have a few minutes and are in a quiet place, you’re ready to clone your voice. ElevenCreative creates a digital replica of your voice that you can deploy in 32+ languages while matching the emotional register and prosody of your natural language.
Here’s how to use ElevenLabs Instant Voice Cloning:
- Access Voices
- Upload your samples
- Name and save your voice
- Test it with a script
- Adjust stability and similarity settings
Let’s break these steps down in more detail.
Step 1: Navigate to the Instant Voice Cloning page in Voices
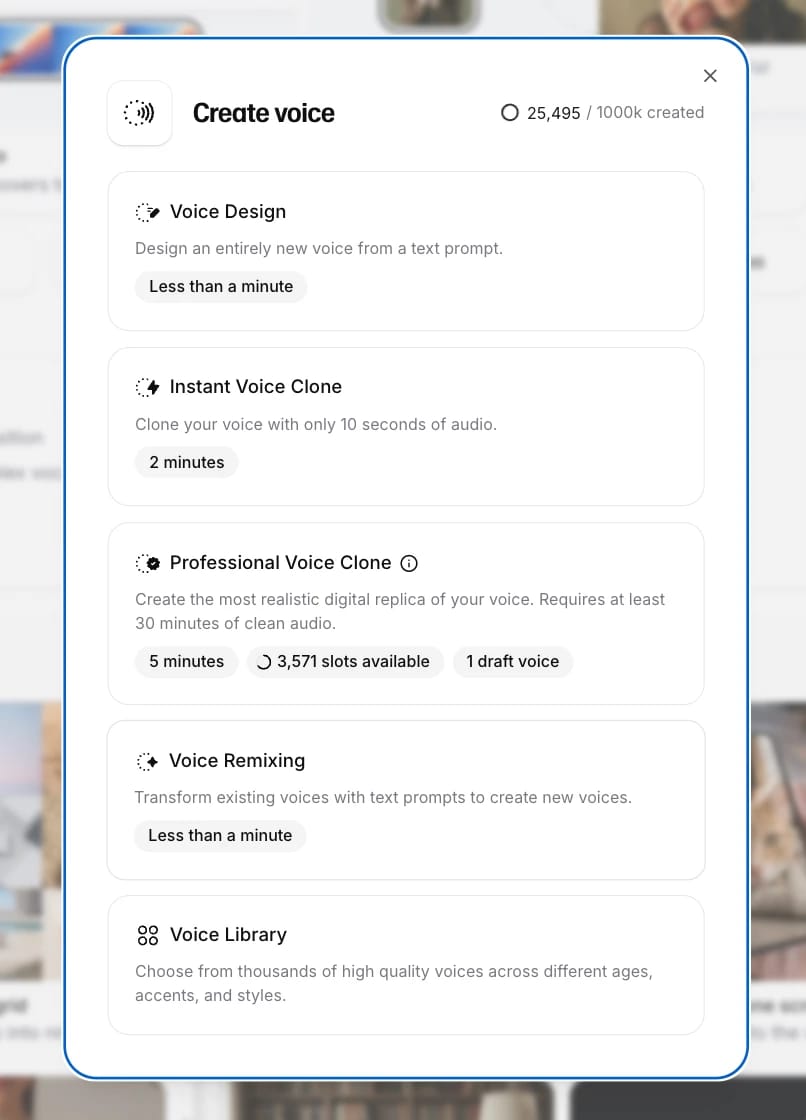
First of all, log into your ElevenLabs dashboard. In the left sidebar, select Voices and then click the plus icon.
You’ll see a pop-up image on your screen (featured below), which gives you a couple of options:
- Voice Design
- Instant Voice Clone
- Professional Voice Clone
- Voice remixing
Select Instant Voice Clone from the module and we’ll take you to the right page.
Step 2: Upload your samples
Follow the on-screen instructions to either upload pre-recorded audio files or record directly in your browser. At this stage, you can upload multiple files to the engine. ElevenLabs uses the total combined runtime, not the individual file length, for voice cloning.
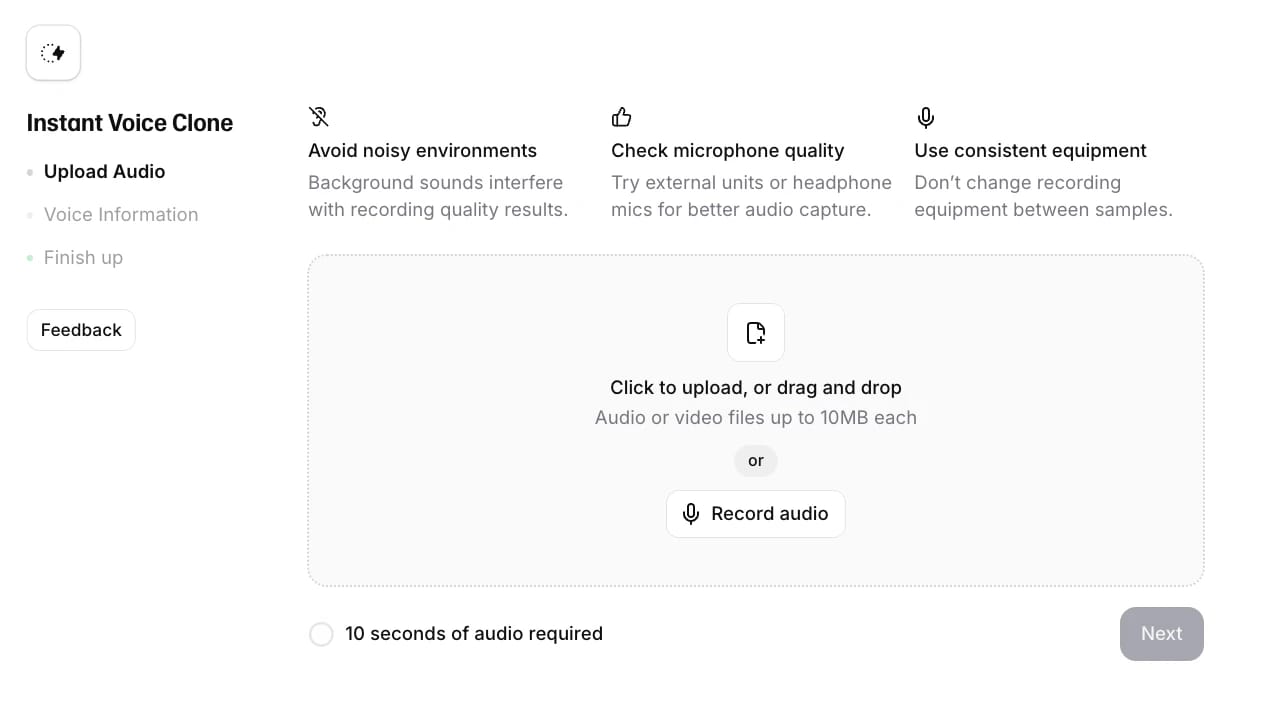
You should aim to provide at least 1-2 minutes of clean, consistent audio for us to work with.
You’ll also see some best practices here, like avoiding noisy environments, checking your microphone quality, and using the same equipment across your recordings.
Step 3: Name and save your voice
After recording your voice, ElevenLabs will begin to synthesize your voice clone. At this stage, you’ll be able to preview the voice to see what it sounds like, as well as giving it a name.
You’ll also be able to add other details to the clone’s information, like adding labels for language, accent, gender, and age. There is a description box where you can add other details you think would be useful for cataloging this voice or as a reminder for yourself.
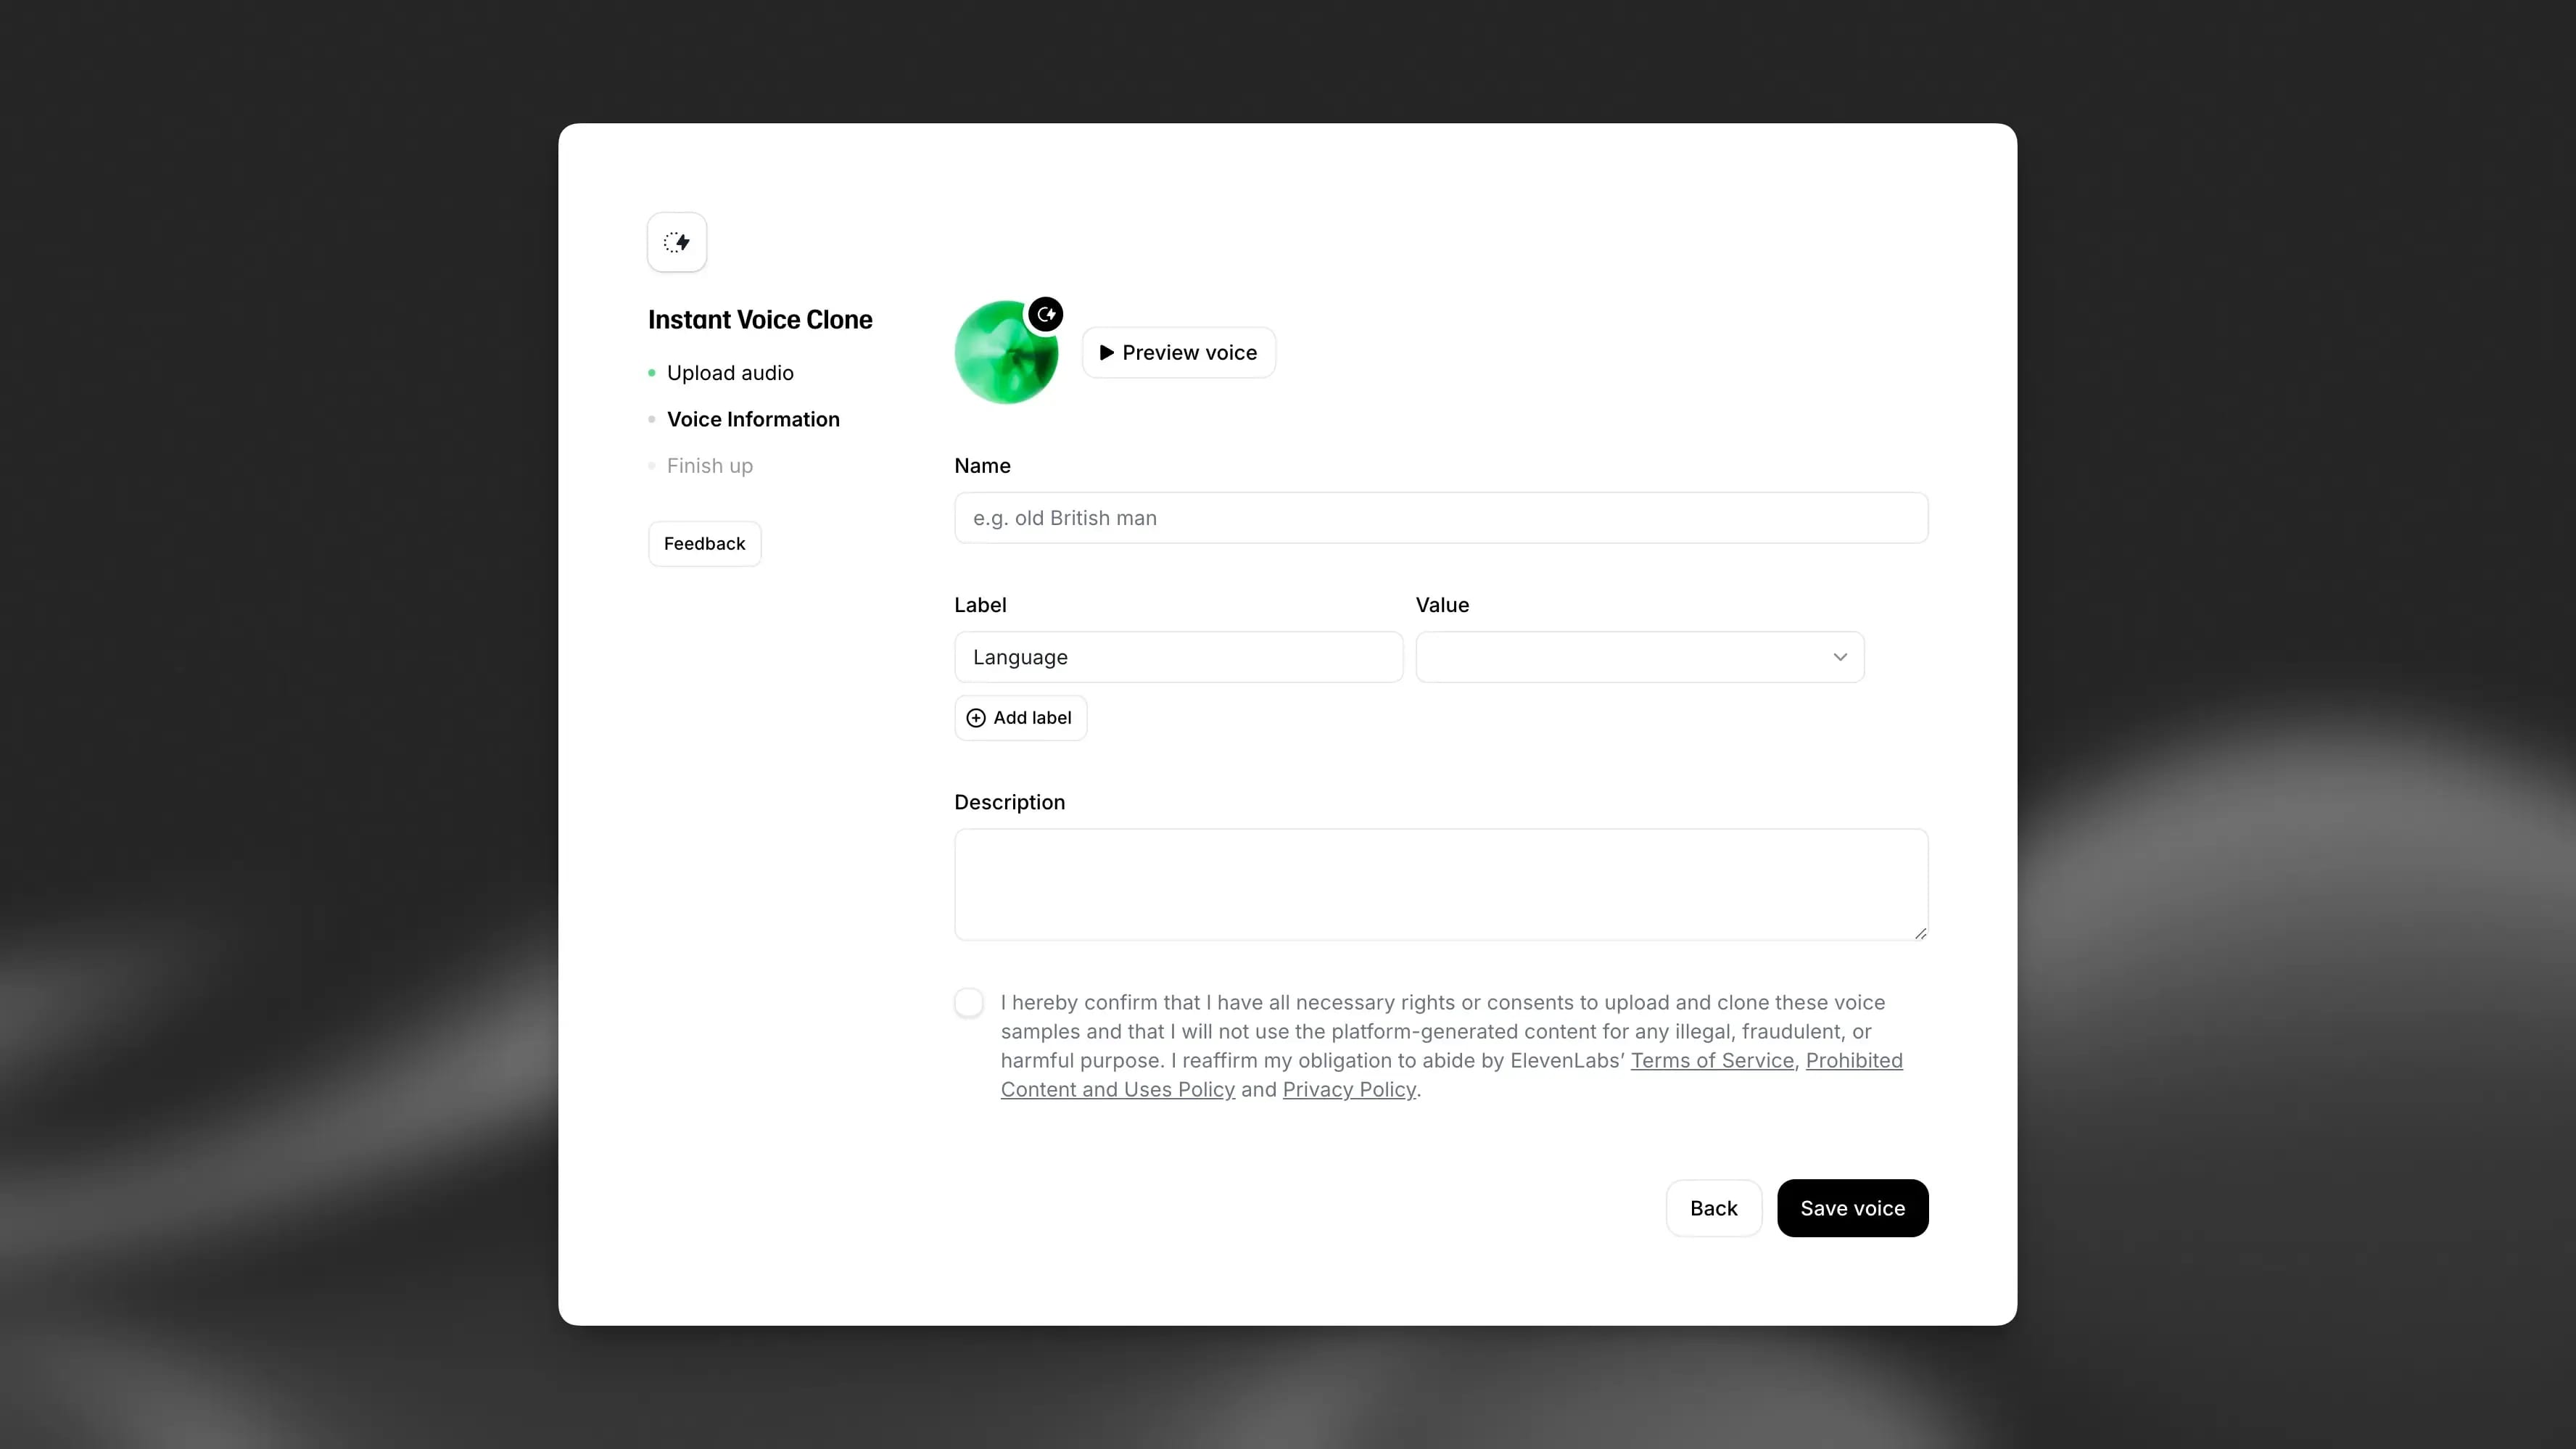
Finally, you’ll have to click on the consent box to confirm you’ve read and accept it. It’s imperative that you have consent to create a clone of the voice you’re working with, whether it's your own or someone else’s.
Step 4: Test your instant voice clone
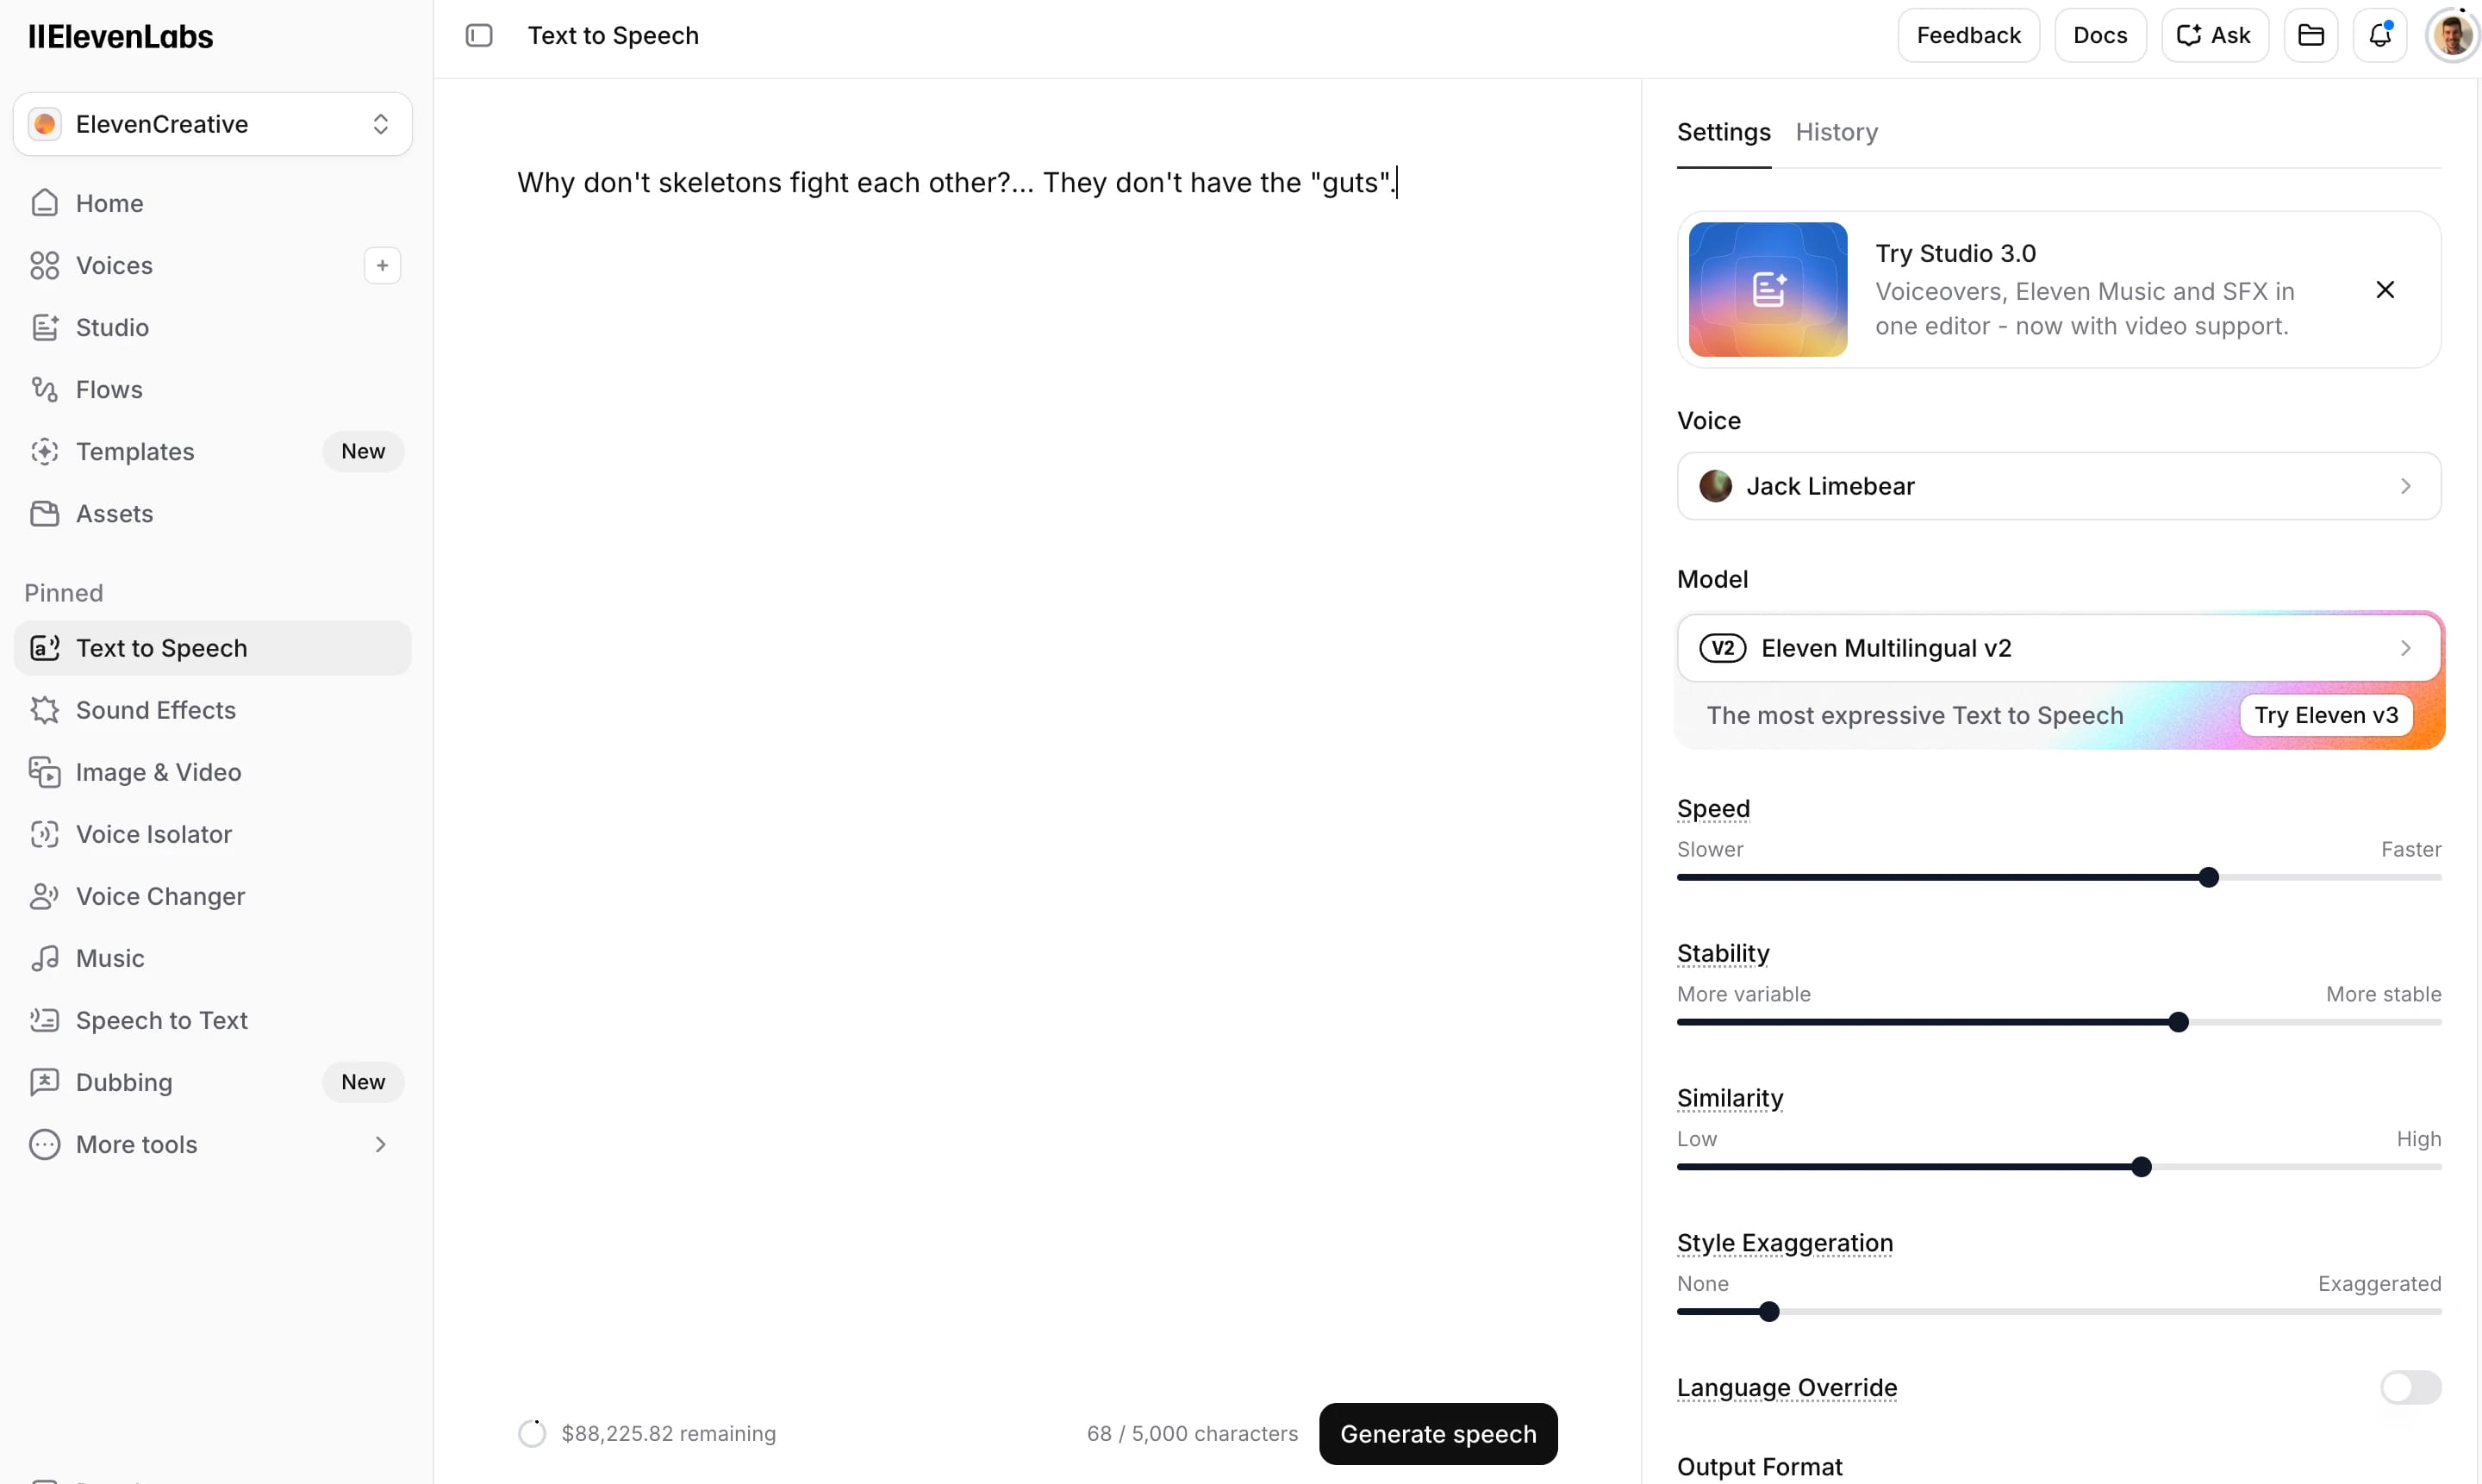
After creating your voice, navigate to My Voices and click Use voice to start using your clone in the Text to Speech playground. Write out a short script for your voice clone to say. To really put it to the test, make sure to write something that you didn’t include in your training audio.
Once you’ve selected your voice clone and written out the text, hit Generate speech at the bottom of the page to bring it to life.
Step 5: Adjust the model to iterate
If you hear your voice clone and think that something doesn’t quite sound right, you don’t have to start from scratch. ElevenLabs offers a range of settings sliders that let you configure the final audio product.
Try playing with the following controls on the right-hand side of the screen to see how they impact your voice clone:
- Stability: Higher stability produces consistent, predictable voices. Lower values can provide more expression but may introduce some inconsistency. A mid-range setting works best for most use cases.
- Similarity: Defines how closely the voice clone sticks to the voice samples you gave it. Increasing this slider helps make the voice feel more like your own. If you’re hearing distortions, decrease this slider.
- Style: Want to amplify the expressive qualities from your training audio? Increase this slider. However, high values may lead to a distorted final sample.
After tinkering with the values on these sliders, hit Generate speech again and see how the model changes.
Once you’ve moved through these 5 steps, you’ll have an ElevenLabs voice clone ready to go.


How to create a professional voice clone with ElevenLabs
Professionally cloning your voice with ElevenLabs takes more time than the instant option but will provide a highly accurate model that closely replicates your voice.
If you’re on the Creator plan or above, you can use these steps to create a professional voice clone with ElevenLabs:
- Access Voices
- Upload your audio
- Check the sample length feedback
- Process audio samples to improve quality
- Verify your own voice for security
- Wait for the voice fine-tuning process
- Use your voice clone
Let’s break these steps down in more detail.
Step 1: Navigate to the Professional Voice Cloning page in Voices
Log into your ElevenLabs dashboard, select Voices in the sidebar on the left, then click Create Voice. From the popup, you’ll see the same options as before.
This time, select Professional Voice Clone. You’ll see a wide range of recommendations appear, including:
- Using a pop filter
- Keeping the recording noise-free
- Recording in an acoustically treated room
- Pre-processing your audio
- Maintaining consistent volume throughout
- Providing at least 30 minutes of audio but ideally close to 3 hours
Step 2: Upload your audio
Click Upload samples and add your pre-recorded audio files. You can also record yourself to upload directly into the software. We’ve included a range of scripts that you can use for different purposes, like advertising, narrative, or conversational modeling.
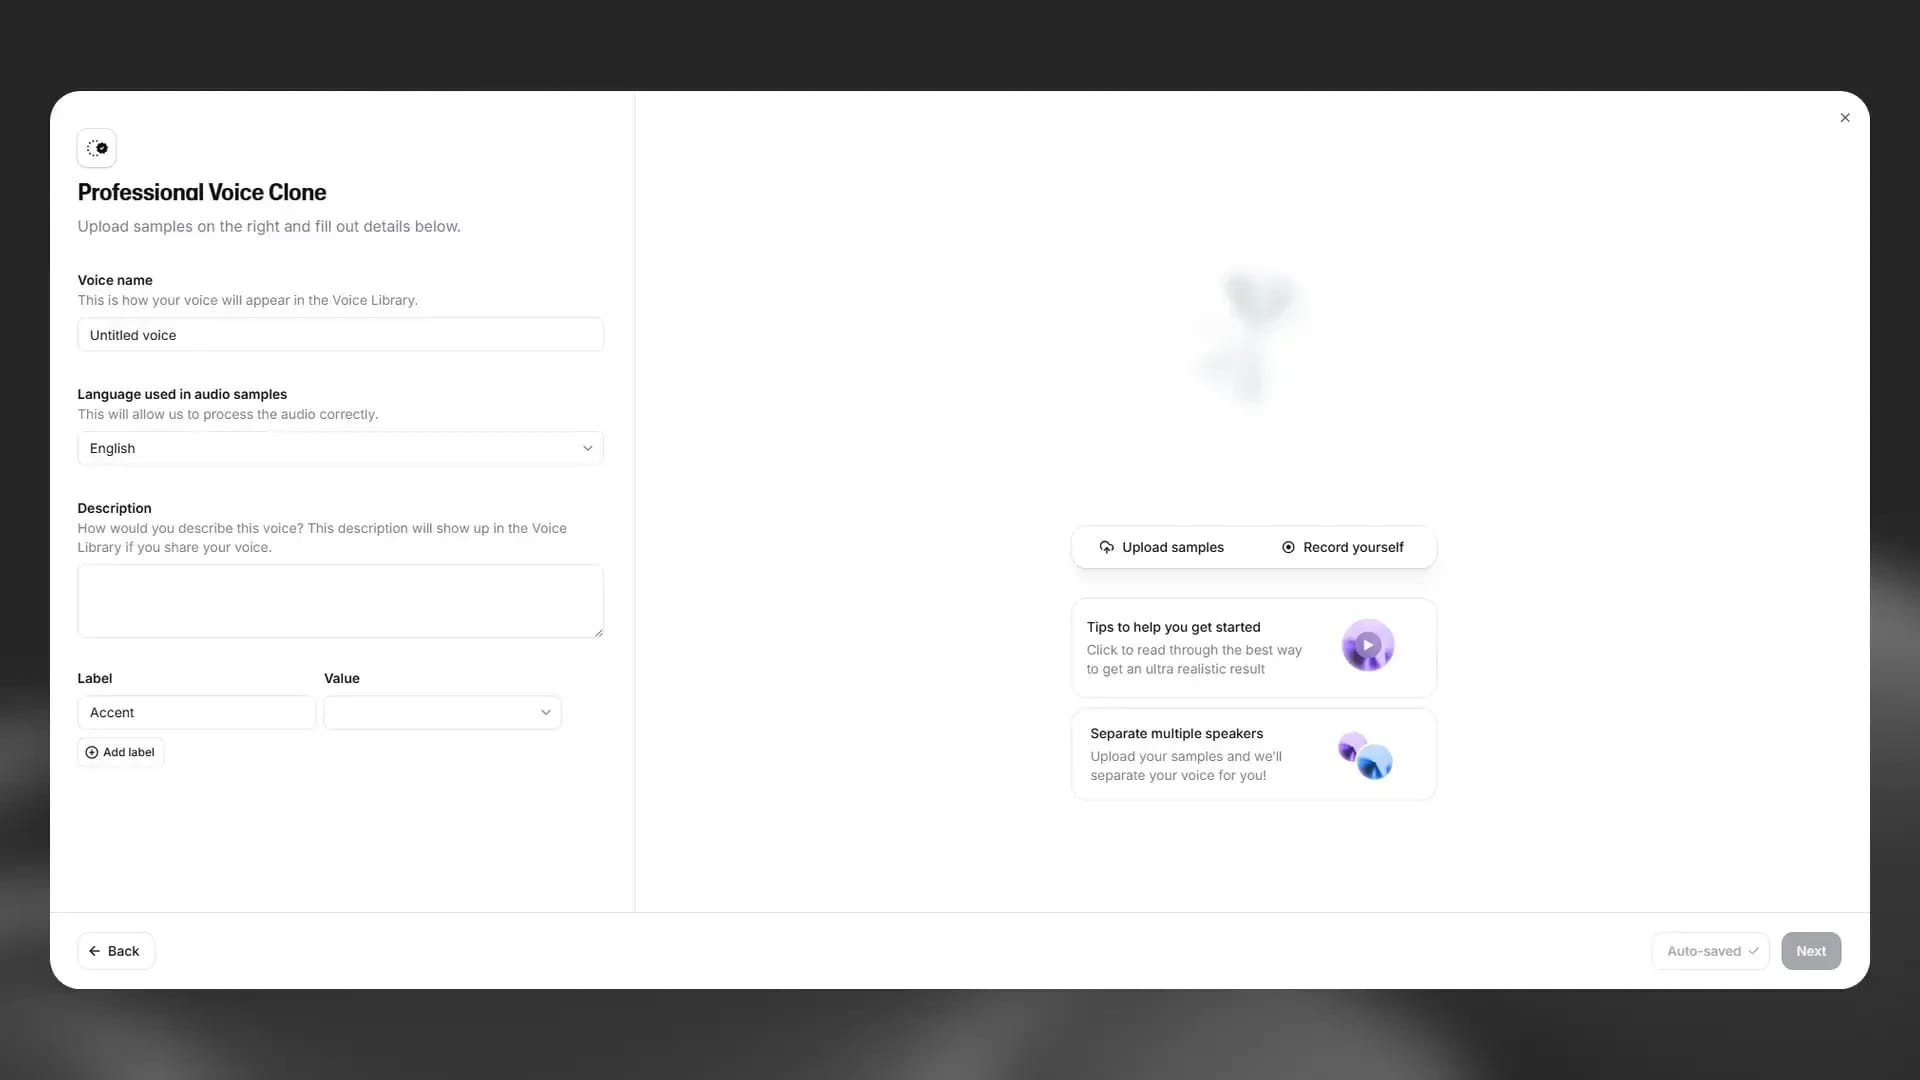
These audio files should be spoken voice only. We currently don’t support singing as an input or output source.
Step 3: Check the sample length feedback
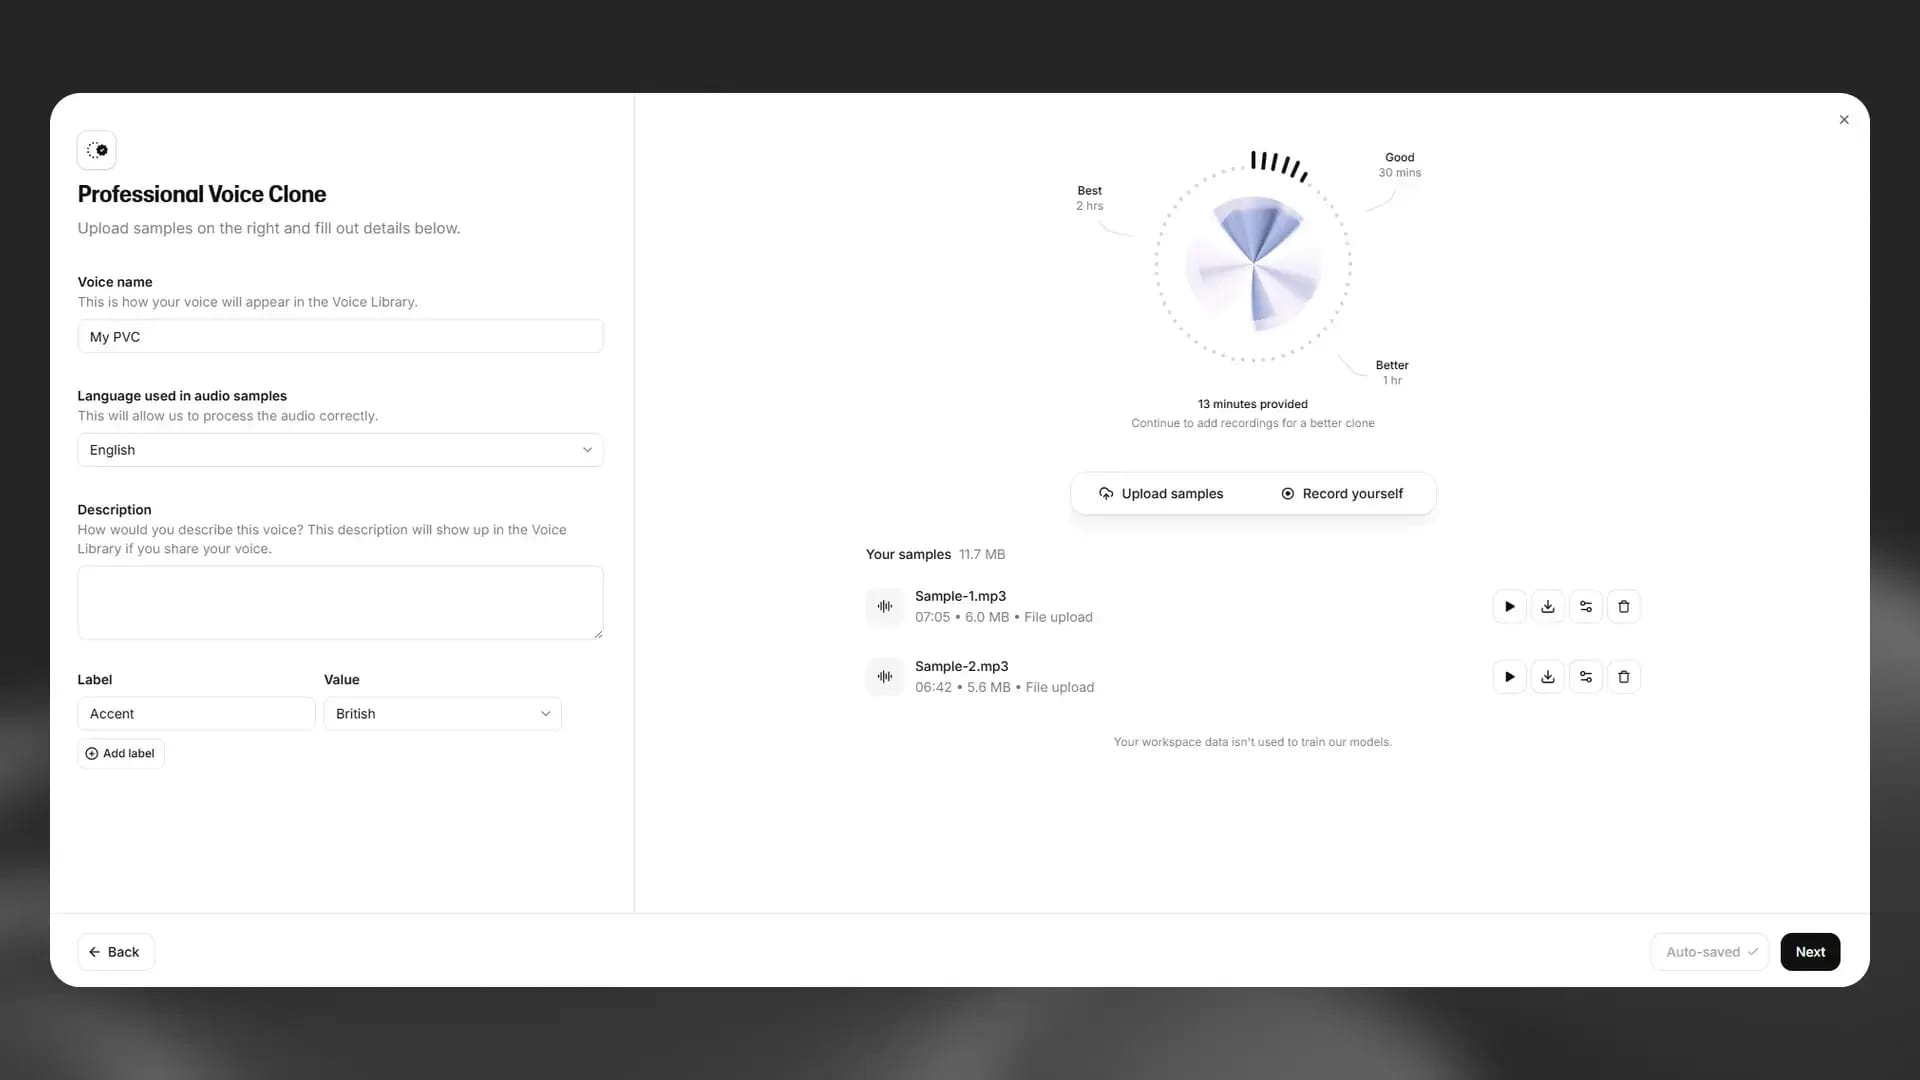
After successfully uploading your audio, make sure to check the feedback on its length. While 1-2 minutes was enough for an instant voice clone, we recommend uploading between one and three hours of audio for this service.
Remember to include audio files that have a variety of emotional content in them. You want a diverse selection of studio-ready content to give our models the best possible information to work with.
Step 4: Process audio samples to improve quality
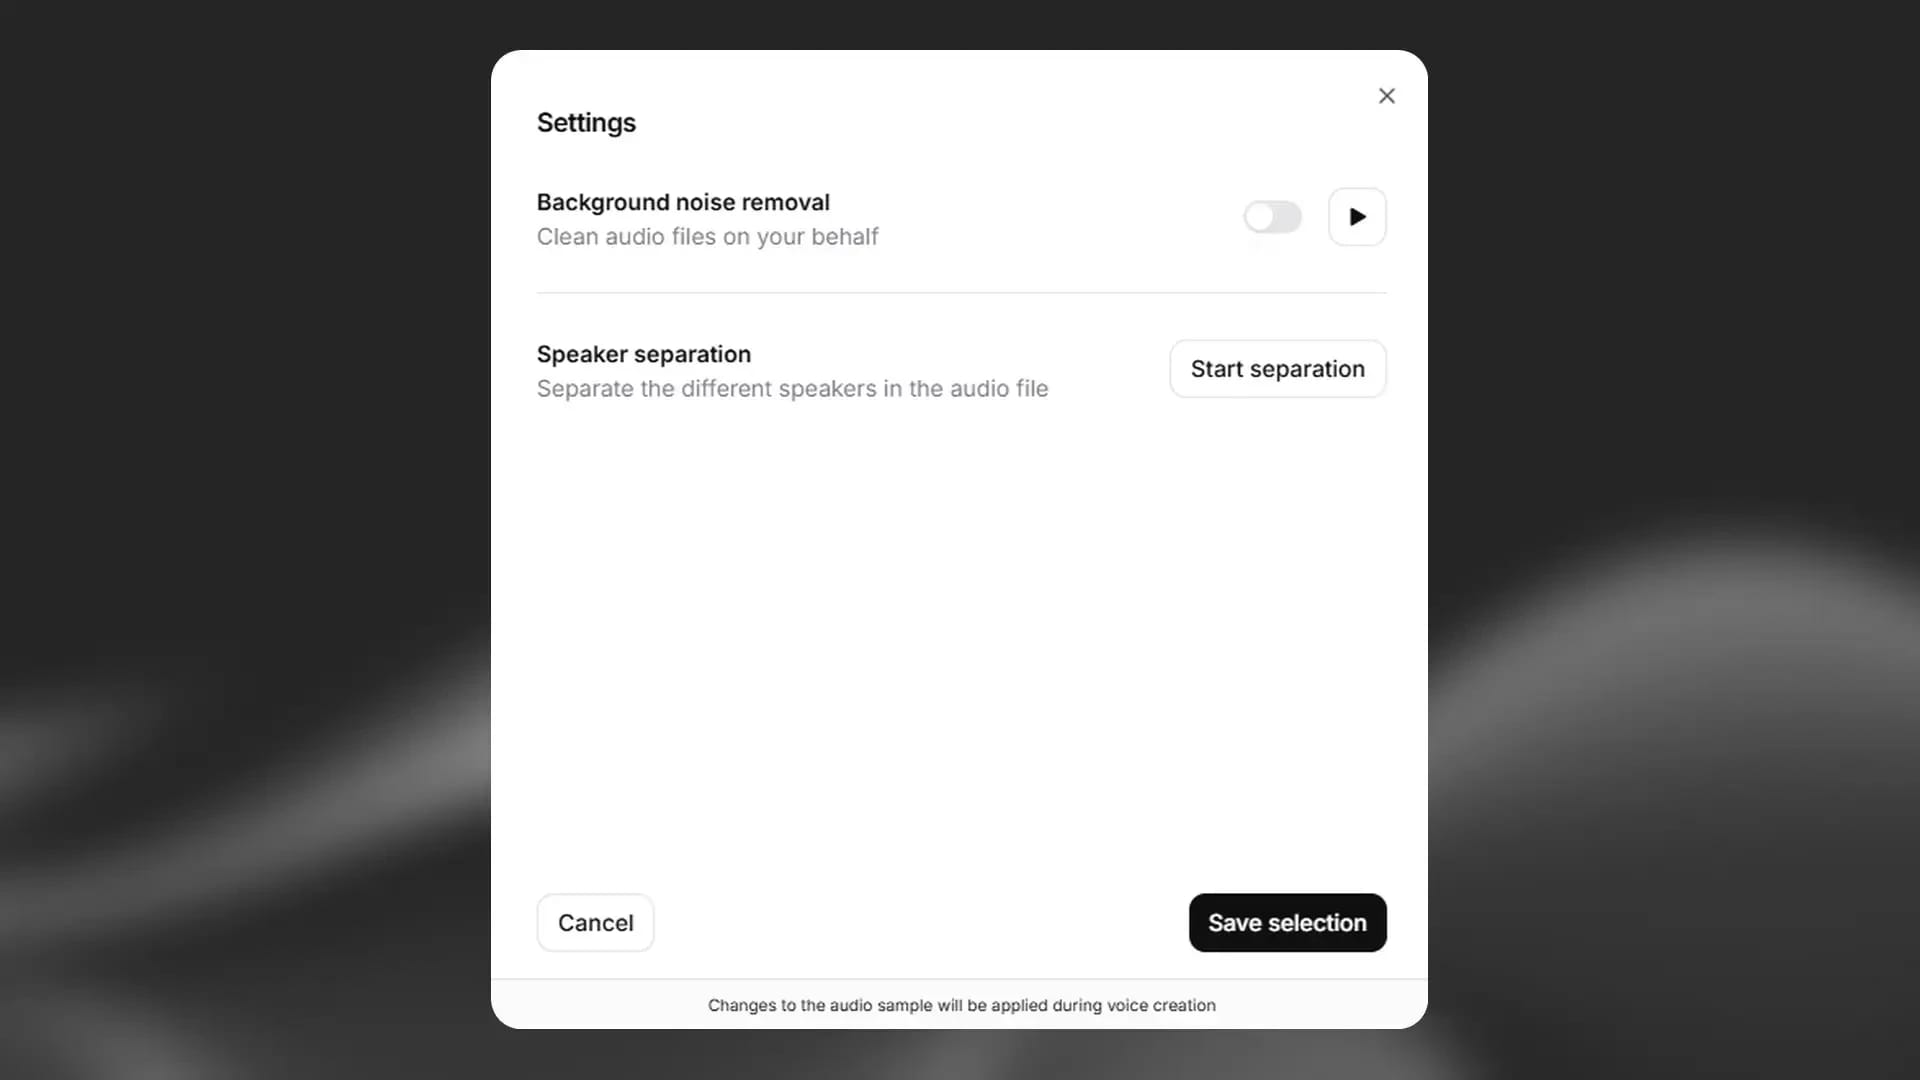
Within the Professional Voice Cloning platform, you can improve the quality of your audio samples directly. From removing background noise to separating out different speakers, ElevenLabs helps you create high-quality audio inputs.
While not absolutely necessary, this stage is useful as it will improve the quality of your final voice clone model.
Step 5: Verify your own voice for security
ElevenLabs requires verification when creating a professional voice clone. After you’ve uploaded everything, we’ll ask you to record a short clip directly into the interface. If possible, use the same microphone and room setup as your training recordings here, matching the tone and style of delivery as closely as you can.
If verification fails, you’ll be able to try again in 24 hours. If you need to get started before then, you can contact ElevenLabs support directly for help.
Step 6: Wait for the voice fine-tuning process
After you’ve verified your voice, ElevenLabs will then begin fine-tuning your model. Typically, this will take between 3 and 6 hours, though it may run longer than this if many other Professional Voice Clones are in the queue ahead of yours.
To monitor the status of your clone, navigate to My Voices. We’ll also send you a notification once your voice model is ready to use.
Step 7: Use your voice clone
Congratulations, you now have a fully functional professional-grade voice clone. The finished model will appear in My Voices, allowing you to use it across all other ElevenLabs products, like Text to Speech, Studio, Dubbing and API, and voice agents.
Select your voice from the voice picker dashboard (using the name you gave it in the production process) to get started.
Best practices for ElevenLabs voice cloning
While following the steps above for either the Instant or Professional Voice Cloning pathways allow you to produce a clone, there are a few extra steps you can follow beforehand. These tips are small adjustments you can make to either your recording tools or strategy to improve the quality of your voice clone.
These following best practices for AI voice cloning apply for instant and professional recreations:
- Room acoustics and background noise: How clean your audio is directly influences the final quality. Make sure to record somewhere with no background noise or echo. For professional recordings, a recording booth works great. If you’re wanting to access that quality without booking a studio, look to see if a local coworking space has any sound-proof pods to make use of.
- Microphone distance: You want to be roughly two fists away from the microphone when you’re speaking. While this is a good rule to follow, check the specifications of your microphone for more details.
- Emotional range in your samples: An AI model will use the natural prosody and speech identifiers of your voice. If your performance is flat, your model might bear the same lacking delivery. Give it your all, including a range of emotional samples that show off your natural style of speaking in different contexts.
- Sentence variety vs. reading a script: Reading a script out loud is a useful place to start for providing a longer sample but may fall into feeling rehearsed or unnatural. Especially if you’re reading it for the first time, you might not accurately portray the expected emotional nuance of a sentence. To get the balance right, provide a range of different scripted passages with a more conversational delivery.
By following these best practices, you’ll provide a higher quality input for ElevenLabs to work with. From there, we’ll be able to create a voice clone that’s more accurate to your vocal identity.
How can you use an ElevenLabs voice clone?
After going through the process of creating a professional or instant voice clone with ElevenLabs, your voice will appear in My Voices. Once there, you can access it from every other ElevenLabs product.
Here’s where you can use your ElevenLabs voice clone:
- Text to Speech in the app: ElevenLabs Text to Speech playground lets you select your voice and have it read anything you enter into the space. You’ll use this for one-off voice generations, like voiceovers or for podcast intros. Remember to adjust style, similarity, and stability in the real-time settings to make the voice feel as correct as possible.
- Via API: You can use the List Voices API endpoint to return a list of all the voices available to your API calls. Every voice has a unique voice ID that you can use, implementing it wherever you connect ElevenAPI.
- In a voice agent: Connect your ElevenLabs voice clone to an agent to let it use your voice when speaking. Especially for businesses that want a consistent voice presence across different platforms, this will help create a branded approach to agents.
- Across languages: Your voice clone works across 32 languages, letting you translate content and produce it in your voice. Even without vocal samples in that language, ElevenCreative closely matches prosody and emotional qualities of your speech across different languages.
Deployed across all our products, you’re ready to bring your voice to life and start producing high-quality content at scale.
Clone your voice with ElevenCreative
Whether you’re a content creator looking to accelerate video production or are simply looking to preserve your voice, ElevenLabs voice cloning is simple, fast, and effective.
Instant Voice Cloning is available on the free plan and only takes a few minutes. With the creator plan, you can get started with Professional Voice Cloning. Learn more about voice cloning on ElevenLabs or sign-up to clone your voice today.
FAQ

Jack Limebear is on the Growth team, acting as a content writer and strategist across the blog and insights pages. Before ElevenLabs, he spent over a decade leading content strategy for organizations ranging from fast-growing SaaS startups to Fortune 500 companies. He holds a Master's degree in English Literature from the University of Cambridge.