文字起こしTelegramボット

Supabase Edge FunctionsでDenoとTypeScriptを使用し、90以上の言語でオーディオとビデオメッセージを文字起こしするTelegramボットを構築します。

ハウツーガイド · スピーチtoテキスト クイックスタートを完了し、Telegramボットトークンと Supabaseアカウントを持っていることを前提としています。

はじめに

このチュートリアルでは、スピーチtoテキストAPIを通じてTypeScriptとElevenLabs Scribeモデルを使用し、90以上の言語でオーディオメッセージとビデオメッセージを文字起こしするTelegramボットの作成方法を学びます。

必要なもの

セットアップ

Telegramボットを登録する

BotFatherを使って新しいTelegramボットを作成します。/newbotコマンドを実行し、手順に従って新しいボットを作成してください。最後に、秘密のボットトークンを受け取ります。次のステップで使用するため、安全な場所に記録しておきましょう。
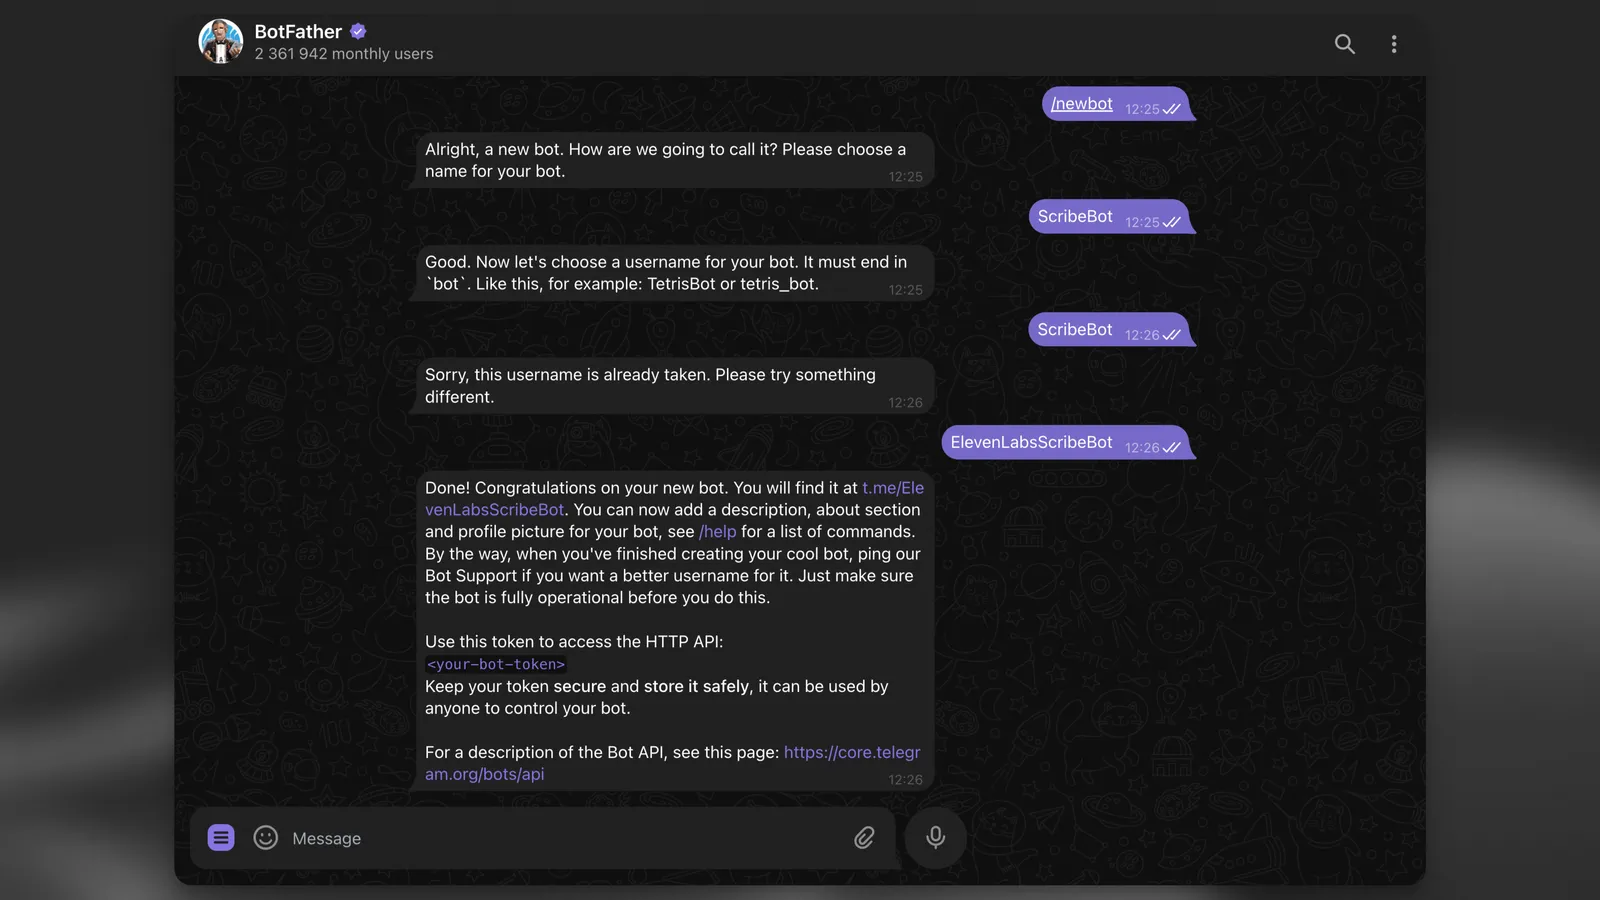
BotFather

Supabaseプロジェクトをローカルに作成する

Supabase CLIをインストールしたら、次のコマンドを実行してローカルに新しいSupabaseプロジェクトを作成します。

supabase init

文字起こし結果を記録するデータベーステーブルを作成する

次に、文字起こし結果を記録する新しいデータベーステーブルを作成します。

supabase migrations new init

これにより、supabase/migrationsディレクトリに新しいマイグレーションファイルが作成されます。ファイルを開き、次のSQLを追加します。

supabase/migrations/init.sql
CREATE TABLE IF NOT EXISTS transcription_logs (
id BIGSERIAL PRIMARY KEY,
file_type VARCHAR NOT NULL,
duration INTEGER NOT NULL,
chat_id BIGINT NOT NULL,
message_id BIGINT NOT NULL,
username VARCHAR,
transcript TEXT,
language_code VARCHAR,
created_at TIMESTAMP WITH TIME ZONE DEFAULT CURRENT_TIMESTAMP,
error TEXT
);
ALTER TABLE transcription_logs ENABLE ROW LEVEL SECURITY;

Telegram webhookリクエストを処理するSupabase Edge Functionを作成する

次に、Telegram webhookリクエストを処理する新しいEdge Functionを作成します。

supabase functions new scribe-bot

VS CodeまたはCursorを使用している場合、CLIで「Generate VS Code settings for Deno? [y/N]」と表示されたらyを選択してください。

環境変数を設定する

supabase/functionsディレクトリ内に新しい.envファイルを作成し、以下の変数を追加します。

supabase/functions/.env
# Find / create an API key at https://elevenlabs.io/app/settings/api-keys
ELEVENLABS_API_KEY=your_api_key
# The bot token you received from the BotFather.
TELEGRAM_BOT_TOKEN=your_bot_token
# A random secret chosen by you to secure the function.
FUNCTION_SECRET=random_secret

依存関係

このプロジェクトでは、いくつかの依存関係を使用します。

  • Telegram webhookリクエストを処理するオープンソースのgrammY Framework。
  • Supabaseデータベースと連携するための@supabase/supabase-jsライブラリ。
  • スピーチtoテキストAPIと連携するためのElevenLabs JavaScript SDK。

Supabase Edge FunctionはDenoランタイムを使用するため、依存関係をインストールする必要はありません。npm:プレフィックスを使ってインポートできます。

Telegramボットを実装する

新しく作成したscribe-bot/index.tsファイルに、次のコードを追加します。

supabase/functions/scribe-bot/index.ts
import { Bot, webhookCallback } from "https://deno.land/x/grammy@v1.34.0/mod.ts";
import "jsr:@supabase/functions-js/edge-runtime.d.ts";
import { createClient } from "jsr:@supabase/supabase-js@2";
import { ElevenLabsClient } from "npm:elevenlabs@1.50.5";
console.log(`Function "elevenlabs-scribe-bot" up and running!`);
const elevenlabs = new ElevenLabsClient({
apiKey: Deno.env.get("ELEVENLABS_API_KEY") || "",
});
const supabase = createClient(
Deno.env.get("SUPABASE_URL") || "",
Deno.env.get("SUPABASE_SERVICE_ROLE_KEY") || ""
);
async function scribe({
fileURL,
fileType,
duration,
chatId,
messageId,
username,
}: {
fileURL: string;
fileType: string;
duration: number;
chatId: number;
messageId: number;
username: string;
}) {
let transcript: string | null = null;
let languageCode: string | null = null;
let errorMsg: string | null = null;
try {
const sourceFileArrayBuffer = await fetch(fileURL).then((res) => res.arrayBuffer());
const sourceBlob = new Blob([sourceFileArrayBuffer], {
type: fileType,
});
const scribeResult = await elevenlabs.speechToText.convert({
file: sourceBlob,
model_id: "scribe_v2",
tag_audio_events: false,
});
transcript = scribeResult.text;
languageCode = scribeResult.language_code;
// Reply to the user with the transcript
await bot.api.sendMessage(chatId, transcript, {
reply_parameters: { message_id: messageId },
});
} catch (error) {
errorMsg = error.message;
console.log(errorMsg);
await bot.api.sendMessage(chatId, "Sorry, there was an error. Please try again.", {
reply_parameters: { message_id: messageId },
});
}
// Write log to Supabase.
const logLine = {
file_type: fileType,
duration,
chat_id: chatId,
message_id: messageId,
username,
language_code: languageCode,
error: errorMsg,
};
console.log({ logLine });
await supabase.from("transcription_logs").insert({ ...logLine, transcript });
}
const telegramBotToken = Deno.env.get("TELEGRAM_BOT_TOKEN");
const bot = new Bot(telegramBotToken || "");
const startMessage = `Welcome to the ElevenLabs Scribe Bot\\! I can transcribe speech in 90\\+ languages with super high accuracy\\!
\nTry it out by sending or forwarding me a voice message, video, or audio file\\!
\n[Learn more about Scribe](https://elevenlabs.io/speech-to-text) or [build your own bot](https://elevenlabs.io/developers/guides/cookbooks/speech-to-text/telegram-bot)\\!
`;
bot.command("start", (ctx) => ctx.reply(startMessage.trim(), { parse_mode: "MarkdownV2" }));
bot.on([":voice", ":audio", ":video"], async (ctx) => {
try {
const file = await ctx.getFile();
const fileURL = `https://api.telegram.org/file/bot${telegramBotToken}/${file.file_path}`;
const fileMeta = ctx.message?.video ?? ctx.message?.voice ?? ctx.message?.audio;
if (!fileMeta) {
return ctx.reply("No video|audio|voice metadata found. Please try again.");
}
// Run the transcription in the background.
EdgeRuntime.waitUntil(
scribe({
fileURL,
fileType: fileMeta.mime_type!,
duration: fileMeta.duration,
chatId: ctx.chat.id,
messageId: ctx.message?.message_id!,
username: ctx.from?.username || "",
})
);
// Reply to the user immediately to let them know we received their file.
return ctx.reply("Received. Scribing...");
} catch (error) {
console.error(error);
return ctx.reply(
"Sorry, there was an error getting the file. Please try again with a smaller file!"
);
}
});
const handleUpdate = webhookCallback(bot, "std/http");
Deno.serve(async (req) => {
try {
const url = new URL(req.url);
if (url.searchParams.get("secret") !== Deno.env.get("FUNCTION_SECRET")) {
return new Response("not allowed", { status: 405 });
}
return await handleUpdate(req);
} catch (err) {
console.error(err);
}
});

コードの詳細

コードには注目すべき点がいくつかあります。順に見ていきましょう。

1

受信リクエストの処理

受信リクエストを処理するには、Deno.serveハンドラーを使用します。ハンドラーはリクエストに正しいシークレットがあるかを確認してから、handleUpdate関数にリクエストを渡します。

const handleUpdate = webhookCallback(bot, 'std/http');
Deno.serve(async (req) => {
try {
const url = new URL(req.url);
if (url.searchParams.get('secret') !== Deno.env.get('FUNCTION_SECRET')) {
return new Response('not allowed', { status: 405 });
}
return await handleUpdate(req);
} catch (err) {
console.error(err);
}
});
2

音声・オーディオ・ビデオメッセージを処理する

grammY Frameworkには、特定のメッセージタイプをフィルタリングする便利な方法があります。この例では、ボットは音声、オーディオ、ビデオメッセージを待ち受けます。

リクエストコンテキストを使用して、ボットはファイルメタデータを抽出し、Supabase Background TasksのEdgeRuntime.waitUntilでバックグラウンドの文字起こしを実行します。

これにより、ユーザーにはすぐに応答しつつ、ファイルの文字起こしをバックグラウンドで処理できます。

bot.on([':voice', ':audio', ':video'], async (ctx) => {
try {
const file = await ctx.getFile();
const fileURL = `https://api.telegram.org/file/bot${telegramBotToken}/${file.file_path}`;
const fileMeta = ctx.message?.video ?? ctx.message?.voice ?? ctx.message?.audio;
if (!fileMeta) {
return ctx.reply('No video|audio|voice metadata found. Please try again.');
}
// Run the transcription in the background.
EdgeRuntime.waitUntil(
scribe({
fileURL,
fileType: fileMeta.mime_type!,
duration: fileMeta.duration,
chatId: ctx.chat.id,
messageId: ctx.message?.message_id!,
username: ctx.from?.username || '',
})
);
// Reply to the user immediately to let them know we received their file.
return ctx.reply('Received. Scribing...');
} catch (error) {
console.error(error);
return ctx.reply(
'Sorry, there was an error getting the file. Please try again with a smaller file!'
);
}
});
3

ElevenLabs APIで文字起こしする

最後に、バックグラウンドワーカーでボットはElevenLabs JavaScript SDKを使用してファイルを文字起こしします。文字起こしが完了すると、ボットはトランスクリプトをユーザーに返信し、supabase-jsを使ってSupabaseデータベースにログエントリを書き込みます。

const elevenlabs = new ElevenLabsClient({
apiKey: Deno.env.get('ELEVENLABS_API_KEY') || '',
});
const supabase = createClient(
Deno.env.get('SUPABASE_URL') || '',
Deno.env.get('SUPABASE_SERVICE_ROLE_KEY') || ''
);
async function scribe({
fileURL,
fileType,
duration,
chatId,
messageId,
username,
}: {
fileURL: string;
fileType: string;
duration: number;
chatId: number;
messageId: number;
username: string;
}) {
let transcript: string | null = null;
let languageCode: string | null = null;
let errorMsg: string | null = null;
try {
const sourceFileArrayBuffer = await fetch(fileURL).then((res) => res.arrayBuffer());
const sourceBlob = new Blob([sourceFileArrayBuffer], {
type: fileType,
});
const scribeResult = await elevenlabs.speechToText.convert({
file: sourceBlob,
model_id: 'scribe_v2',
tag_audio_events: false,
});
transcript = scribeResult.text;
languageCode = scribeResult.language_code;
// Reply to the user with the transcript
await bot.api.sendMessage(chatId, transcript, {
reply_parameters: { message_id: messageId },
});
} catch (error) {
errorMsg = error.message;
console.log(errorMsg);
await bot.api.sendMessage(chatId, 'Sorry, there was an error. Please try again.', {
reply_parameters: { message_id: messageId },
});
}
// Write log to Supabase.
const logLine = {
file_type: fileType,
duration,
chat_id: chatId,
message_id: messageId,
username,
language_code: languageCode,
error: errorMsg,
};
console.log({ logLine });
await supabase.from('transcription_logs').insert({ ...logLine, transcript });
}

Supabaseにデプロイする

まだの場合は、database.newで新しいSupabaseアカウントを作成し、ローカルプロジェクトをSupabaseアカウントにリンクします。

supabase link

データベースマイグレーションを適用する

次のコマンドを実行して、supabase/migrationsディレクトリのデータベースマイグレーションを適用します。

supabase db push

Supabaseダッシュボードのテーブルエディターに移動すると、空のtranscription_logsテーブルが表示されます。
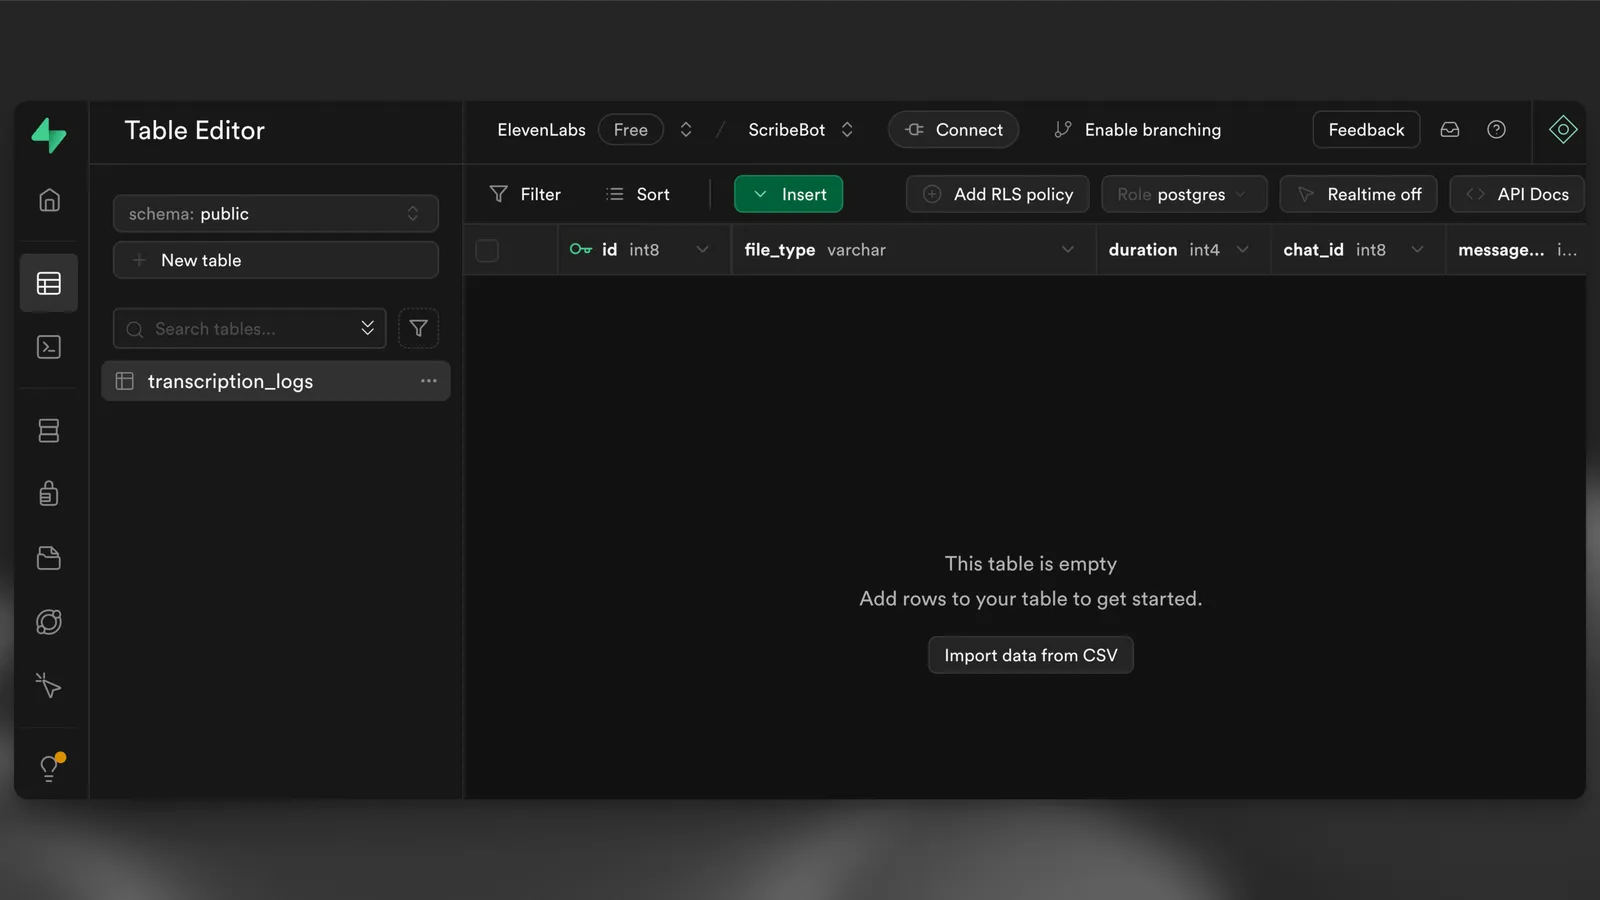
空のテーブル

最後に、次のコマンドを実行してEdge Functionをデプロイします。

supabase functions deploy --no-verify-jwt scribe-bot

SupabaseダッシュボードのEdge Functionsビューに移動すると、scribe-bot関数がデプロイされています。後で必要になるため、関数URLを控えておいてください。https://<project-ref>.functions.supabase.co/scribe-botのような形式です。
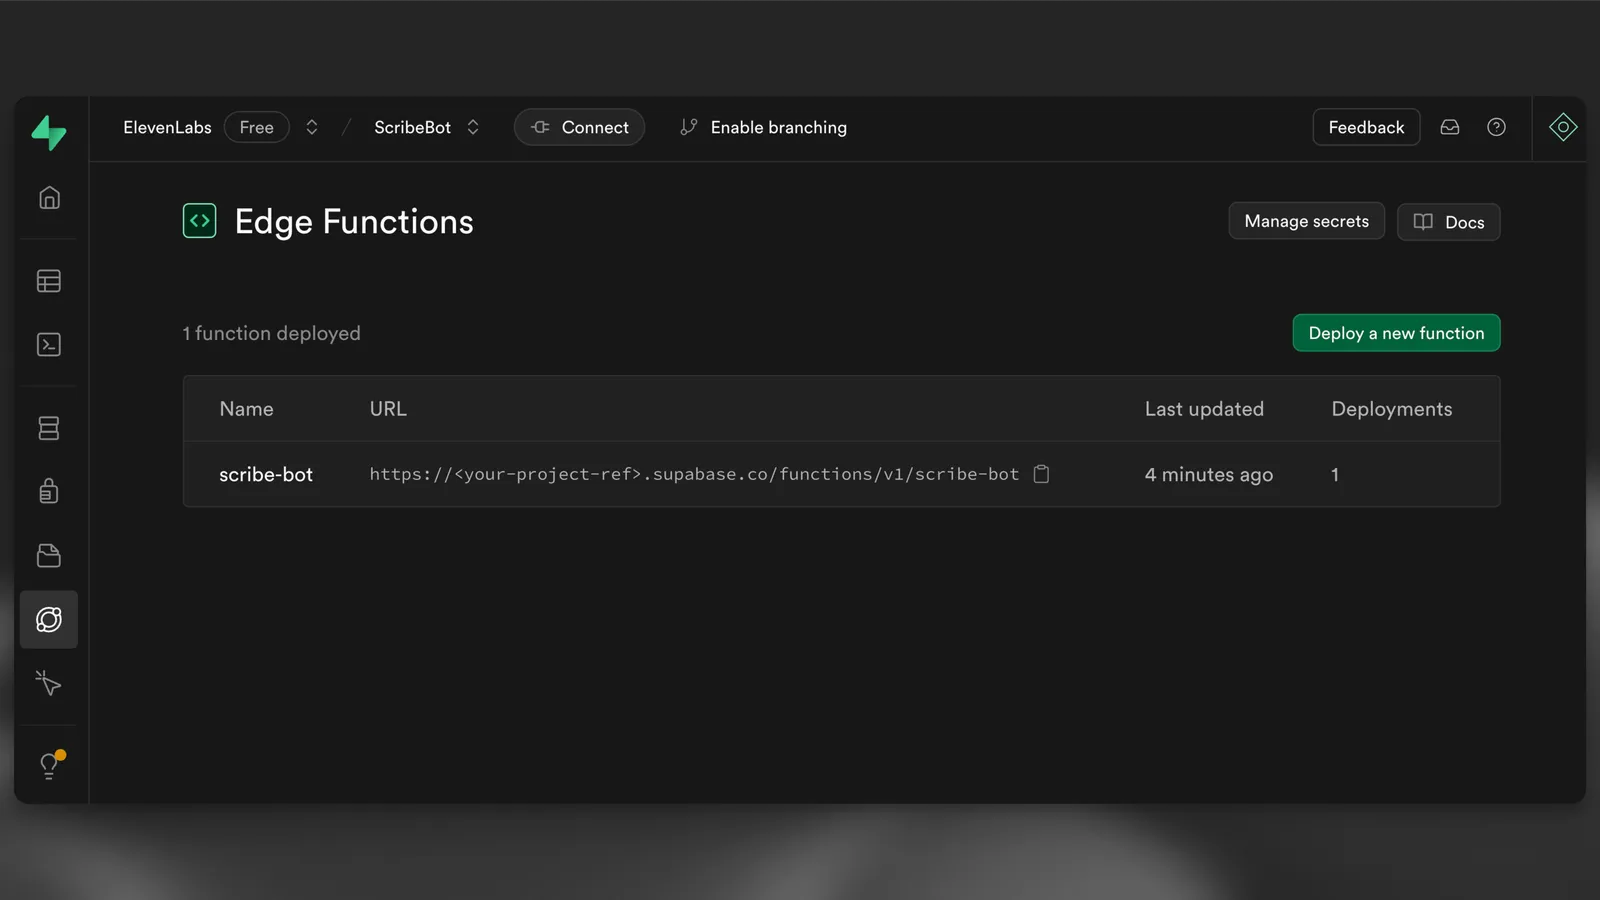
デプロイされたEdge Function

webhookを設定する

ボットのwebhook URLをhttps://<PROJECT_REFERENCE>.functions.supabase.co/telegram-botに設定します(<...>をそれぞれの値に置き換えてください)。これを行うには、たとえばブラウザで次のURLにGETリクエストを実行します。

https://api.telegram.org/bot<TELEGRAM_BOT_TOKEN>/setWebhook?url=https://<PROJECT_REFERENCE>.supabase.co/functions/v1/scribe-bot?secret=<FUNCTION_SECRET>

FUNCTION_SECRETは、.envファイルに設定したシークレットです。
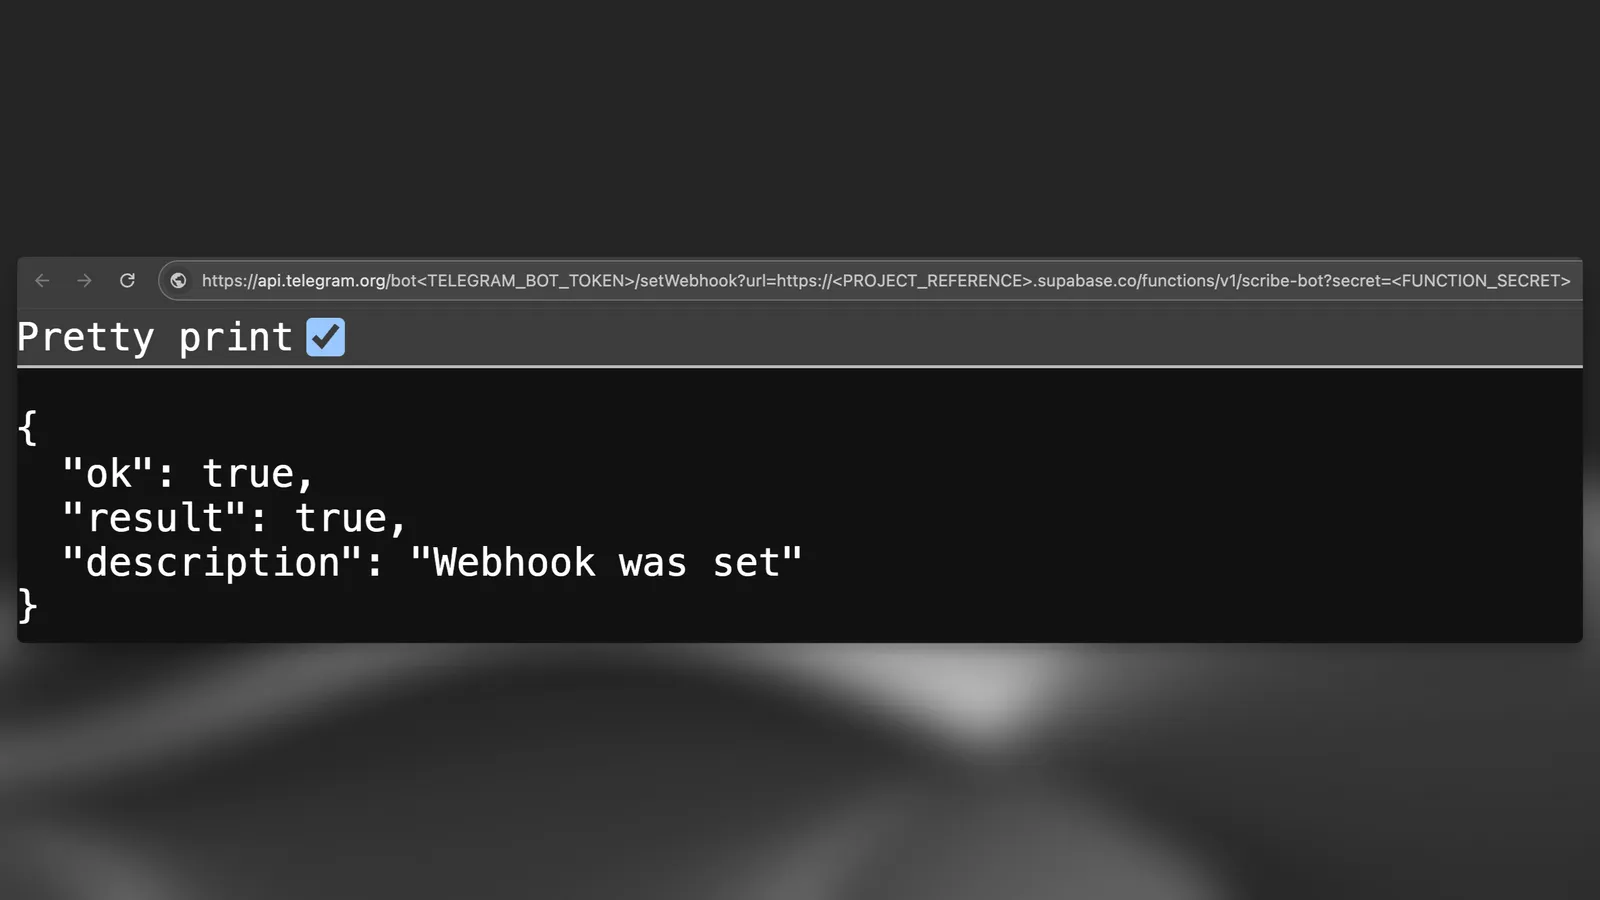
webhookを設定

関数のシークレットを設定する

すべてのシークレットをローカルで設定したら、次のコマンドを実行してSupabaseプロジェクトにシークレットを設定できます。

supabase secrets set --env-file supabase/functions/.env

ボットをテストする

最後に、音声メッセージ、オーディオファイル、またはビデオファイルを送信してボットをテストできます。
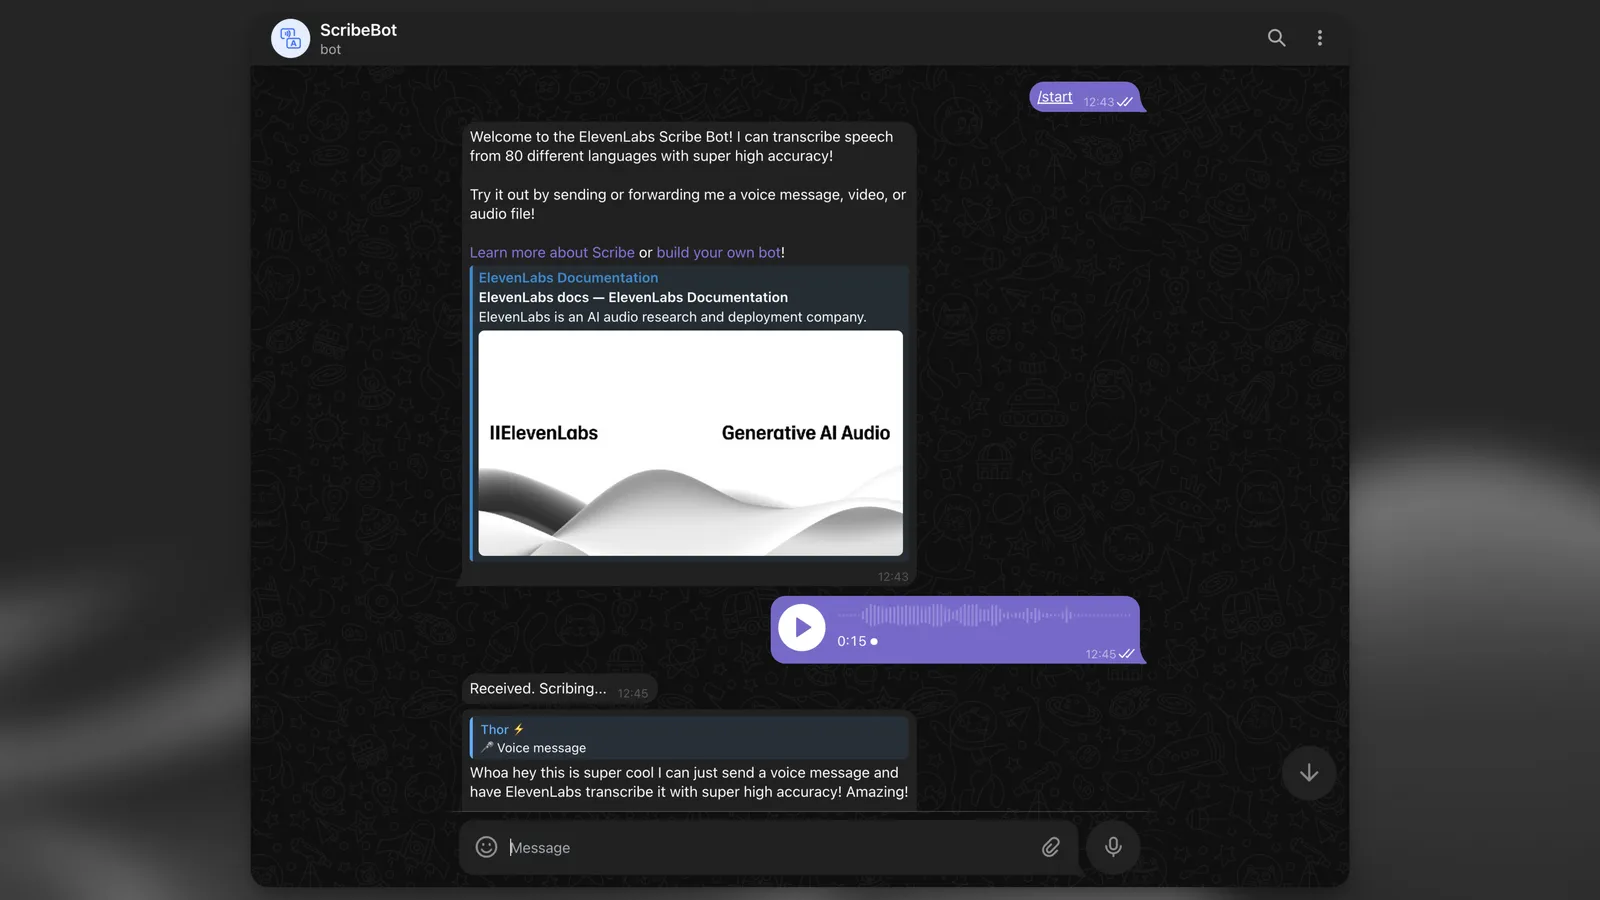
ボットをテスト

トランスクリプトが返信として表示されたら、Supabaseダッシュボードのテーブルエディターに戻ります。transcription_logsテーブルに新しい行が表示されます。
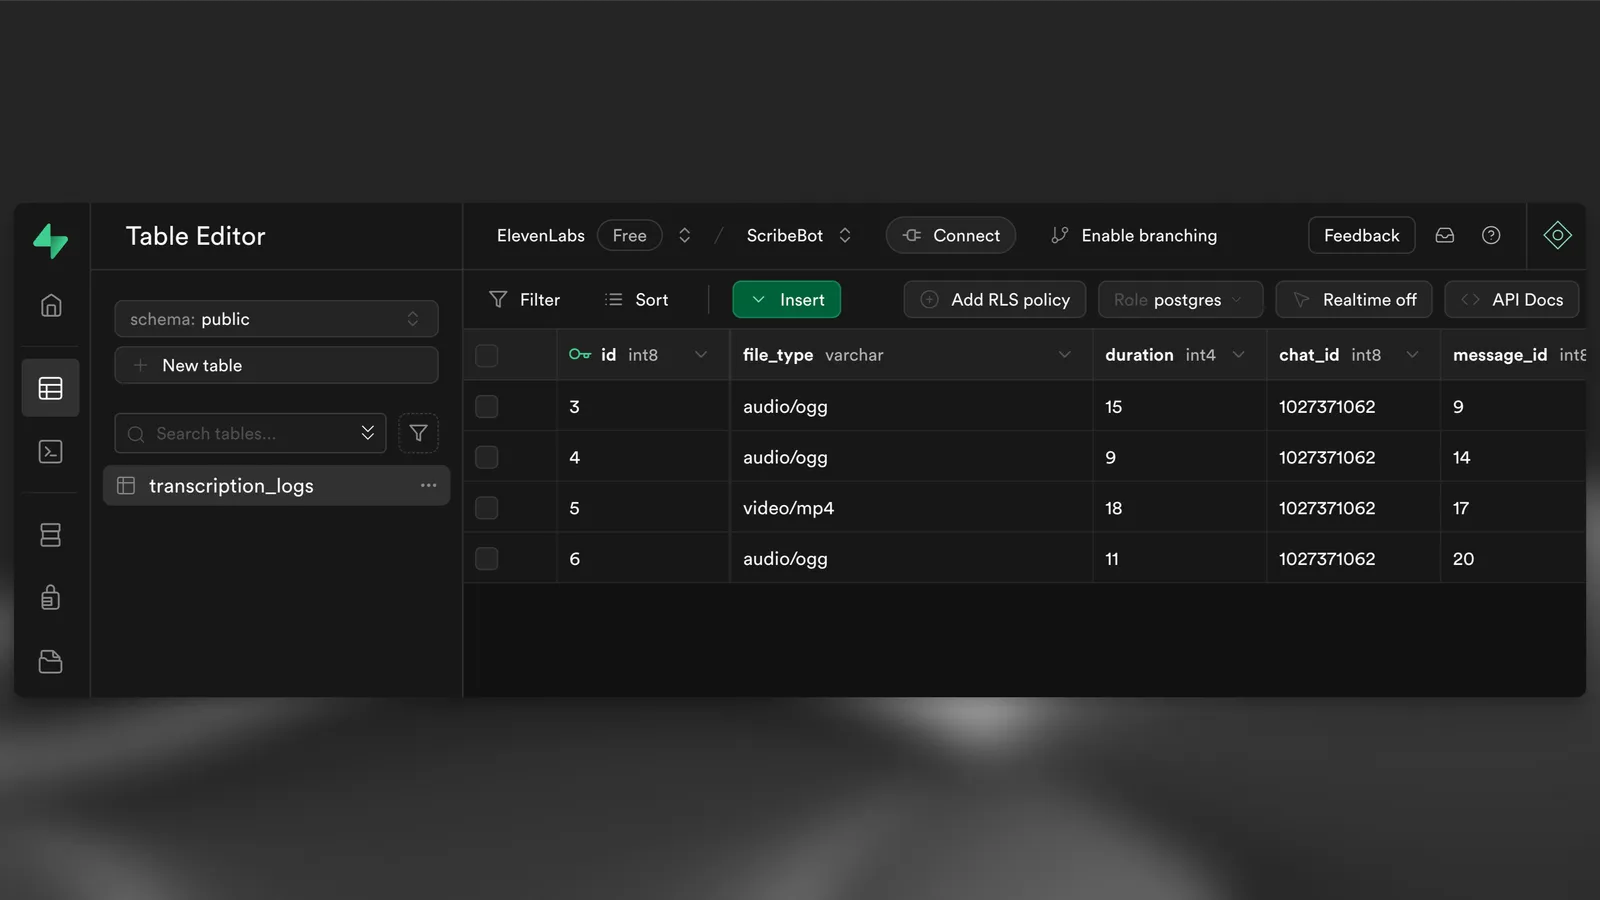
テーブルの新しい行

次のステップ