ट्रांसक्रिप्शन Telegram बॉट

Supabase Edge Functions में Deno के साथ TypeScript इस्तेमाल करके ऐसा Telegram बॉट बनाएं, जो 90+ भाषाओं में ऑडियो और वीडियो संदेशों को ट्रांसक्राइब करे।

कैसे करें गाइड · यह मानता है कि आपने स्पीच टू टेक्स्ट क्विकस्टार्ट पूरा कर लिया है और आपके पास Telegram bot token और Supabase अकाउंट है।

परिचय

इस ट्यूटोरियल में आप सीखेंगे कि स्पीच-टू-टेक्स्ट API के ज़रिए TypeScript और ElevenLabs Scribe मॉडल का उपयोग करके 90+ भाषाओं में ऑडियो और वीडियो संदेशों को ट्रांसक्राइब करने वाला Telegram bot कैसे बनाएं।

ज़रूरी चीज़ें

सेटअप

Telegram bot रजिस्टर करें

नया Telegram bot बनाने के लिए BotFather का इस्तेमाल करें। /newbot कमांड चलाएं और नया bot बनाने के लिए निर्देशों का पालन करें। अंत में, आपको अपना गुप्त bot token मिलेगा। अगले चरण के लिए इसे सुरक्षित रूप से नोट कर लें।
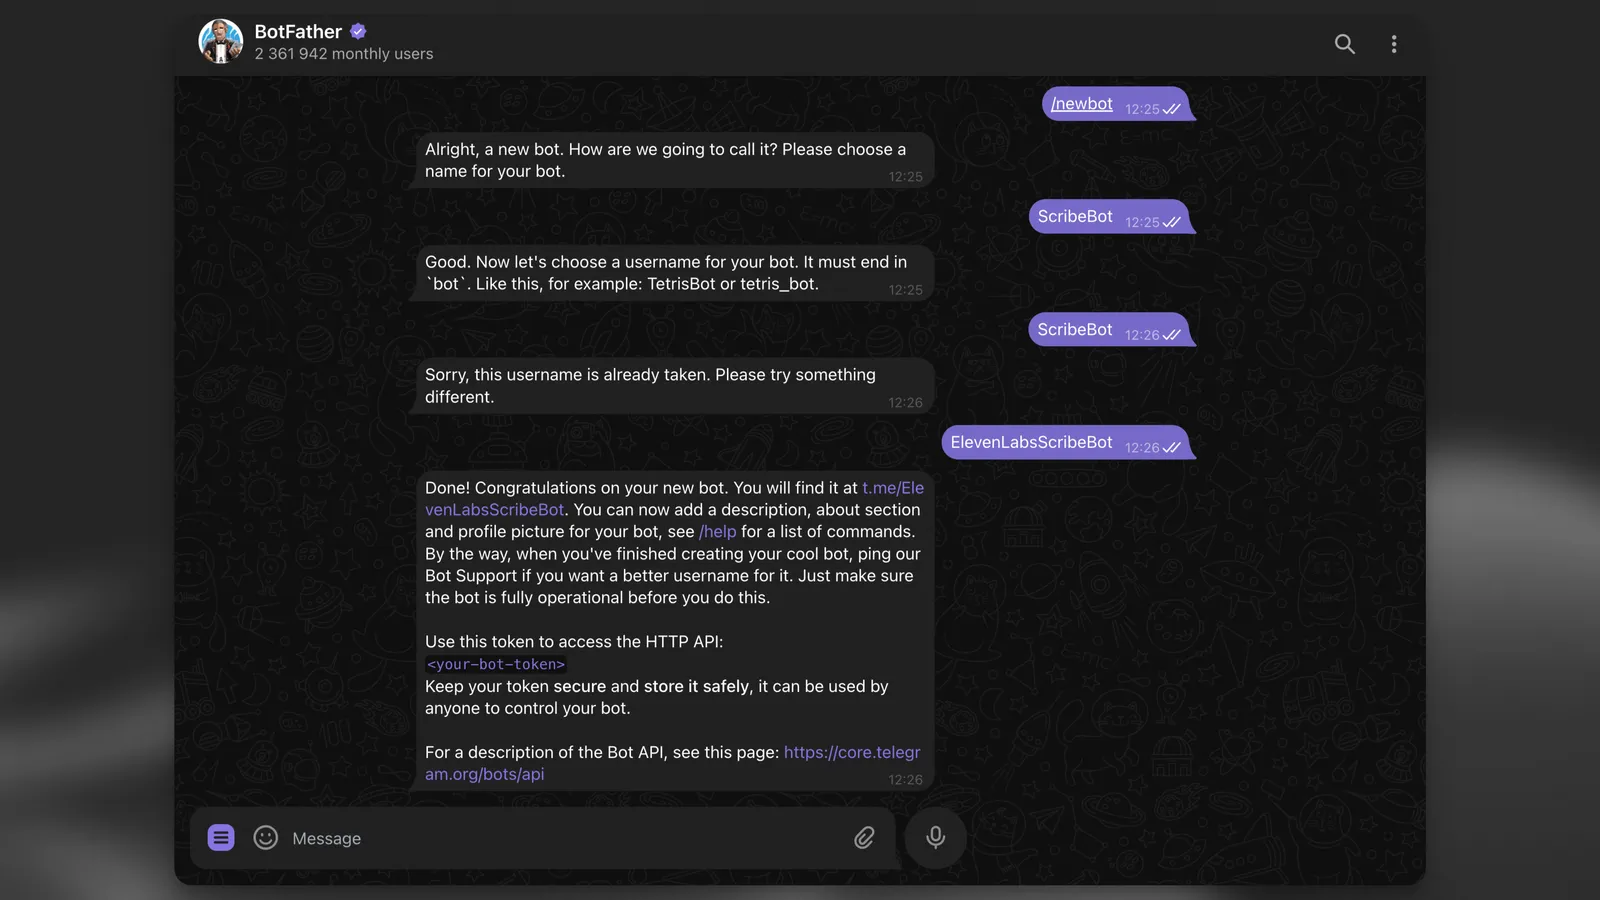
BotFather

लोकल रूप से Supabase प्रोजेक्ट बनाएं

Supabase CLI इंस्टॉल करने के बाद, लोकल रूप से नया Supabase प्रोजेक्ट बनाने के लिए यह कमांड चलाएं:

supabase init

ट्रांसक्रिप्शन नतीजे लॉग करने के लिए डेटाबेस टेबल बनाएं

अब, ट्रांसक्रिप्शन नतीजे लॉग करने के लिए नई डेटाबेस टेबल बनाएं:

supabase migrations new init

इससे supabase/migrations डायरेक्टरी में नई migration फ़ाइल बनेगी। फ़ाइल खोलें और यह SQL जोड़ें:

supabase/migrations/init.sql
CREATE TABLE IF NOT EXISTS transcription_logs (
id BIGSERIAL PRIMARY KEY,
file_type VARCHAR NOT NULL,
duration INTEGER NOT NULL,
chat_id BIGINT NOT NULL,
message_id BIGINT NOT NULL,
username VARCHAR,
transcript TEXT,
language_code VARCHAR,
created_at TIMESTAMP WITH TIME ZONE DEFAULT CURRENT_TIMESTAMP,
error TEXT
);
ALTER TABLE transcription_logs ENABLE ROW LEVEL SECURITY;

Telegram webhook अनुरोधों को संभालने के लिए Supabase Edge Function बनाएं

अब, Telegram webhook अनुरोधों को संभालने के लिए नया Edge Function बनाएं:

supabase functions new scribe-bot

अगर आप VS Code या Cursor इस्तेमाल कर रहे हैं, तो CLI के “Generate VS Code settings for Deno? [y/N]” पूछने पर y चुनें!

एनवायरनमेंट वैरिएबल सेट करें

supabase/functions डायरेक्टरी में एक नई .env फ़ाइल बनाएं और ये वैरिएबल जोड़ें:

supabase/functions/.env
# Find / create an API key at https://elevenlabs.io/app/settings/api-keys
ELEVENLABS_API_KEY=your_api_key
# The bot token you received from the BotFather.
TELEGRAM_BOT_TOKEN=your_bot_token
# A random secret chosen by you to secure the function.
FUNCTION_SECRET=random_secret

डिपेंडेंसीज़

प्रोजेक्ट कुछ डिपेंडेंसीज़ इस्तेमाल करता है:

  • Telegram webhook अनुरोधों को संभालने के लिए ओपन-सोर्स grammY Framework।
  • Supabase डेटाबेस के साथ काम करने के लिए @supabase/supabase-js लाइब्रेरी।
  • स्पीच-टू-टेक्स्ट API के साथ काम करने के लिए ElevenLabs JavaScript SDK।

Supabase Edge Function Deno runtime का इस्तेमाल करता है, इसलिए आपको डिपेंडेंसीज़ इंस्टॉल करने की ज़रूरत नहीं है। आप उन्हें npm: प्रीफ़िक्स के ज़रिए import कर सकते हैं।

Telegram Bot का कोड लिखें

अपनी नई scribe-bot/index.ts फ़ाइल में यह कोड जोड़ें:

supabase/functions/scribe-bot/index.ts
import { Bot, webhookCallback } from "https://deno.land/x/grammy@v1.34.0/mod.ts";
import "jsr:@supabase/functions-js/edge-runtime.d.ts";
import { createClient } from "jsr:@supabase/supabase-js@2";
import { ElevenLabsClient } from "npm:elevenlabs@1.50.5";
console.log(`Function "elevenlabs-scribe-bot" up and running!`);
const elevenlabs = new ElevenLabsClient({
apiKey: Deno.env.get("ELEVENLABS_API_KEY") || "",
});
const supabase = createClient(
Deno.env.get("SUPABASE_URL") || "",
Deno.env.get("SUPABASE_SERVICE_ROLE_KEY") || ""
);
async function scribe({
fileURL,
fileType,
duration,
chatId,
messageId,
username,
}: {
fileURL: string;
fileType: string;
duration: number;
chatId: number;
messageId: number;
username: string;
}) {
let transcript: string | null = null;
let languageCode: string | null = null;
let errorMsg: string | null = null;
try {
const sourceFileArrayBuffer = await fetch(fileURL).then((res) => res.arrayBuffer());
const sourceBlob = new Blob([sourceFileArrayBuffer], {
type: fileType,
});
const scribeResult = await elevenlabs.speechToText.convert({
file: sourceBlob,
model_id: "scribe_v2",
tag_audio_events: false,
});
transcript = scribeResult.text;
languageCode = scribeResult.language_code;
// Reply to the user with the transcript
await bot.api.sendMessage(chatId, transcript, {
reply_parameters: { message_id: messageId },
});
} catch (error) {
errorMsg = error.message;
console.log(errorMsg);
await bot.api.sendMessage(chatId, "Sorry, there was an error. Please try again.", {
reply_parameters: { message_id: messageId },
});
}
// Write log to Supabase.
const logLine = {
file_type: fileType,
duration,
chat_id: chatId,
message_id: messageId,
username,
language_code: languageCode,
error: errorMsg,
};
console.log({ logLine });
await supabase.from("transcription_logs").insert({ ...logLine, transcript });
}
const telegramBotToken = Deno.env.get("TELEGRAM_BOT_TOKEN");
const bot = new Bot(telegramBotToken || "");
const startMessage = `Welcome to the ElevenLabs Scribe Bot\\! I can transcribe speech in 90\\+ languages with super high accuracy\\!
\nTry it out by sending or forwarding me a voice message, video, or audio file\\!
\n[Learn more about Scribe](https://elevenlabs.io/speech-to-text) or [build your own bot](https://elevenlabs.io/developers/guides/cookbooks/speech-to-text/telegram-bot)\\!
`;
bot.command("start", (ctx) => ctx.reply(startMessage.trim(), { parse_mode: "MarkdownV2" }));
bot.on([":voice", ":audio", ":video"], async (ctx) => {
try {
const file = await ctx.getFile();
const fileURL = `https://api.telegram.org/file/bot${telegramBotToken}/${file.file_path}`;
const fileMeta = ctx.message?.video ?? ctx.message?.voice ?? ctx.message?.audio;
if (!fileMeta) {
return ctx.reply("No video|audio|voice metadata found. Please try again.");
}
// Run the transcription in the background.
EdgeRuntime.waitUntil(
scribe({
fileURL,
fileType: fileMeta.mime_type!,
duration: fileMeta.duration,
chatId: ctx.chat.id,
messageId: ctx.message?.message_id!,
username: ctx.from?.username || "",
})
);
// Reply to the user immediately to let them know we received their file.
return ctx.reply("Received. Scribing...");
} catch (error) {
console.error(error);
return ctx.reply(
"Sorry, there was an error getting the file. Please try again with a smaller file!"
);
}
});
const handleUpdate = webhookCallback(bot, "std/http");
Deno.serve(async (req) => {
try {
const url = new URL(req.url);
if (url.searchParams.get("secret") !== Deno.env.get("FUNCTION_SECRET")) {
return new Response("not allowed", { status: 405 });
}
return await handleUpdate(req);
} catch (err) {
console.error(err);
}
});

कोड को विस्तार से समझें

कोड में कुछ अहम बातें हैं। आइए इन्हें चरण-दर-चरण समझते हैं।

1

आने वाले अनुरोध को संभालना

आने वाले अनुरोध को संभालने के लिए Deno.serve handler इस्तेमाल करें। handler जांचता है कि अनुरोध में सही secret है या नहीं, फिर अनुरोध को handleUpdate फ़ंक्शन में भेजता है।

const handleUpdate = webhookCallback(bot, 'std/http');
Deno.serve(async (req) => {
try {
const url = new URL(req.url);
if (url.searchParams.get('secret') !== Deno.env.get('FUNCTION_SECRET')) {
return new Response('not allowed', { status: 405 });
}
return await handleUpdate(req);
} catch (err) {
console.error(err);
}
});
2

वॉइस, ऑडियो और वीडियो संदेश संभालें

grammY framework, खास तरह के संदेशों के लिए filter करने का आसान तरीका देता है। इस मामले में, bot वॉइस, ऑडियो और वीडियो संदेशों को सुन रहा है।

अनुरोध context का इस्तेमाल करके bot फ़ाइल metadata निकालता है और फिर बैकग्राउंड में ट्रांसक्रिप्शन चलाने के लिए Supabase Background Tasks EdgeRuntime.waitUntil का उपयोग करता है।

इस तरह आप यूज़र को तुरंत जवाब दे सकते हैं और फ़ाइल का ट्रांसक्रिप्शन बैकग्राउंड में संभाल सकते हैं।

bot.on([':voice', ':audio', ':video'], async (ctx) => {
try {
const file = await ctx.getFile();
const fileURL = `https://api.telegram.org/file/bot${telegramBotToken}/${file.file_path}`;
const fileMeta = ctx.message?.video ?? ctx.message?.voice ?? ctx.message?.audio;
if (!fileMeta) {
return ctx.reply('No video|audio|voice metadata found. Please try again.');
}
// Run the transcription in the background.
EdgeRuntime.waitUntil(
scribe({
fileURL,
fileType: fileMeta.mime_type!,
duration: fileMeta.duration,
chatId: ctx.chat.id,
messageId: ctx.message?.message_id!,
username: ctx.from?.username || '',
})
);
// Reply to the user immediately to let them know we received their file.
return ctx.reply('Received. Scribing...');
} catch (error) {
console.error(error);
return ctx.reply(
'Sorry, there was an error getting the file. Please try again with a smaller file!'
);
}
});
3

ElevenLabs API से ट्रांसक्रिप्शन

आखिर में, बैकग्राउंड worker में bot फ़ाइल को ट्रांसक्राइब करने के लिए ElevenLabs JavaScript SDK इस्तेमाल करता है। ट्रांसक्रिप्शन पूरा होने पर bot यूज़र को transcript के साथ जवाब देता है और supabase-js का इस्तेमाल करके Supabase डेटाबेस में log entry लिखता है।

const elevenlabs = new ElevenLabsClient({
apiKey: Deno.env.get('ELEVENLABS_API_KEY') || '',
});
const supabase = createClient(
Deno.env.get('SUPABASE_URL') || '',
Deno.env.get('SUPABASE_SERVICE_ROLE_KEY') || ''
);
async function scribe({
fileURL,
fileType,
duration,
chatId,
messageId,
username,
}: {
fileURL: string;
fileType: string;
duration: number;
chatId: number;
messageId: number;
username: string;
}) {
let transcript: string | null = null;
let languageCode: string | null = null;
let errorMsg: string | null = null;
try {
const sourceFileArrayBuffer = await fetch(fileURL).then((res) => res.arrayBuffer());
const sourceBlob = new Blob([sourceFileArrayBuffer], {
type: fileType,
});
const scribeResult = await elevenlabs.speechToText.convert({
file: sourceBlob,
model_id: 'scribe_v2',
tag_audio_events: false,
});
transcript = scribeResult.text;
languageCode = scribeResult.language_code;
// Reply to the user with the transcript
await bot.api.sendMessage(chatId, transcript, {
reply_parameters: { message_id: messageId },
});
} catch (error) {
errorMsg = error.message;
console.log(errorMsg);
await bot.api.sendMessage(chatId, 'Sorry, there was an error. Please try again.', {
reply_parameters: { message_id: messageId },
});
}
// Write log to Supabase.
const logLine = {
file_type: fileType,
duration,
chat_id: chatId,
message_id: messageId,
username,
language_code: languageCode,
error: errorMsg,
};
console.log({ logLine });
await supabase.from('transcription_logs').insert({ ...logLine, transcript });
}

Supabase पर डिप्लॉय करें

अगर आपने अभी तक नहीं किया है, तो database.new पर नया Supabase अकाउंट बनाएं और लोकल प्रोजेक्ट को अपने Supabase अकाउंट से लिंक करें:

supabase link

डेटाबेस migrations लागू करें

supabase/migrations डायरेक्टरी से डेटाबेस migrations लागू करने के लिए यह कमांड चलाएं:

supabase db push

अपने Supabase dashboard में table editor पर जाएं। वहां आपको खाली transcription_logs टेबल दिखनी चाहिए।
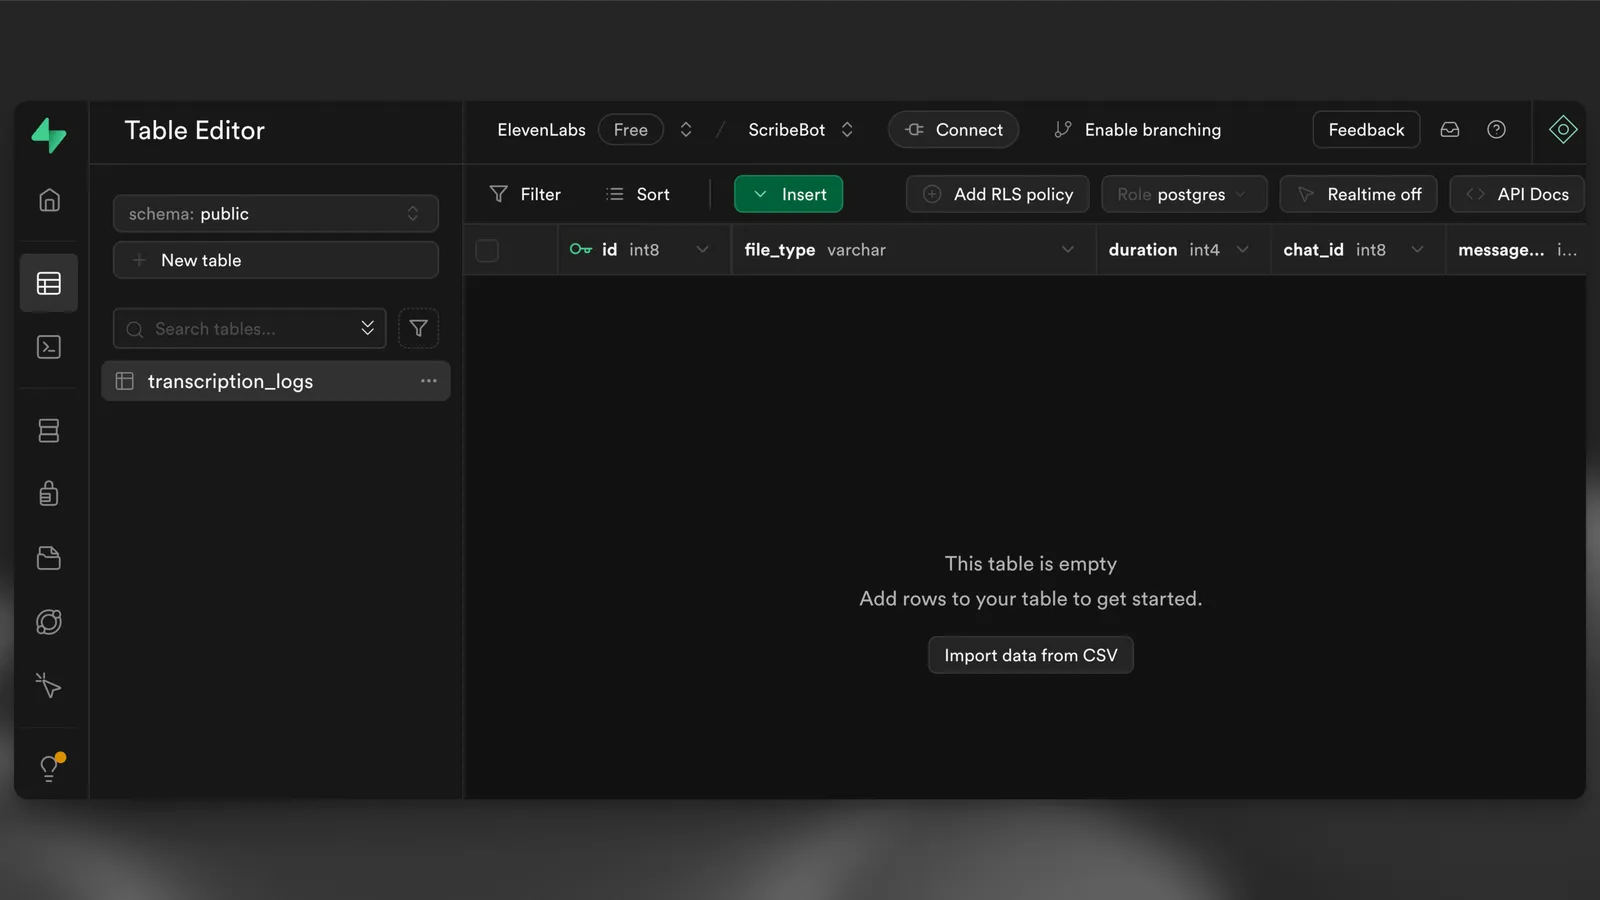
खाली टेबल

अंत में, Edge Function डिप्लॉय करने के लिए यह कमांड चलाएं:

supabase functions deploy --no-verify-jwt scribe-bot

अपने Supabase dashboard में Edge Functions view पर जाएं। वहां आपको डिप्लॉय किया हुआ scribe-bot फ़ंक्शन दिखना चाहिए। फ़ंक्शन URL नोट कर लें, क्योंकि आगे इसकी ज़रूरत होगी। यह कुछ ऐसा दिखेगा: https://<project-ref>.functions.supabase.co/scribe-bot।
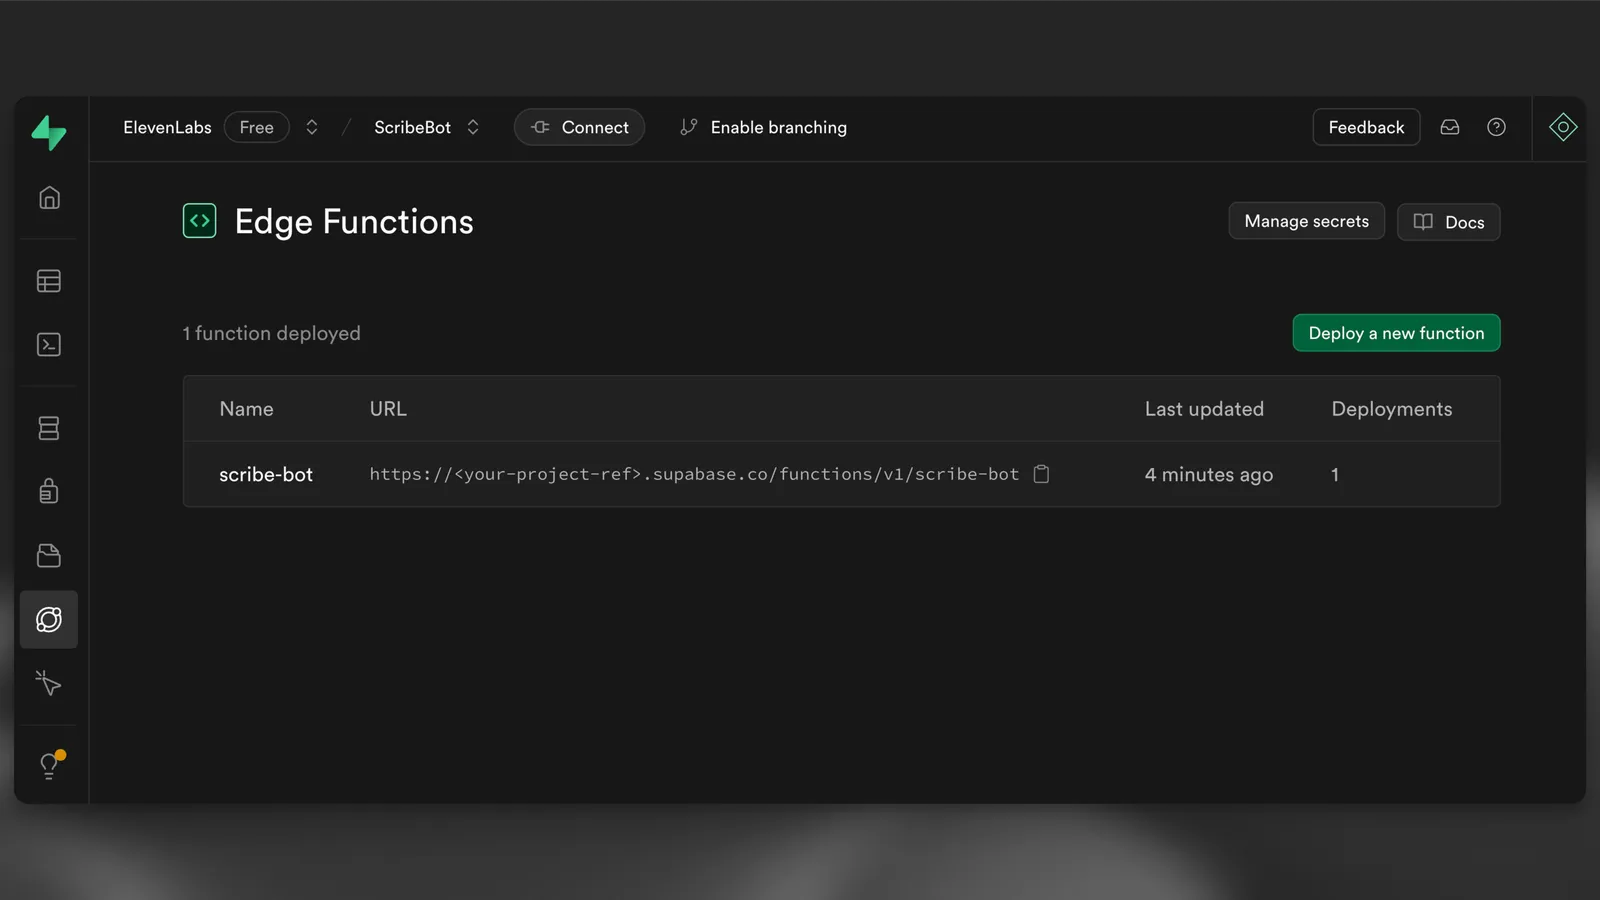
Edge Function डिप्लॉय हो गया

webhook सेट करें

अपने bot का webhook URL https://<PROJECT_REFERENCE>.functions.supabase.co/telegram-bot पर सेट करें (यहां <...> को संबंधित वैल्यू से बदलें)। ऐसा करने के लिए बस नीचे दिए URL पर GET अनुरोध चलाएं (उदाहरण के लिए, अपने browser में):

https://api.telegram.org/bot<TELEGRAM_BOT_TOKEN>/setWebhook?url=https://<PROJECT_REFERENCE>.supabase.co/functions/v1/scribe-bot?secret=<FUNCTION_SECRET>

ध्यान दें कि FUNCTION_SECRET वही secret है जो आपने अपनी .env फ़ाइल में सेट किया था।
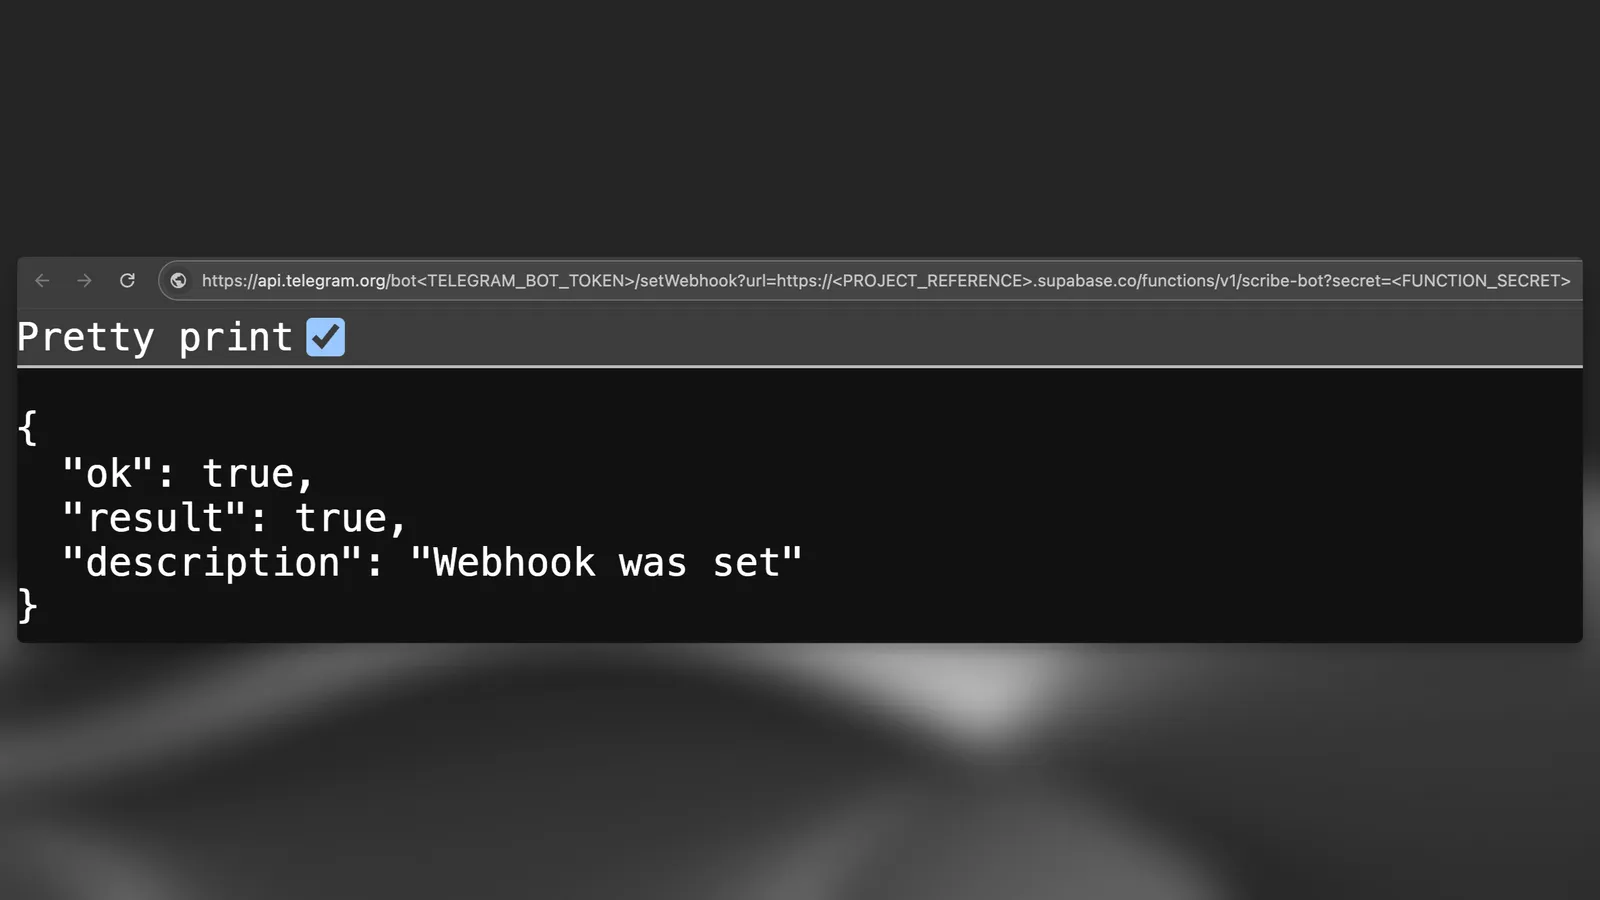
webhook सेट करें

फ़ंक्शन secrets सेट करें

अब जब आपने सभी secrets लोकल रूप से सेट कर लिए हैं, तो अपने Supabase प्रोजेक्ट में secrets सेट करने के लिए यह कमांड चलाएं:

supabase secrets set --env-file supabase/functions/.env

bot टेस्ट करें

अंत में, bot को वॉइस संदेश, ऑडियो या वीडियो फ़ाइल भेजकर टेस्ट करें।
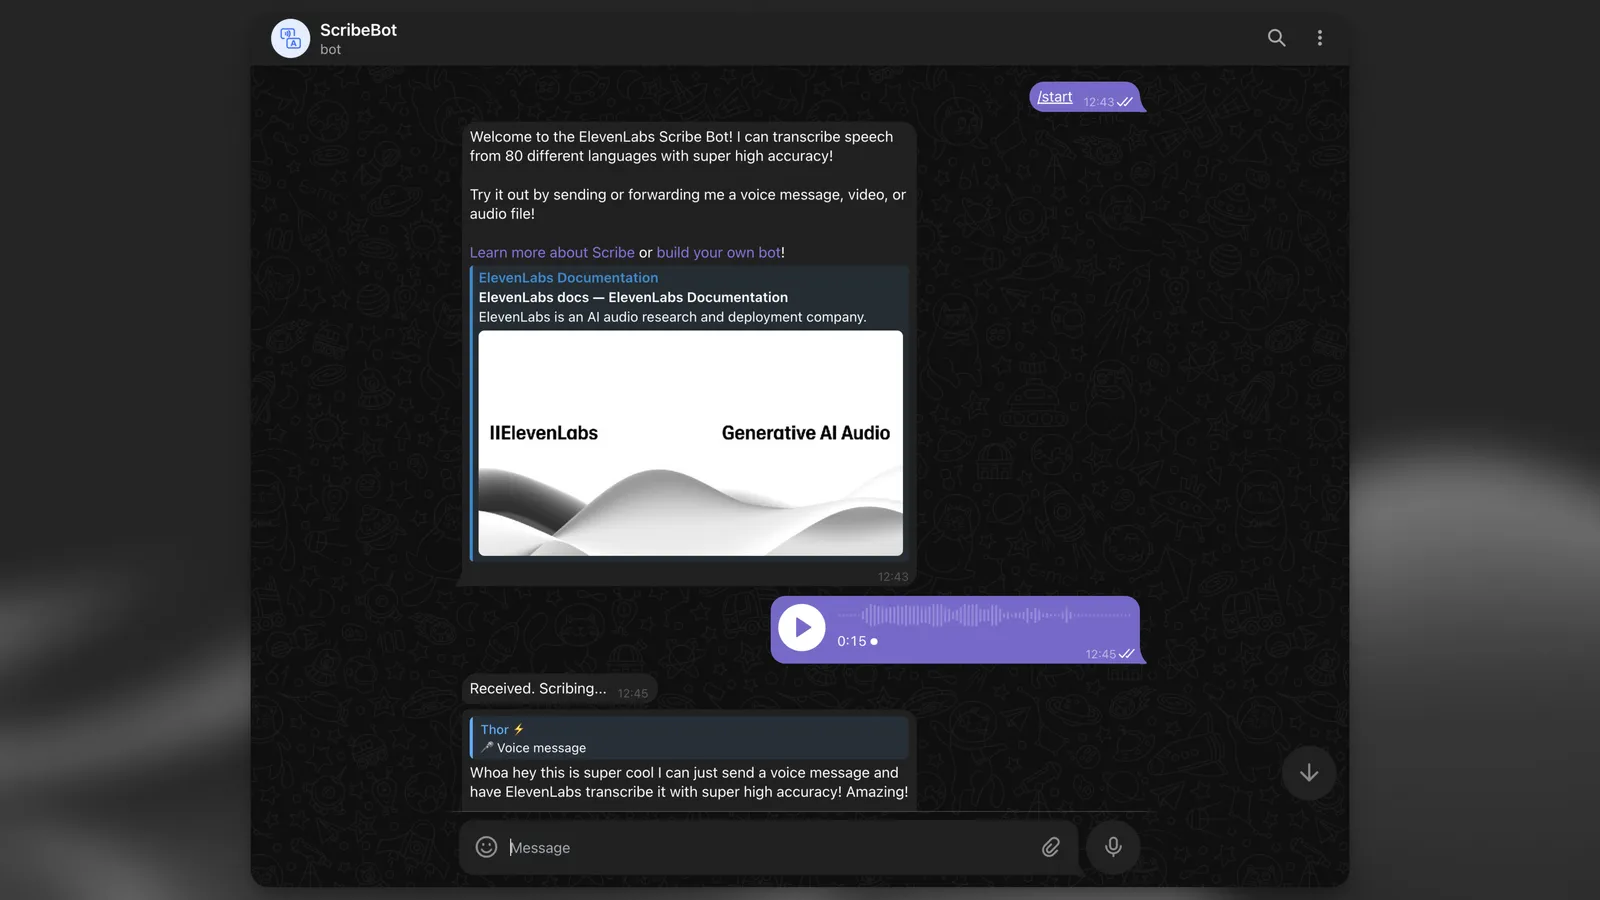
bot टेस्ट करें

जवाब के रूप में transcript दिखने के बाद, Supabase dashboard में वापस अपने table editor पर जाएं। वहां आपको अपनी transcription_logs टेबल में नई row दिखनी चाहिए।
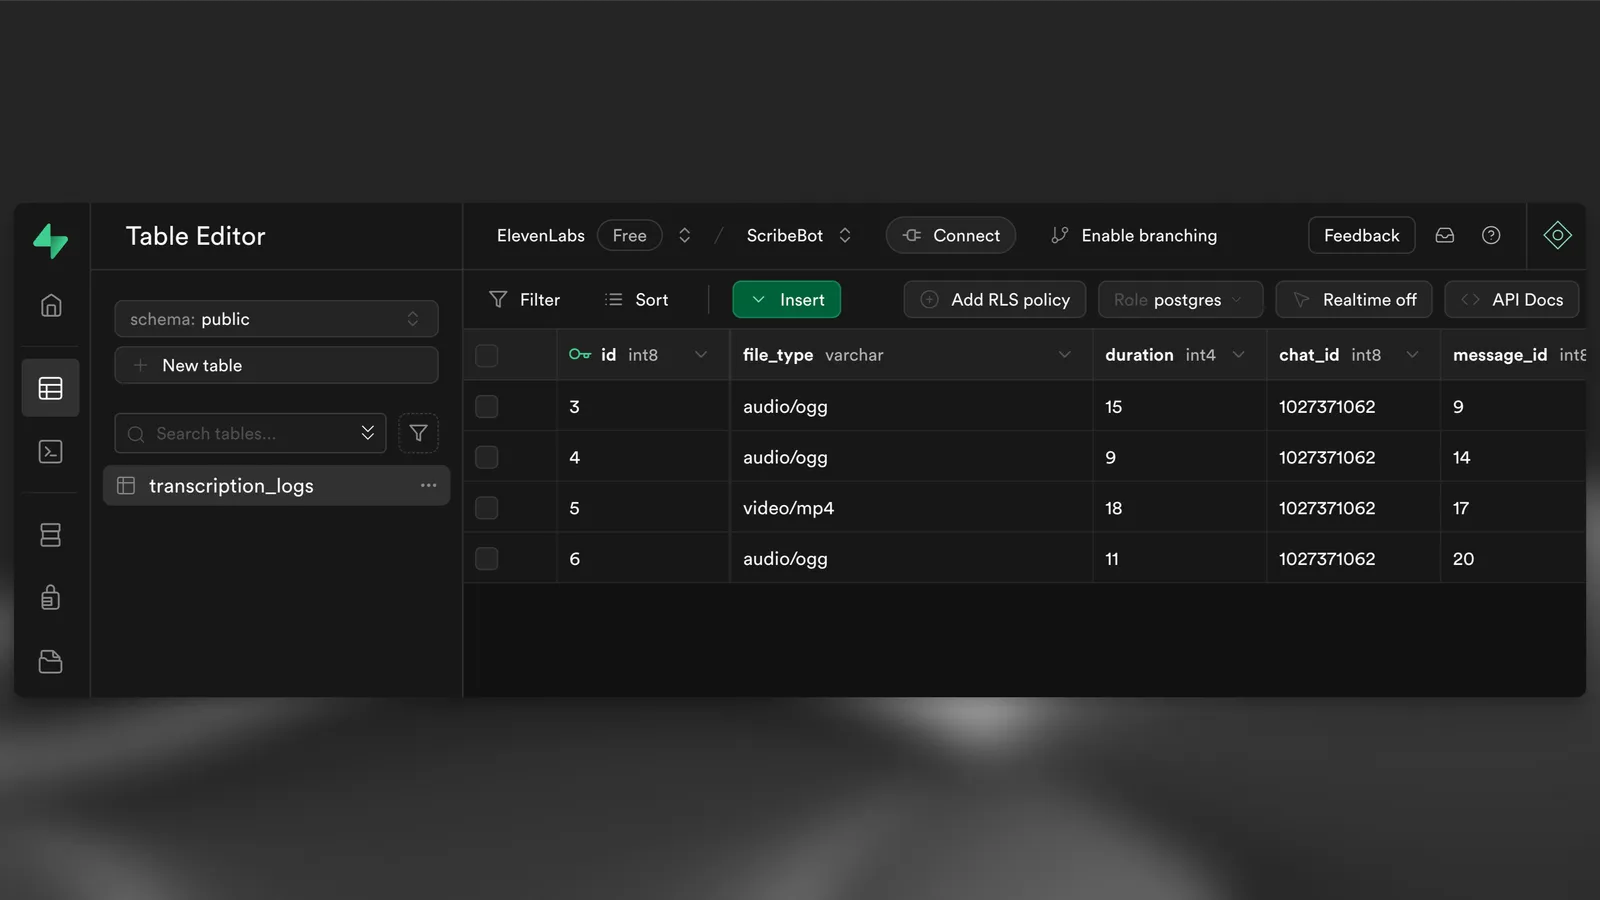
टेबल में नई row

अगले चरण