
How to do text to speech on Mac (2026 guide)
- Written by
- Jack Limebear
- Published
- Last updated
ListenListen to this article
Every Mac ships with text to speech (TTS) built in. Turn it on once and your Mac reads documents, emails, web articles, and social media threads aloud with a keyboard shortcut.
Setting up text to speech on Mac takes under a minute, with this guide covering the whole process: enabling it, customizing voices and shortcuts, and what to use instead when built-in voices fall short.
While built-in systems handle accessibility needs well, they often sound robotic. If you want narration that sounds human, dedicated AI voices pave the way for natural-sounding audio.
Summary
- Turn on text to speech in System Settings in the Accessibility tab. Then click on Spoken Content and enable Speak selection.
- The default keyboard shortcut on Mac for TTS is Option-ESC. Highlight any text and press it to hear the text aloud.
- You can change the built-in voice, adjust the speaking rate, download higher-quality Siri voices, and choose to highlight words as they’re spoken.
- The built-in reader is designed for accessibility but lacks natural sounding TTS options.
How to do text to speech on Mac
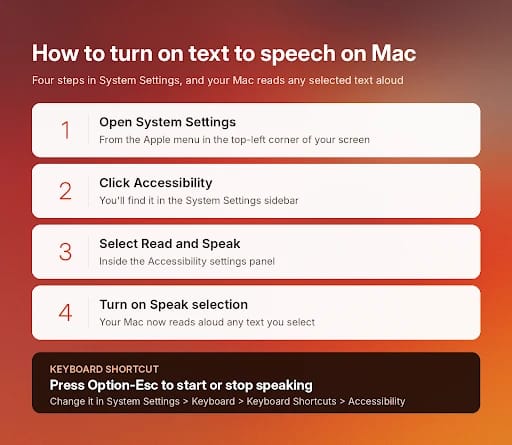
Enabling text to speech on Mac should only take a few seconds. Here’s how to do it:
- Open System Settings from the Apple menu
- Click Accessibility in the sidebar
- Select Read and Speak
- Turn on Speak selection
Your Mac will now read any text you select aloud when you press the configured shortcut. If nothing is selected, it’ll read the entire current window. These are the default shortcuts:
Setting Up Text to Speech on Your Mac
Let’s explore every step in more detail with screenshots to help make turning on text to speech on Mac as easy as possible.
Enabling Speak Selection
- First, access your Mac's System Settings and click on 'Accessibility' in the sidebar.
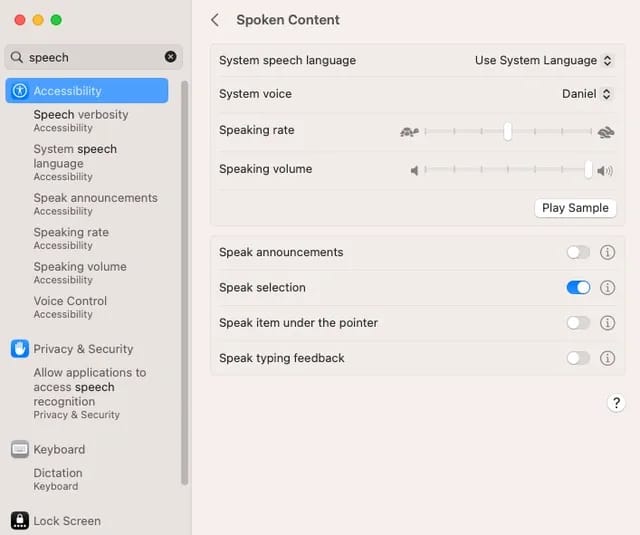
- Within the Accessibility settings, select 'Spoken Content'.
- Turn on the 'Speak selection' option. This feature allows your Mac to read out selected text or, in its absence, any text items in the current window, such as an email in Mail.
Customizing Keyboard Shortcuts
- To personalize your experience, you can set a custom keyboard shortcut for Speak selection.
- Go to System Settings, then click 'Keyboard' in the sidebar.
- Under Keyboard Shortcuts, choose 'Accessibility' to modify the shortcut for Speak selection. The default combination is Option-Esc, but you can change it to something that suits your workflow better.
Using the Onscreen Controller
- When Speak selection is active, you have the option to display an onscreen controller.
- This controller includes buttons for adjusting the speaking rate, skipping sentences, playing/pausing, and stopping the speech.
- The controller is particularly handy for managing the speech in longer texts, allowing you to easily navigate and control the playback.
Highlighting Spoken Content
- For visual tracking, you can set your Mac to highlight words or sentences as they are spoken.
- In the Spoken Content settings, choose your preferred highlighting style and colors for both words and sentences.
- This feature enhances comprehension and is useful for following along with the spoken text.
Customizing Sentence Style
- You can also customize how spoken sentences are indicated, either by underlining or background color, enhancing the readability and understanding of the text.
Controller Visibility Options
- Decide when the controller appears: automatically with the shortcut, always, or never. This customization ensures the controller is available according to your preference and usage patterns.
How to customize text to speech on Mac
Now that you’ve enabled text to speech on your Mac, here’s how you can customize it according to your unique preferences.
Accessing customization options
To begin customizing text to speech on your Mac, open 'System Settings' from the Apple menu and navigate to 'Accessibility.' From there, select 'Spoken Content' in the sidebar.
This section houses a variety of settings that allow you to tailor the text-to-speech functionality to your specific needs.
Change the voice
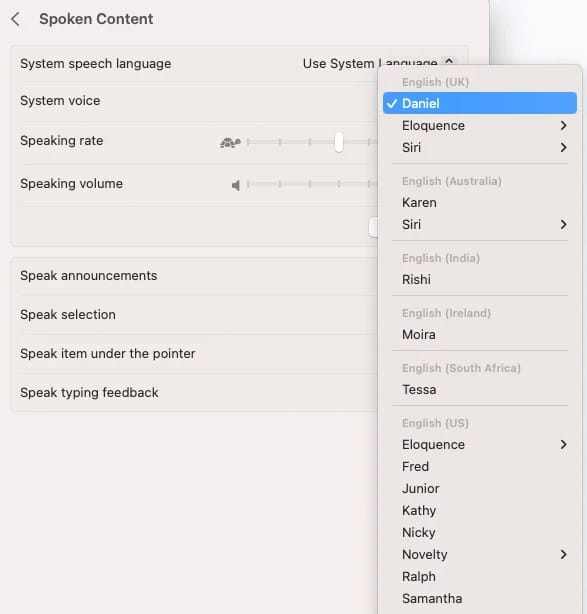
macOS offers a limited selection of voices, varying in gender, accents, and languages. Some of these voices are even available for additional download from the App Store.
Click the info icon next to System voice, browse the library, then use the play button to preview a voice before selecting the one that resonates best with you.
Adjust the speaking rate
The speaking rate of the text to speech feature is fully adjustable. Drag the Speaking rate slider to slow the voice down for comprehension or speed it up for skimming.
The onscreen controller adds play, pause, skip, and speed/rate buttons.

Highlight text as it’s spoken
Turn on content highlighting to follow along visually. Select different colors for the spoken word and sentence, and pick underline or background style. This feature harmonizes well with proofreading and language learning, where seeing and hearing together aids visual retention.
What Mac’s built-in text to speech can’t do
The built-in reader is an accessibility feature. It’s free, widely available across the system, and instant to use. The limits only start to show when you ask it to do more: the voice remains flat and mechanical over longer texts. There’s also no way to direct diction or export audio as a file, which will frustrate some users.
If you’re looking for a quick one-sentence read, the Mac TTS will work well. If you need TTS software for proofreading your article or reading a newspaper piece out loud, then a dedicated option is the way to go.
Best text to speech software for Mac: Built-in vs. AI voices
Here’s how Mac’s built-in TTS compares to AI voices across the use cases that people default to on Mac.
Especially for users wanting TTS in more languages than English, ElevenLabs is a strong contender. ElevenLabs models detect the language of your text and automatically speak it with native-level fluency and the appropriate accent. The same Spanish text could be rendered in Mexican or Latin American Spanish, with just a click.
How to use ElevenLabs on a Mac
ElevenLabs works in Chrome, Safari, or any browser you can run on macOS. No installation required.
- Sign up for a free account at ElevenLabs.
- Open Text to Speech in the app and paste your text.
- Pick a voice from the Voice Library, or clone your own.
- Click generate, listen, and download the audio as MP3 or WAV.
Developers on macOS can even use the Text to Speech API to batch convert documents into human-sounding audio.
Create natural-sounding Text to Speech on Mac with ElevenLabs
Although the built-in Mac TTS reader definitely has its place, a dedicated TTS solution built for human listeners offers a noticeable upgrade.
When you’re ready for a high-quality alternative, ElevenLabs Text to Speech is the natural upgrade. Try ElevenLabs for free by signing up today.
Mac TTS FAQ

Jack Limebear is on the Growth team, acting as a content writer and strategist across the blog and insights pages. Before ElevenLabs, he spent over a decade leading content strategy for organizations ranging from fast-growing SaaS startups to Fortune 500 companies. He holds a Master's degree in English Literature from the University of Cambridge.