实时生成音频

本指南介绍如何通过 WebSocket 连接实时生成音频。

WebSocket 流式传输是一种通过单个长期连接发送和接收数据的方法。它适用于需要在音频数据可用时实时传输的应用。

如果想快速测试连接到 ElevenLabs 文本转语音 API 的 WebSocket 延迟(首字节时间),可以通过 npm 安装 elevenlabs-latency,并按照此处的说明操作。

文本转语音和 Agents Platform 均支持 WebSocket。本指南介绍的是 文本 转语音 WebSocket(/v1/text-to-speech/{voice_id}/stream-input)。该端点 不 支持 eleven_v3 或 eleven_v4 模型。如需通过 WebSocket 使用 Eleven v3 或 Eleven v4 对话,请参阅实时文本转对话 和文本转语音与文本转对话 WebSocket。

前提条件

  • 拥有带 API 密钥的 ElevenLabs 账户(了解如何查找 API 密钥)。
  • 设备上已安装 Python 或 Node.js(或其他 JavaScript 运行时)

设置

安装所需依赖:

pip install python-dotenv
pip install websockets

接下来,在项目目录中创建 .env 文件,并添加 API 密钥:

.env
ELEVENLABS_API_KEY=your_elevenlabs_api_key_here

建立 WebSocket 连接

从声音库中选择音色和要使用的文本转语音模型后,建立到文本转语音 API 的 WebSocket 连接。

import os
from dotenv import load_dotenv
import websockets
# Load the API key from the .env file
load_dotenv()
ELEVENLABS_API_KEY = os.getenv("ELEVENLABS_API_KEY")
voice_id = 'Xb7hH8MSUJpSbSDYk0k2'
# For use cases where latency is important, we recommend using the 'eleven_flash_v2_5' model.
model_id = 'eleven_flash_v2_5'
async def text_to_speech_ws_streaming(voice_id, model_id):
uri = f"wss://api.elevenlabs.io/v1/text-to-speech/{voice_id}/stream-input?model_id={model_id}"
async with websockets.connect(uri) as websocket:
...

发送输入文本

WebSocket 连接打开后,先设置音色参数,然后向 API 发送文本消息。

async def text_to_speech_ws_streaming(voice_id, model_id):
async with websockets.connect(uri) as websocket:
await websocket.send(json.dumps({
"text": " ",
"voice_settings": {"stability": 0.5, "similarity_boost": 0.8, "use_speaker_boost": False},
"generation_config": {
"chunk_length_schedule": [120, 160, 250, 290]
},
"xi_api_key": ELEVENLABS_API_KEY,
}))
text = "The twilight sun cast its warm golden hues upon the vast rolling fields, saturating the landscape with an ethereal glow. Silently, the meandering brook continued its ceaseless journey, whispering secrets only the trees seemed privy to."
await websocket.send(json.dumps({"text": text}))
# Send empty string to indicate the end of the text sequence which will close the WebSocket connection
await websocket.send(json.dumps({"text": ""}))

将音频保存到文件

读取 WebSocket 连接传入的消息,并将音频块写入本地文件。

import asyncio
async def write_to_local(audio_stream):
"""Write the audio encoded in base64 string to a local mp3 file."""
with open(f'./output/test.mp3', "wb") as f:
async for chunk in audio_stream:
if chunk:
f.write(chunk)
async def listen(websocket):
"""Listen to the websocket for audio data and stream it."""
while True:
try:
message = await websocket.recv()
data = json.loads(message)
if data.get("audio"):
yield base64.b64decode(data["audio"])
elif data.get('isFinal'):
break
except websockets.exceptions.ConnectionClosed:
print("Connection closed")
break
async def text_to_speech_ws_streaming(voice_id, model_id):
async with websockets.connect(uri) as websocket:
...
# Add listen task to submit the audio chunks to the write_to_local function
listen_task = asyncio.create_task(write_to_local(listen(websocket)))
await listen_task
asyncio.run(text_to_speech_ws_streaming(voice_id, model_id))

运行脚本

在终端执行以下命令即可运行脚本。MP3 音频文件将保存到 output 目录。

python text-to-speech-websocket.py

高级配置

WebSocket 提供了一些高级设置,可用于微调实时音频生成。

缓冲

生成实时音频时,需要考虑两个重要概念:首字节时间(TTFB)和缓冲。为了生成高质量音频并推断上下文,模型需要达到一定的输入文本阈值。通过 WebSocket 连接发送的文本越多,音频质量越好。如果未达到阈值,模型会将文本加入缓冲区,并在缓冲区填满后生成音频。

就延迟而言,TTFB 是向客户端发送第一个音频字节所需的时间。这一点很重要,因为它会影响用户感知到的音频延迟。因此,你可能需要控制缓冲区大小,在质量与延迟之间取得平衡。

为此,可以在初始化 WebSocket 连接或发送文本时使用 chunk_length_schedule 参数。该参数是一个整数数组,表示模型生成音频前需要接收的字符数。例如,将 chunk_length_schedule 设为 [120, 160, 250, 290] 后,模型会在分别接收到 120、160、250 和 290 个字符后生成音频。

以下示例展示 chunk_length_schedule 默认设置的工作方式:
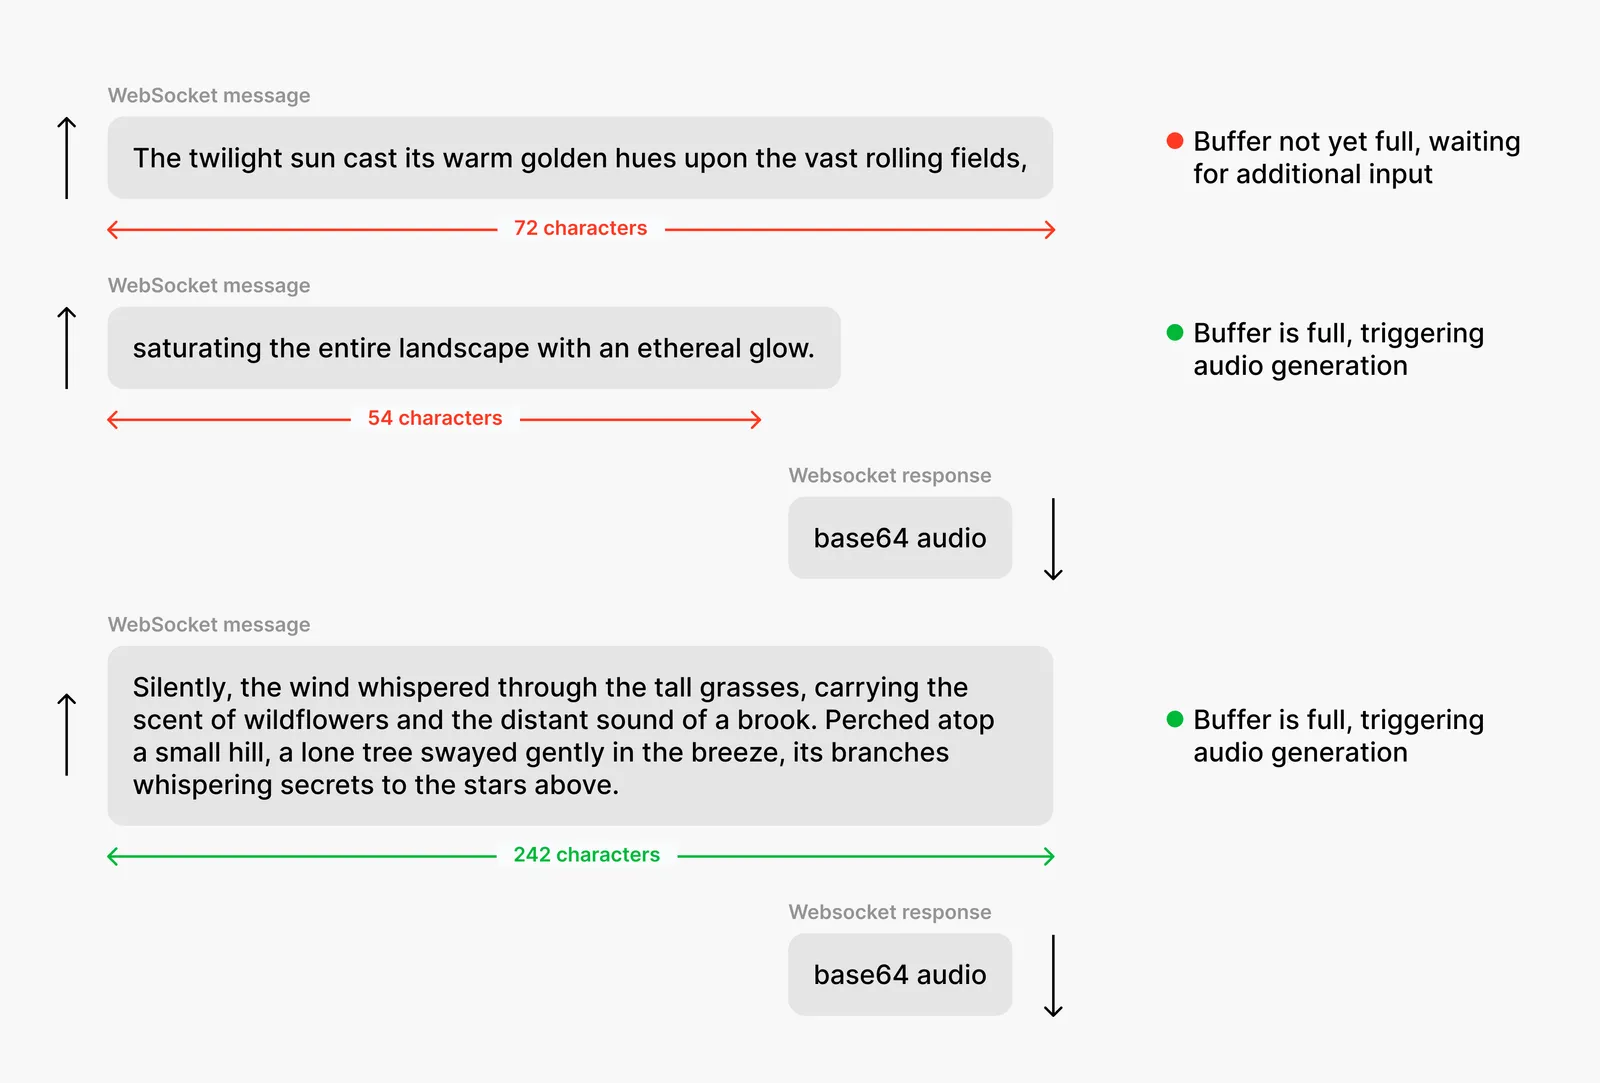
在上图中,服务器收到第二条消息后才生成音频。这是因为第一条消息未达到 120 个字符的阈值,而第二条消息使字符总数超过该阈值。第三条消息超过 160 个字符的阈值,因此会立即生成音频并返回给客户端。

可以在初始化 WebSocket 连接或发送文本时,为 chunk_length_schedule 指定自定义值。

await websocket.send(json.dumps({
"text": text,
"generation_config": {
# Generate audio after 50, 120, 160, and 290 characters have been sent
"chunk_length_schedule": [50, 120, 160, 290]
},
"xi_api_key": ELEVENLABS_API_KEY,
}))

如果想强制立即返回音频,可以使用 flush: true 清空缓冲区,并强制生成所有已缓冲文本的音频。例如,当已到达文档末尾并希望为最后一部分生成音频时,这会很有用。
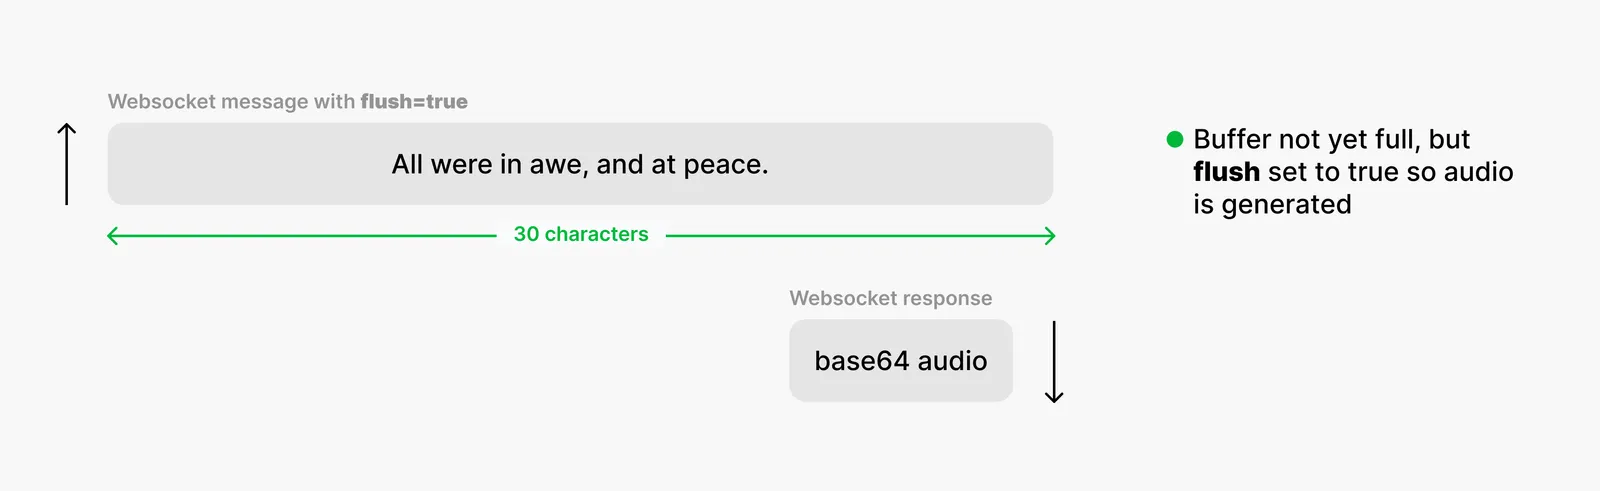
可以为单条消息设置 flush: true 来指定此行为。

await websocket.send(json.dumps({"text": "Generate this audio immediately.", "flush": True}))

此外,关闭 WebSocket 会自动强制生成所有已缓冲文本的音频。

音色设置

初始化 WebSocket 连接时,可以为后续生成指定音色设置。这样可以控制生成音频的速度、稳定性和其他音色特征。

await websocket.send(json.dumps({
"text": text,
"voice_settings": {"stability": 0.5, "similarity_boost": 0.8, "use_speaker_boost": False},
}))

也可以在单条消息中指定不同的 voice_settings 来覆盖这些设置。

发音词典

可以使用发音词典控制特定单词或短语的发音。这有助于确保特定词语正确发音,或强调特定单词或短语。

与 voice_settings 和 generation_config 不同,必须在“初始化连接”消息中指定发音词典。详情请参阅 API 参考文档。

使用基于音素的发音词典搭配 WebSocket 时,必须在 WebSocket URI 中添加查询参数 enable_ssml_parsing=true。例如:

wss://api.elevenlabs.io/v1/text-to-speech/{voice_id}/stream-input?model_id={model_id}&enable_ssml_parsing=true

最佳实践

  • 建议在 generation_config 中使用 chunk_length_schedule 的默认设置。
  • 开发实时对话式智能体应用时,建议在每轮对话文本末尾使用 flush: true,确保及时生成音频。
  • 如果默认设置无法为你的使用场景提供最佳延迟,可以修改 chunk_length_schedule。但请注意,通过此调整降低延迟可能会牺牲音频质量。

提示

  • WebSocket 连接在 20 秒无活动后会自动关闭。要保持连接打开,可以发送单个空格字符 " "。请注意,此字符串必须包含空格;发送完全空的字符串 "" 会关闭 WebSocket。
  • 发送最后一条文本消息后,发送空字符串即可关闭 WebSocket 连接。
  • 可以使用 alignment 获取文本中每个单词的词级时间戳。这有助于将视频中的音频与文本对齐,或用于其他需要精确计时的应用。详情请参阅 API 参考文档。

后续步骤